
Every time you crack open a window, air passes through the screen before it reaches you. If that screen is coated in dust, pollen, and dried grime, that is exactly what flows into your home.
Over time, clogged mesh also restricts airflow, making even a wide-open window feel stuffy. The good news is that cleaning window screens takes less than 30 minutes and requires nothing beyond basic household supplies.
Let’s get started and find out the best way to clean screens from start to finish, whether yours pop out easily or need to stay in the frame.
What You’ll Need
|
How to Clean Window Screens in 6 Simple Steps
This is the most thorough method, and the one worth doing at least once a year. If your screens have been in the windows through a full pollen season or a dusty summer, this is the approach to use.
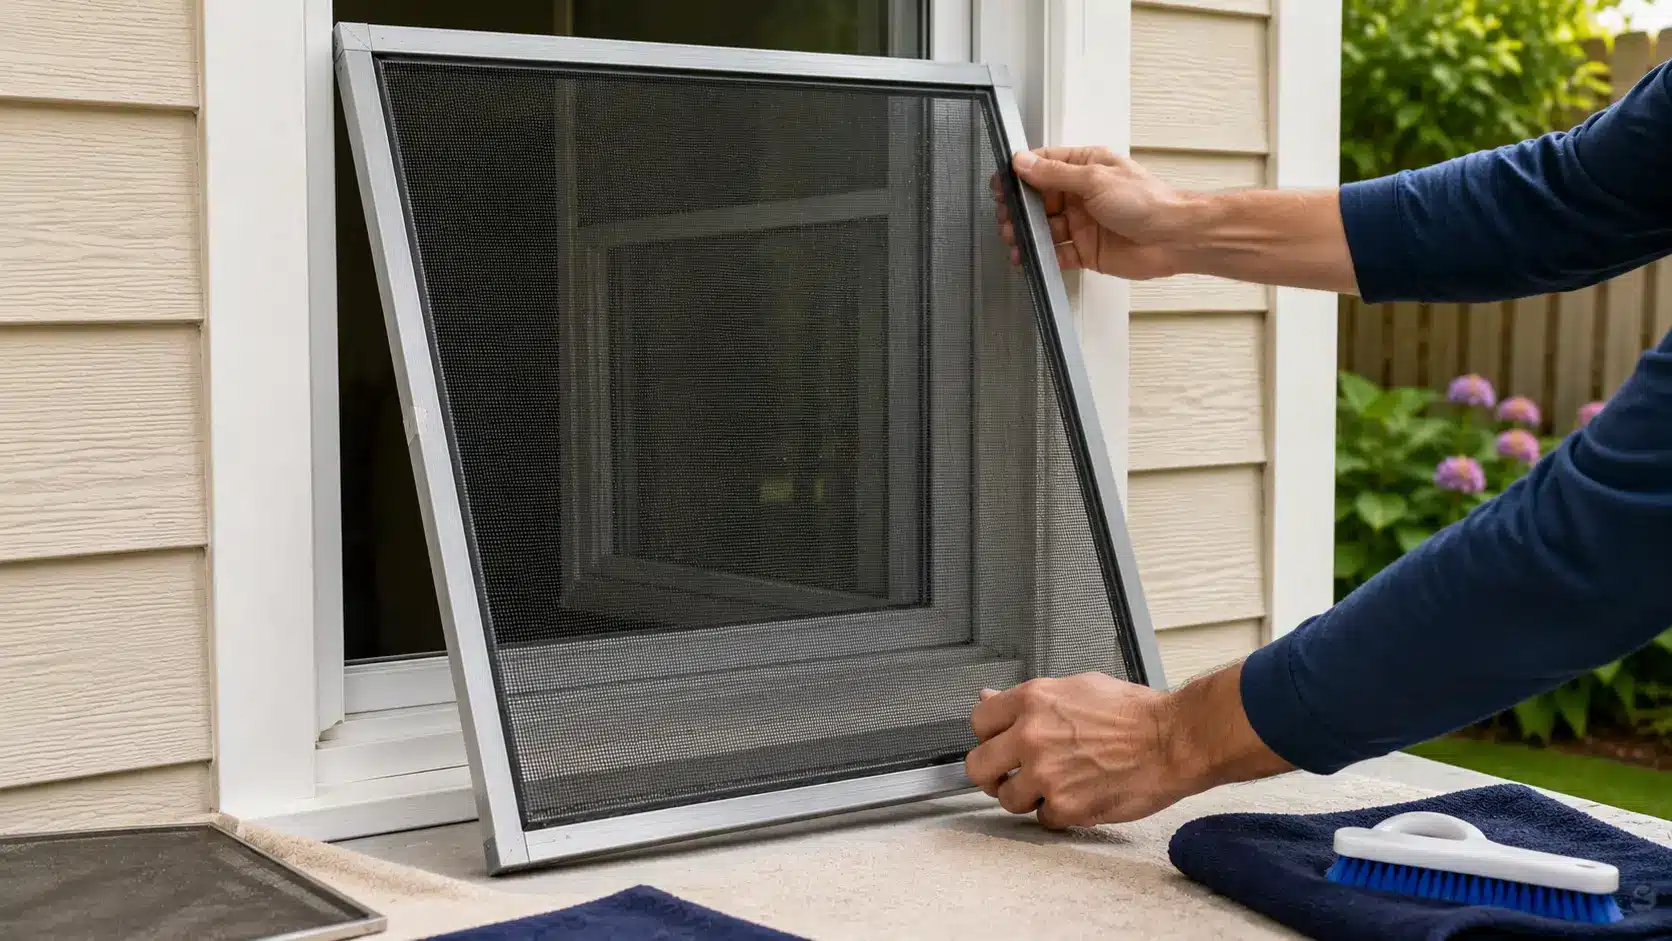
Step 1: Remove the Screens
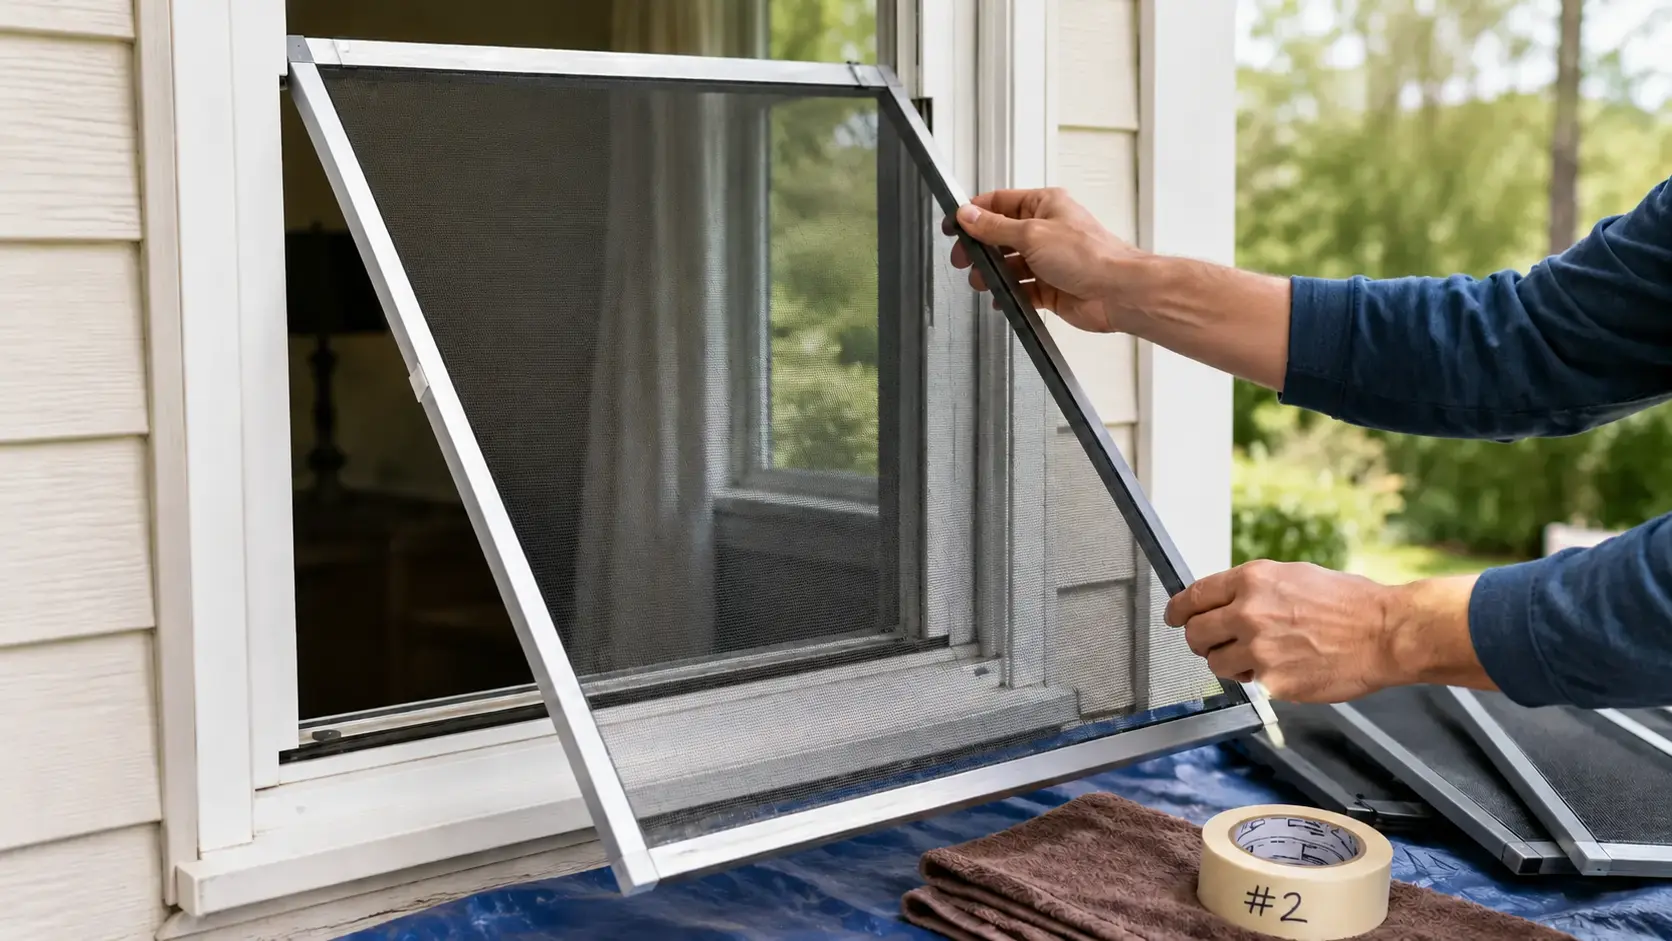
Most window screens have two small plastic tabs along one edge. Push both tabs inward at the same time to release the screen from its track, then tilt it forward and lift it out.
Some older frames use spring-loaded pins instead; press them inward, compress the screen slightly in that direction, and the screen will slide free.
Once a screen is out, set it aside on a clean tarp or a few old towels. If you are cleaning multiple screens in one session, use a strip of masking tape and a marker to number each one.
Step 2: Vacuum Away Loose Dirt
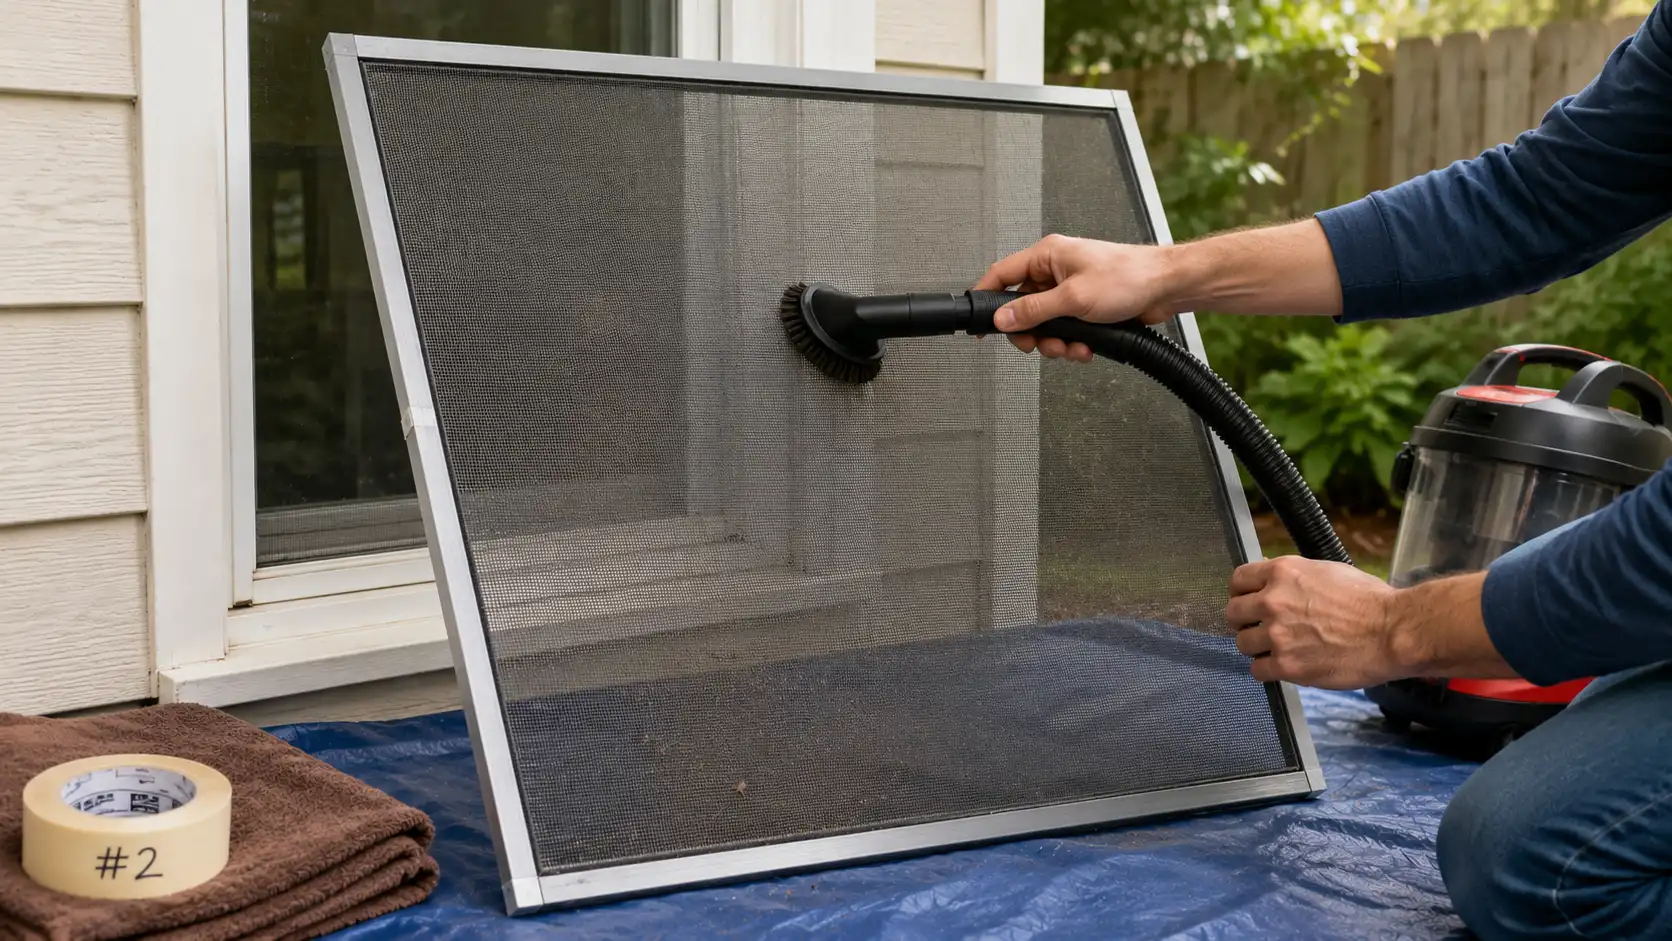
Before any water touches the screen, run a vacuum with a brush attachment over both sides. Work in straight passes from top to bottom.
This pulls out dry dust, cobwebs, dead insects, and loose pollen that would otherwise turn into muddy streaks the moment they get wet.
Spend a little extra time on the corners and along the frame edges, where debris tends to pack in tightly. This step takes about two minutes per screen and makes the scrubbing step significantly easier.
Step 3: Mix a Gentle Cleaning Solution
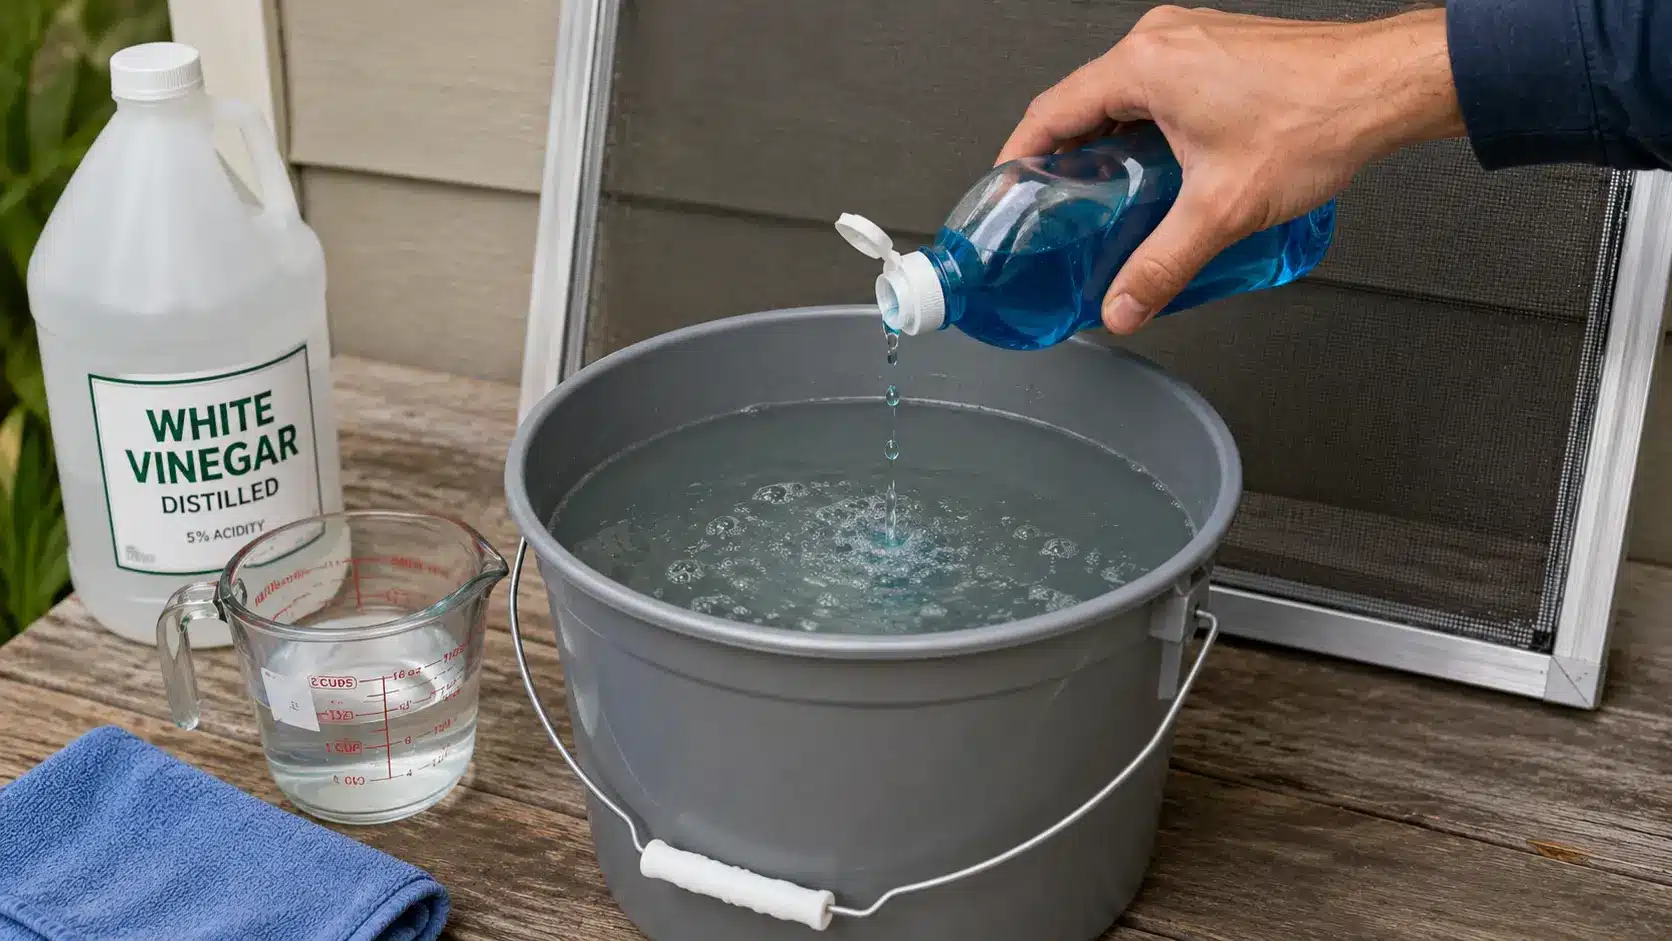
Fill a bucket with warm water and add a few drops of mild dish soap, roughly the amount you would use to hand-wash a small pile of dishes. That is enough.
If your screens have visible mold spots, mildew discoloration, or a season’s worth of hardened grime, swap in a 50/50 mix of white vinegar and warm water instead.
Vinegar breaks down mineral deposits and organic buildup without any harsh fumes or risk of mesh damage.
One thing to avoid: ammonia-based cleaners. They are harsher than necessary for screen cleaning, and the fumes are unpleasant to work around.
Step 4: Scrub Both Sides Carefully
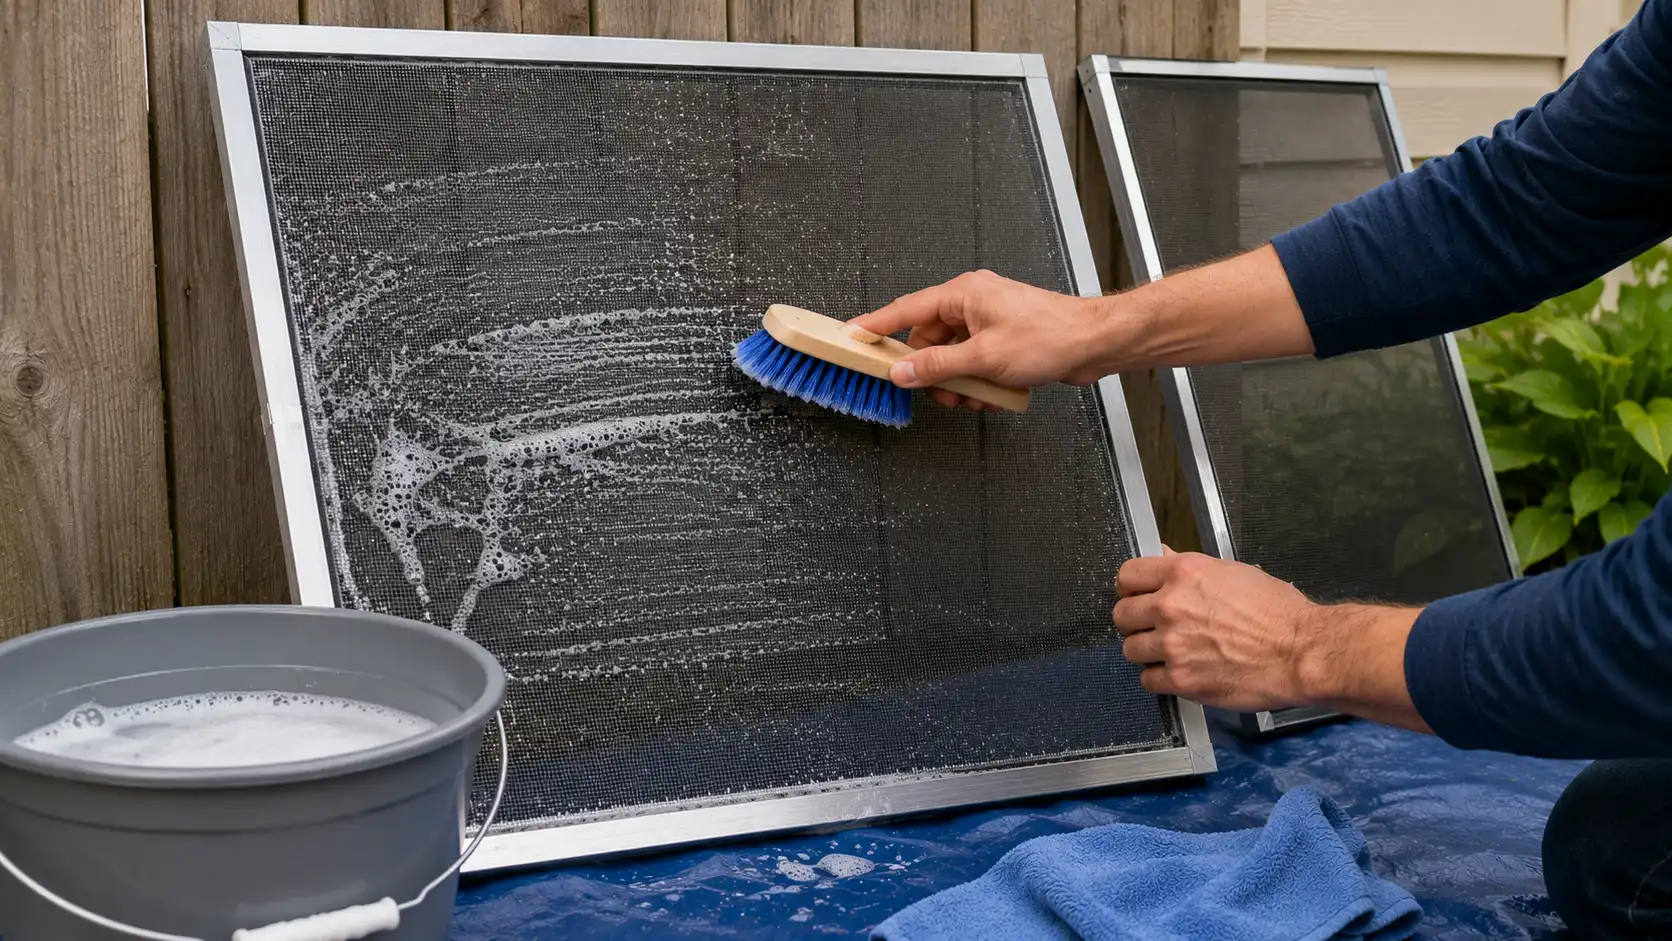
Lean each screen upright against a fence, a wall, or the side of your house.
Dip your soft-bristle brush into the cleaning solution and scrub in even, side-to-side strokes across the full surface. Then flip the screen and repeat on the other side.
Re-dip the brush after every few passes so you are working with a clean solution rather than spreading grime around. If the water in the bucket turns dark, mix a fresh batch.
Pay close attention to the frame edges and corners. That is where debris dries out and cakes the hardest.
Step 5: Rinse Thoroughly
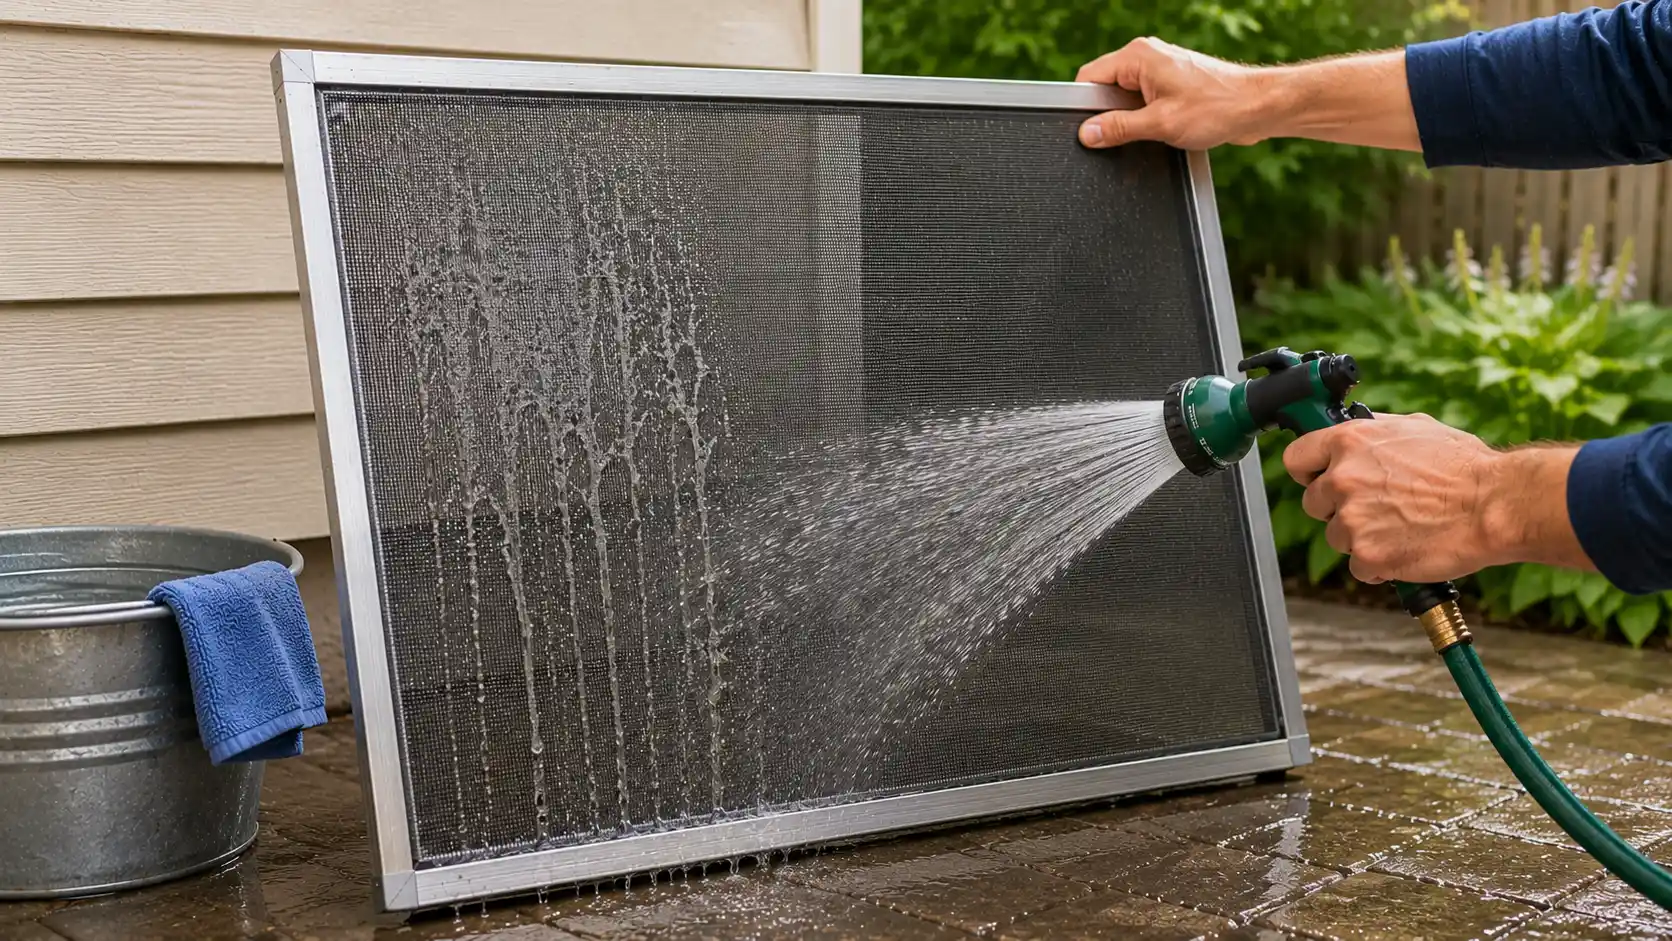
Hold each screen upright and rinse both sides with a garden hose set to a gentle spray. Work from top to bottom so the water carries dirt downward and off the screen rather than back across a clean section.
Make sure all the soap is gone before you move on. Soap residue left on the mesh dries sticky and attracts fresh dust faster than a clean screen would.
If you do not have outdoor hose access, a bathtub showerhead on a low setting works just as well.
Step 6: Dry Completely and Reinstall
Shake each screen gently to knock off standing water, then set it upright somewhere with good air circulation. A sunny spot outdoors is ideal.
Flip the screen halfway through so both sides dry at the same rate, since the mesh holds water in its small openings and can keep one side damp longer than expected.
Do not rush this step. Reinstalling a screen while it is still damp traps moisture against the window frame, leading to corrosion of metal frames and mildew streaking on the glass.
Once the screens are fully dry, press each one back into its original frame. Check that all four edges seat flush; any gap is an opening for insects.
Best Way to Clean Screens Without Removing Them
Not every screen pops out easily, and second-floor windows are not always worth the effort of full removal. For lighter buildup or routine maintenance between deep cleans, you can get good results without taking the screen out of the frame.
Vacuum Method: Open the window as wide as it will go, then run a vacuum with a brush attachment over the screen. Work from top to bottom so loosened debris falls away rather than spreading upward.
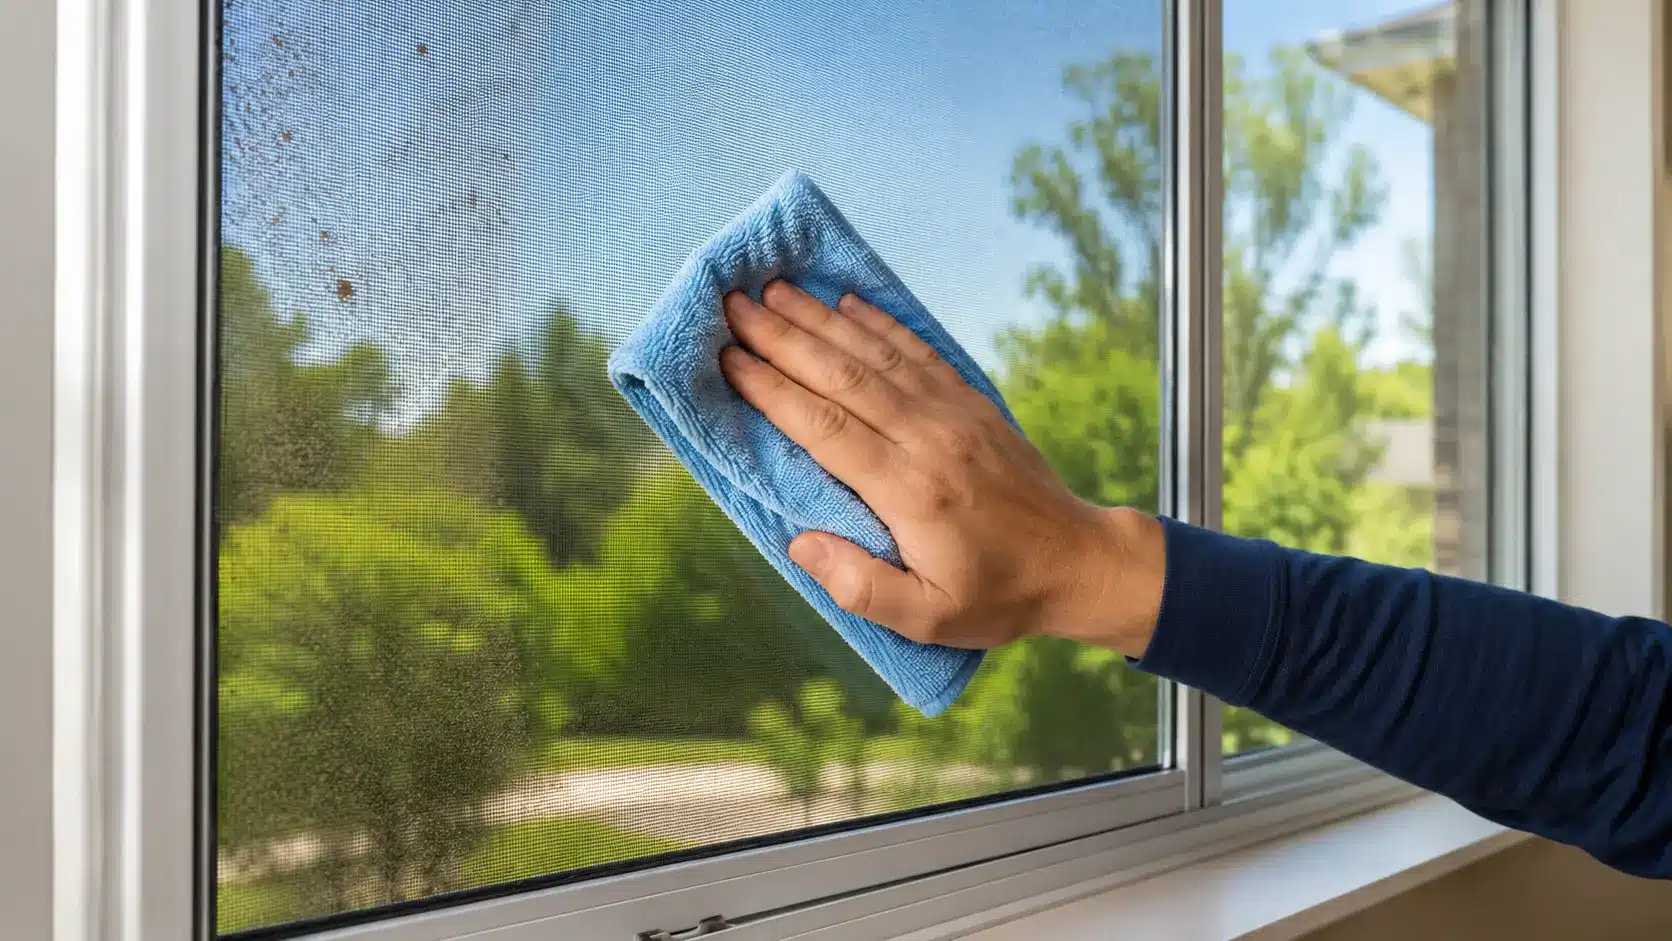
Microfiber Cloth Method: Mix a small amount of dish soap into a bowl of warm water. Wring a microfiber cloth until it is damp but not dripping, then wipe the screen in steady top-to-bottom passes. Rinse the cloth in clean water between sections so you are not wiping the same grime back on. A second pass with a cloth dipped in plain water removes any soap residue.
Vinegar Spray Option: Fill a spray bottle with equal parts white vinegar and water. Mist one section of the screen at a time, then wipe it with a clean microfiber cloth, aiming outward. This works particularly well for pollen buildup and light mildew.
None of these methods match the results of a full removal and scrub, but for in-between upkeep, they are quick, easy, and genuinely effective.
Window Screen Cleaning Hack That Saves Time
Not every screen needs a full scrub with soap and water. If your screens have only light dust, pollen, or pet hair, this quick cleaning hack can freshen them up in just a few minutes and extend the time between deep cleanings.
The Lint Roller Method
Before you bring any water into the process, roll a standard lint roller across both sides of the screen mesh. It pulls up pollen, pet hair, fine dust, and cobwebs in seconds.
Use light pressure. Pressing too hard stretches the mesh, and that damage is permanent. Let the roller do the work.
This is especially useful in spring when screens collect a visible layer of pollen within days of cleaning.
A 60-second pass with a lint roller keeps buildup from compounding between full washes, and it works just as well on screens that stay in the frame.
Quick Method Comparison
| Cleaning Method | Time Needed | Best For |
|---|---|---|
| Vacuum | 5 min | Light dust |
| Lint Roller Hack | 3 min | Pollen and pet hair |
| Soap and Water | 20 min | Deep cleaning |
Full Method Comparison
| Method | Difficulty | Cleaning Power | Best Use |
|---|---|---|---|
| Vacuum Only | Easy | Low | Weekly maintenance |
| Lint Roller Hack | Easy | Medium | Pollen and pet hair |
| Soap and Water | Easy | High | Seasonal deep cleaning |
| Vinegar Solution | Medium | High | Stubborn grime |
Common Mistakes to Avoid
Using a Pressure Washer. Even a moderate pressure setting can stretch the mesh, bend the frame, or punch small holes through fiberglass screening. A garden hose on a gentle spray is all you need.
Scrubbing Too Hard. Aggressive scrubbing with a stiff brush tears fiberglass mesh and leaves aluminum screening misshapen. The goal is to lift dirt, not grind it out. Light, even when passed with a soft brush, does the job without the damage.
Reinstalling Damp Screens. This is one of the most common mistakes. Water trapped between the screen frame and the window frame has nowhere to go; it sits there, causes corrosion on metal components, and creates mildew streaks on the glass that are harder to clean than the original dirty screen.
Using Harsh Chemicals. Bleach, ammonia, and multi-surface sprays with strong solvents are all overkill for screen cleaning. They can degrade the mesh material over time, especially on fiberglass, and leave residue that attracts more dust once dry.
How Often Should You Clean Window Screens?For most homes, twice a year is enough: once in spring, before pollen season peaks, and once in fall, before closing up the windows for winter. If your home is near a construction site, a high-traffic road, or a wooded area with heavy pollen output, plan for three or four light cleanings a year. A quick vacuum or lint roller pass every few weeks during peak seasons prevents the kind of accumulation that turns a 20-minute job into a full afternoon. |
Conclusion
Clean window screens mean better airflow, less pollen and dust circulating through your home, and screens that last longer before needing replacement.
The full six-step process takes about 30 minutes for a set of standard windows and noticeably improves how fresh the air feels indoors.
If you are short on time between deep cleans, a lint roller or a quick vacuum keeps buildup from getting ahead of you.
While the screens are out, it is also worth running a vacuum and a damp toothbrush along the window tracks. That grime gets kicked back up the moment you open the window, and it takes less than five minutes to handle at the same time.
Frequently Asked Questions
What is the Best Way to Clean Window Screens?
Remove the screen from the frame, vacuum off loose debris, scrub both sides with warm, soapy water and a soft brush, rinse with a garden hose at low pressure, and let it air-dry completely before reinstalling.
Does Vinegar Clean Window Screens?
A 50/50 mix of white vinegar and warm water breaks down pollen, mildew, and mineral deposits without damaging the mesh. It rinses off cleanly and leaves no residue. For routine cleaning, it works as well as dish soap.
How Do You Remove Pollen from Window Screens?
Start with a dry lint roller pass to lift the pollen off the surface before it gets wet and pushes deeper into the mesh. Follow with a vinegar-water spray and a light wipe with a microfiber cloth.