
A shirt that looked great on the hanger can feel huge once it’s on. The short version: wash it in the hottest water your care label allows, then dry it on high heat, and check the fit every few minutes so you catch it before it goes too far.
Cotton and wool respond fastest to that treatment, though for different reasons underneath. Polyester and other synthetics barely budge, even after several rounds through the wash.
If the tag says “pre-shrunk,” don’t expect much change. That already happened at the factory.
From hot wash-and-dry cycles to boiling water, vinegar soaks, and spot ironing, here’s how to shrink a shirt without ruining it, fabric by fabric.
What Happens When You Shrink a Shirt?
When fabric is made, the fibers are pulled and stretched tight during spinning and weaving.
Hot water and heat let cotton fibers relax back toward that original, looser shape, which is why a cotton shirt often comes out smaller after a hot wash and a high-heat dry.
Wool works differently, and it’s worth knowing the difference before you start.
Wool fibers are covered in tiny overlapping scales, and when they get wet, warm, and agitated, those scales open up and lock into each other like a ratchet.
Once that happens, the shrinkage is permanent. You can’t wash it back out the way you sometimes can with cotton.
How to Shrink a Shirt Step by Step
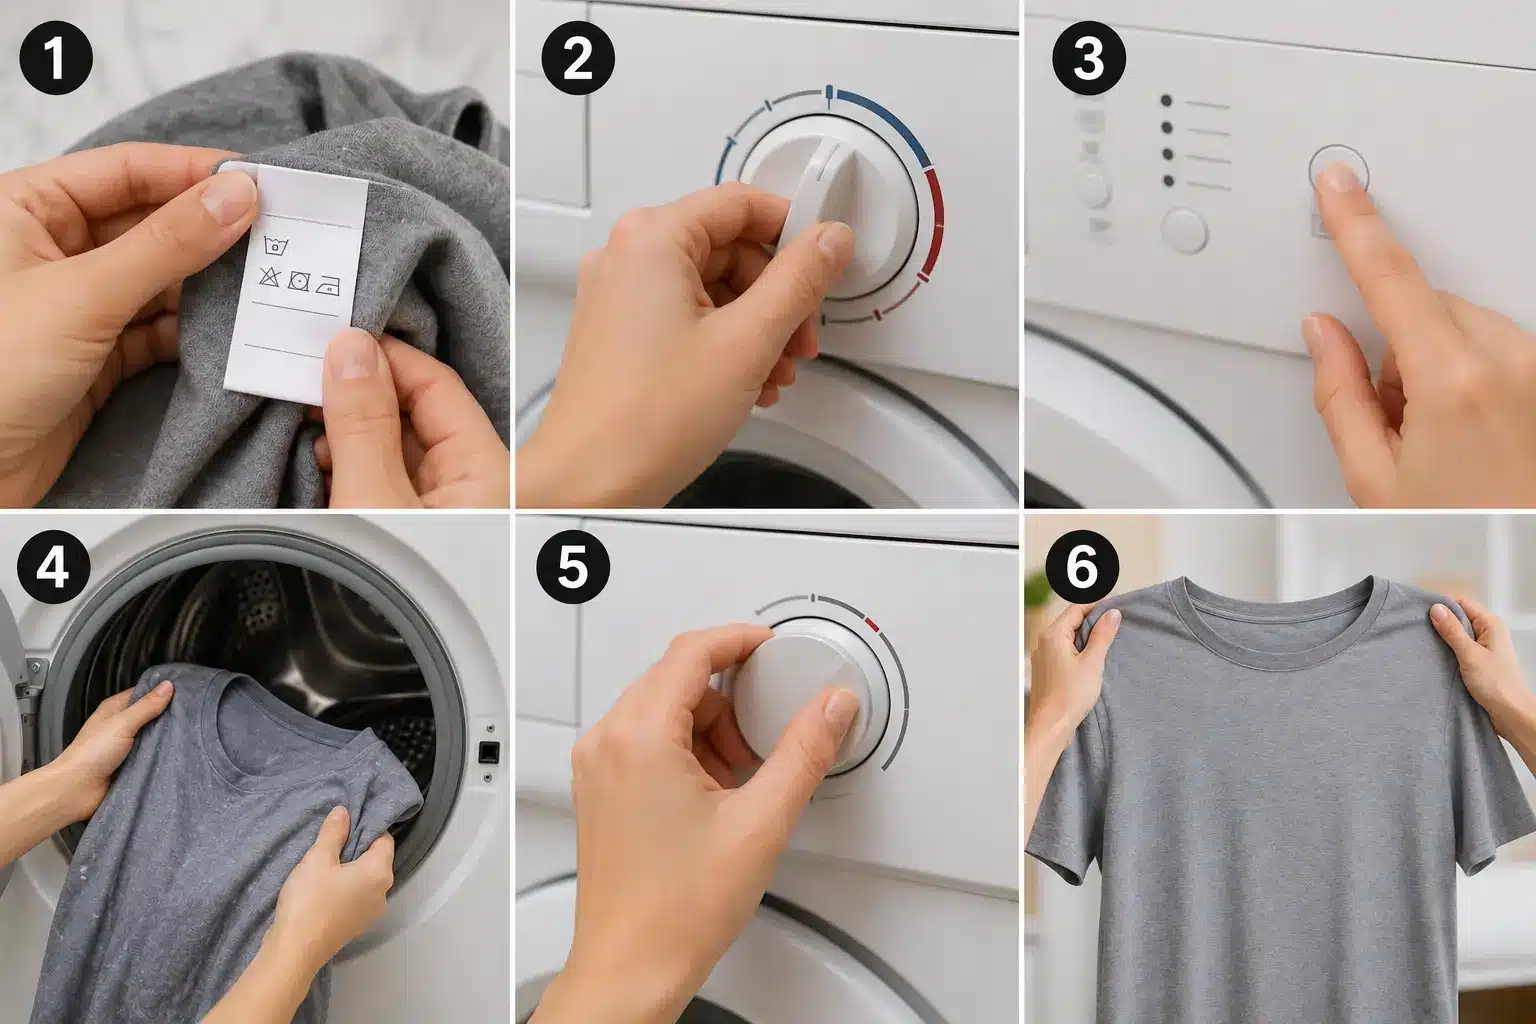
Shrinking a shirt with your washer and dryer is the simplest way to get an all-over fit, no special tools needed. Follow these six steps in order.
Step 1: Check the Care Label and Fabric Type
Look for cotton, wool, or a fabric blend, since these respond best to heat. Also check whether the tag says “pre-shrunk,” which means the shirt won’t shrink much no matter what you do.
If the label lists polyester or another synthetic material, it’s worth knowing upfront that this method will have a limited effect.
Step 2: Wash the Shirt Using the Hottest Safe Water Setting
Wash the shirt using the hottest safe water setting allowed on the care label. Hot water loosens the fibers and gets them ready to contract, since heat is what releases the tension built into the fabric during manufacturing.
Check the care label first, though, since some fabrics can get damaged or discolored at very high temperatures.
Step 3: Use a Regular Wash Cycle
The extra movement in a regular cycle helps the fibers loosen and pull together faster than a gentle cycle would.
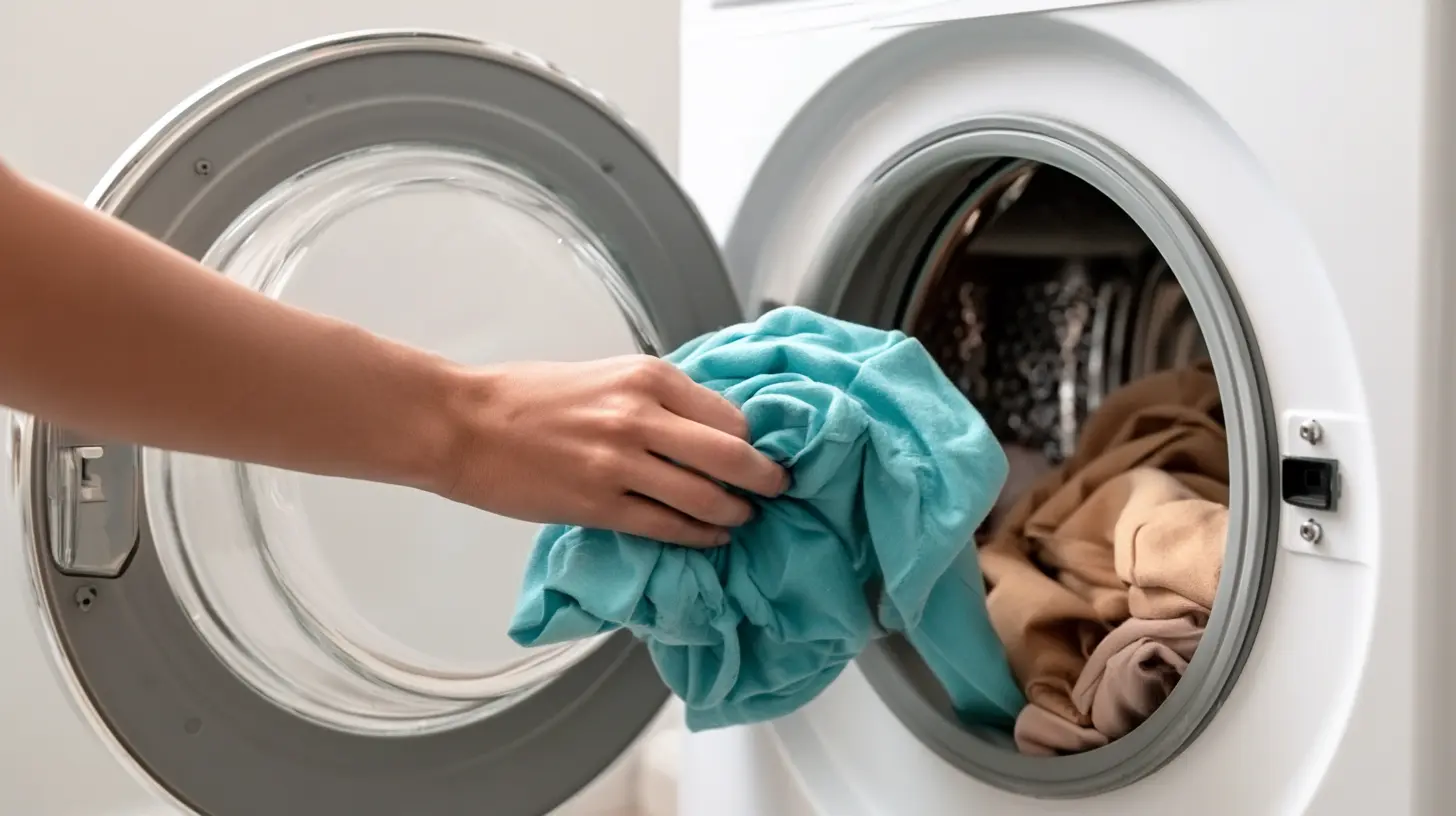
A tidy laundry room setup also makes it easier to keep track of which cycle a shirt is on, especially if you’re shrinking more than one item at a time.
Step 4: Transfer It to the Dryer
Move the shirt straight from the washer to the dryer while it’s still damp, rather than letting it air dry first.
Keeping it wet before the dryer keeps the fibers loose and ready to contract further under heat.
Step 5: Dry on High Heat
This step does most of the actual shrinking, since heat is what pulls the fibers tighter together as the moisture evaporates.
A full drying cycle on high heat, rather than a quick or partial one, gives the best results. Check the shirt every 5 to 10 minutes once it starts to dry, so you catch it at the right size instead of finding out it went too far only after the cycle ends.
Step 6: Check the Fit and Repeat if Needed
Once you’ve run through all six steps, try the shirt on to see where it stands. If it’s still looser than you’d like, another round through the wash and dryer should tighten it up a bit more.
Most fabrics reach their limit after two or three cycles, so don’t expect much more after that.
How to Shrink a Shirt With Vinegar
Vinegar is a common alternative to a straight hot wash, and it works especially well on cotton shirts that have stretched out of shape rather than ones that need a full size drop.
Fill a sink or basin with hot water and add about a cup of white vinegar. Submerge the shirt fully and let it soak for 15 to 30 minutes.
Rinse it in cool water afterward, then lay it flat on a towel and reshape it slightly while it’s still damp. Finish by air-drying it or running it through the dryer on high heat if you want more shrinkage on top of the soak.
This method is gentler than boiling water, which makes it a decent option for shirts you’re not ready to risk in a pot of boiling water yet.
How to Shrink a Shirt with Boiling Water
Boiling water gives a shirt a faster, more concentrated dose of heat than a washer, which makes it a solid option when a shirt needs more shrinkage than one wash-and-dry cycle can manage.
Fill a large pot with water and bring it to a rolling boil, then carefully lower the shirt in so it’s fully submerged.
Let it soak for 5 to 20 minutes, depending on the desired shrinkage. A short soak gives a slight reduction, while a longer soak gives a more noticeable one.
Remove the shirt with tongs to avoid burns, then let it cool before handling. Squeeze out the excess water without wringing the fabric, and lay it flat or hang it to air-dry.
This method works best on cotton, linen, and other natural fibers. Synthetic fabrics respond much less to boiling water since they resist heat-related changes.
How to Shrink a Shirt Without Washing It
A washing machine isn’t always necessary. Heat and moisture alone can pull fibers back together, so a few household tools can get the job done instead.
Method 1: Iron with Steam
Dampen the shirt with a spray bottle, focusing on the areas that need to shrink most. Set the iron to the highest safe setting for the fabric, then press down firmly and hold for a few seconds at a time instead of gliding across the fabric.
Move the iron section by section until you’ve treated the whole shirt. This method works best for small, targeted shrinkage rather than an all-over size change.
Method 2: Garment Steamer
A handheld garment steamer is a gentler option than an iron, and it’s usually the safest bet for wool or silk, since it involves no direct contact or pressure.
Hold the steamer about an inch from the fabric and pass it slowly over the area you want to shrink, gently stretching the fabric with your other hand as you go. The steam relaxes the fibers enough that they contract slightly as the shirt cools.
Method 3: Hair Dryer on High Heat
Wet the shirt with hot water, either the whole thing or just the section that needs to shrink. Use a hair dryer on the highest heat setting and hold it a few inches from the fabric, moving it in slow, steady passes.
Keep the fabric slightly stretched with your hands while drying, since this helps the fibers contract evenly instead of shrinking unevenly in spots.
Method 4: Hot Water Soak in a Sink or Basin
Fill a sink or basin with the hottest tap water available and fully submerge the shirt. Let it sit for 10 to 15 minutes, then remove it and squeeze out the extra water without wringing the fabric.
Lay the shirt flat on a towel and let it air dry, or use a hair dryer on high heat to speed up the process. This method causes less shrinkage than boiling and works well on shirts that need only a slight size drop.
Method 5: Dryer-Only Cycle
Skip the wash entirely and dampen the shirt with a spray bottle or a quick rinse under the tap. Toss it straight into the dryer on high heat and run a full cycle.
Check the fit once it’s done, and repeat if the shirt still needs to shrink more. This works well for a quick fix when a shirt only needs to shrink slightly.
Each method gives more control than a full wash cycle, since there’s no machine agitation involved. They work best on natural fibers like cotton, wool, and linen, and have little to no effect on polyester or other synthetics.
How to Shrink a Cotton Shirt
Cotton responds to heat and water faster than almost any other fabric because its fibers soak up moisture quickly and carry a lot of built-in tension from manufacturing.
Wash the shirt in the hottest water your care label allows, then toss it straight into the dryer while it’s still damp and run it on high heat.
How much it actually shrinks depends on the weave and whether it’s been pre-shrunk. Pre-shrunk cotton tends to lose only a small amount, often in the low single digits, in one hot wash-and-dry cycle. Untreated cotton has more room to move and can shrink noticeably more, sometimes into double digits, since there’s more tension left in the fibers for heat to release.
So if you’re going for a bigger size drop, check that tag first. The higher the cotton percentage and the looser the weave, the more you’ll likely notice.
How Washer and Dryer Settings Affect Different Fabrics
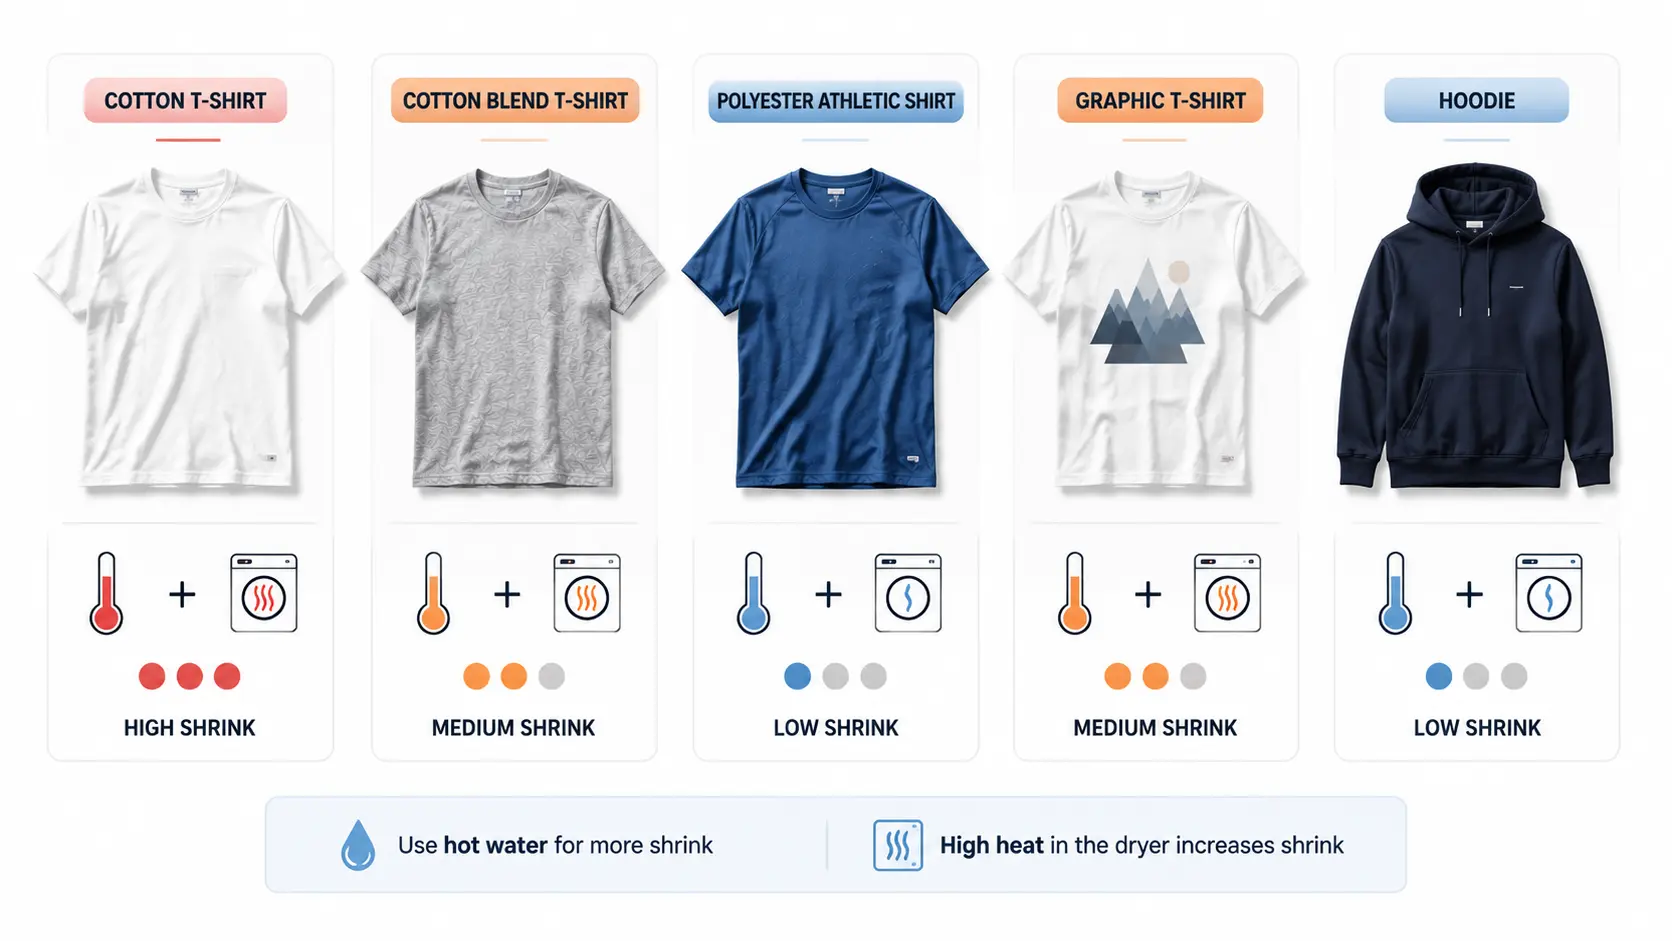
The same wash-and-dry cycle can shrink one shirt and barely touch another, so it helps to match the settings to what you’re actually working with. Always check the care label first, since fabrics react differently to heat.
1. Cotton Shirts
Washer settings:
- Use the hottest water temperature allowed on the care label.
- Select a regular or normal wash cycle.
- Avoid cold-water settings, as they won’t cause much shrinkage.
Dryer settings:
- Transfer the shirt to the dryer immediately after washing.
- Use a high heat setting.
- Remove the shirt once it is dry and check the fit before repeating the process.
2. Cotton Blend Shirts
Cotton blends, like cotton-polyester shirts, usually shrink less because the synthetic fibers mixed in resist heat-related changes.
Washer settings:
- Use warm to hot water depending on the fabric blend.
- Choose a normal wash cycle.
- Avoid extreme heat if the shirt contains stretch fibers like spandex.
Dryer settings:
- Use medium to high heat.
- Check the shirt frequently to prevent damage.
- Stop once the desired fit is reached.
Cotton blends may need a few controlled cycles to show noticeable shrinkage.
3. Silk Shirts
Silk is fragile and can shrink under heat, but it takes extra care to avoid damaging the fabric or its texture in the process.
Washer settings:
- Use cold water or the lowest temperature allowed on the care label.
- Select a gentle or hand-wash cycle.
Dryer settings:
- Avoid high heat drying, since it can damage silk.
- If using a dryer, choose the lowest heat setting and remove the shirt while slightly damp.
4. Polyester Shirts
Polyester is a synthetic fabric built to hold its shape, so it shrinks far less than cotton, no matter how hot the wash.
Washer settings:
- Use warm water instead of very hot water.
- Choose a regular wash cycle.
Dryer settings:
- Use medium heat rather than maximum heat.
- Avoid prolonged drying, since excessive heat can damage polyester fibers.
Instead of trying to force major shrinkage, a polyester shirt may respond better to tailoring or minor heat adjustments.
5. Linen Shirts
Linen shrinks under heat, so handle it carefully to keep its shape intact.
Washer settings:
- Use warm or hot water depending on the care label.
- Select a gentle or normal cycle.
Dryer settings:
- Use medium heat.
- Remove the shirt while it is slightly damp and reshape it if needed.
Linen can shrink quickly, so avoid repeated high-heat cycles.
6. Wool Shirts
Wool reacts fast to heat, moisture, and agitation. According to a peer-reviewed review in PubMed Central, wool fibers are covered in microscopic scales that lock together under heat and movement in a process called felting, and once that happens, the shrinkage can’t be reversed.
Washer settings:
- Use cool or lukewarm water unless you want intentional shrinkage.
- Avoid aggressive washing cycles, since agitation speeds up felting.
Dryer settings:
- Avoid high-heat dryers.
- Use controlled drying methods instead, like air-drying flat.
Because wool shrinkage is permanent once felting sets in, it’s worth checking on it constantly rather than walking away and letting a full cycle run. A shirt that’s slightly too big can turn into one that’s unwearable much faster than you’d expect.
Note: Most shirts can shrink about one size in a single attempt, especially cotton ones. How much a shirt actually shrinks depends on the material, heat level, and method, so results vary from shirt to shirt.
Is Shrinking a Shirt Reversible?
It depends on the fabric, and this is one of the more important things to know before you start.
Cotton shrinkage mostly comes from the fibers relaxing back to their pre-manufactured shape. That process has some give to it. A cotton shirt that’s shrunk too far can sometimes be coaxed back out with a gentle stretch while damp, though it won’t always return all the way to its original size.
Wool is a different story. Once the scales on wool fibers lock together through felting, there’s no undoing it. That’s why it pays to shrink wool in small, closely watched increments rather than running a full aggressive cycle and hoping for the best.
Boiling Water vs Wash-and-Dry: Which Should You Use?
Both methods shrink a shirt, but they work differently. Boiling gives tighter control over the outcome, while wash-and-dry is simpler and doesn’t require a stovetop.
Pick based on how much time you have and how precise you want the shrink to be.
| Factor | Boiling Water | Wash-and-Dry |
|---|---|---|
| Speed | Faster (10–15 min) | Slower (full wash + dry cycle) |
| Control | High; you set soak time | Lower; shrinks in one full step |
| Effort | Needs stovetop and tongs | Just load the machine |
| Best For | Small spot fixes, no machine access | Whole shirt, bigger size drop |
| Best Fabric Fit | 100% cotton, linen | 100% cotton, cotton blends |
Want a small, controlled shrink? Boil it. Want an easy, hands-off shrink for the whole shirt? Run it through a hot wash and a high-heat dry instead.
Things to Check Before Shrinking
- Read the care label. Shows the fabric’s heat limits and any washing or drying warnings.
- Check fabric composition. Determines how much shrinkage to expect and which method works best.
- Measure the shirt first. Gives a clear before-and-after comparison to track results.
- Avoid expensive or fragile garments. Shrinking is unpredictable, so test on something replaceable first.
- Test for colorfastness. Dab a hidden seam with a cotton swab dipped in rubbing alcohol. If color transfers onto the swab, hot water is likely to make the dye bleed or fade.
Shirts That Are Difficult to Shrink
Not every shirt responds to heat and water the same way. Some fabrics and finishes resist shrinking no matter how many cycles you run, so it helps to know which ones to expect trouble from before you start.
| Fabric/Finish | Why It Resists Shrinking | Best Alternative |
|---|---|---|
| Polyester & Synthetic Blends | Fibers hold their shape under heat | Avoid repeated cycles; tailor instead |
| Rayon | Weakens and can distort when wet rather than shrinking predictably | Cool water only; hand wash if possible |
| Pre-Shrunk Shirts | Fibers already tightened during factory processing | Little room left to shrink further; tailor for size changes |
| Spandex & Stretch Blends | Designed to stretch and bounce back, not tighten permanently | Heat risks damaging stretch fibers before shrinking occurs; tailor instead |
| Silk | Reacts unpredictably to heat; prone to brittleness or discoloration | Professional tailoring, not home shrinking |
| High Thread Count Cotton | Tight weave leaves little room for fibers to contract | Expect a smaller size change than looser cotton weaves; tailor if needed |
Knowing which fabrics fight back against shrinking ahead of time saves both effort and the shirt itself. Instead of running cycle after cycle with little to show for it, tailoring is usually the more reliable fix for these materials.
What to Do Instead: When a shirt falls into one of these categories, tailoring is usually the safer bet for a real size change. Forcing shrinkage on a fabric that resists it tends to waste time and risks ruining the shirt rather than fixing the fit.
Protect Printed and Fragile Shirts
Graphic prints and fragile fabrics need a lighter touch than a plain cotton tee, since heat and friction can shrink a shirt just as easily as they can crack a print or weaken the material.
| Tip | Why It Helps |
|---|---|
| Turn graphic shirts inside out | Keeps the print facing away from direct heat and friction, lowering the chance of cracking or fading |
| Avoid repeated high heat | Reduces the risk of damaging prints, weakening fibers, or shrinking the fabric more than intended |
| Use gentle shrinking methods | Warm water and lower heat settings protect fragile fabric while still getting some shrinkage, instead of risking damage with the hottest options available |
Following these steps won’t stop a shirt from shrinking, but it lowers the odds of a cracked print or damaged fabric along with the smaller fit.
Post-Shrink Care Tips
- Wash with care: Use cooler water and gentle cycles for future washes to avoid additional shrinkage.
- Avoid high heat: Use lower dryer settings or air-dry your clothes whenever possible to prevent over-shrinking.
- Check the fit after washing: Try on the garment before putting it through another shrink cycle.
- Store properly: Fold shrunken clothes neatly to help them keep their shape and avoid stretching.
- Follow the care label: Even after shrinking, continue following the fabric instructions to protect the material.
A little extra care with washing, drying, and storage helps a shrunk shirt hold its new fit and keeps it wearable for longer.
Common Mistakes When Shrinking Shirts
- Using extreme heat immediately. This raises the risk of scorching fabric or cracking prints. Start with a hot wash and standard dryer heat first.
- Shrinking fabrics that don’t respond well. Polyester and other synthetics hold their shape no matter how much heat gets applied, so repeated cycles just waste time.
- Leaving shirts in the dryer too long. Extra time doesn’t add much more shrinkage past a point; it just raises the risk of damage. Check the fit after one full cycle before running another.
- Expecting a shirt to shrink multiple sizes. Most fabrics max out around 10 to 15% shrinkage, so a shirt several sizes too big won’t fit no matter how many cycles it goes through.
Avoiding these mistakes makes the process smoother, so the shirt shrinks without getting damaged along the way.
Conclusion
Shrinking a shirt at home comes down to matching the method to the fabric: a hot wash-and-dryer combo for cotton, a boiling-water soak for a bigger reduction, a vinegar soak for something gentler, or a careful ironing or steaming touch-up for wool and silk.
The one thing worth carrying forward is that cotton and wool don’t shrink the same way. Cotton has some flexibility to it.
Once wool felts, it doesn’t come back. Knowing that difference before you start is what keeps a good shrink from turning into a ruined shirt.
Once it fits, hang it back up in a proper closet storage setup so it stays in shape for next time.
Frequently Asked Questions
Can a Shirt Shrink After It Has Already Been Washed Several Times?
Yes. Fibers can still respond to heat even after repeated washes, though the amount of shrinkage usually gets smaller each time.
Do New Shirts Shrink More Than Old Shirts?
Yes. New fibers haven’t gone through repeated heat exposure yet, so they still have more room to contract than older, already-shrunk fabric.
Does Shrinking a Shirt Ruin the Fabric?
Not necessarily, but it can if you push it too far or too fast. Cotton tends to hold up fine through a couple of controlled cycles. Wool and silk are much less forgiving, since wool’s shrinkage is permanent and silk can turn brittle or discolored under too much heat.
Can Tailoring Be a Better Option Than Shrinking a Shirt?
For a bigger or more precise size change, yes. Tailoring adjusts the fit evenly at the seams, while shrinking depends on the fabric cooperating and can end up uneven if you push it too hard.
How Do You Know If a Shirt’s Colors Will Bleed in Hot Water?
Run the rubbing-alcohol swab test on a hidden seam first. If color transfers to the swab, the dye isn’t set, and hot water will likely cause bleeding or fading.