

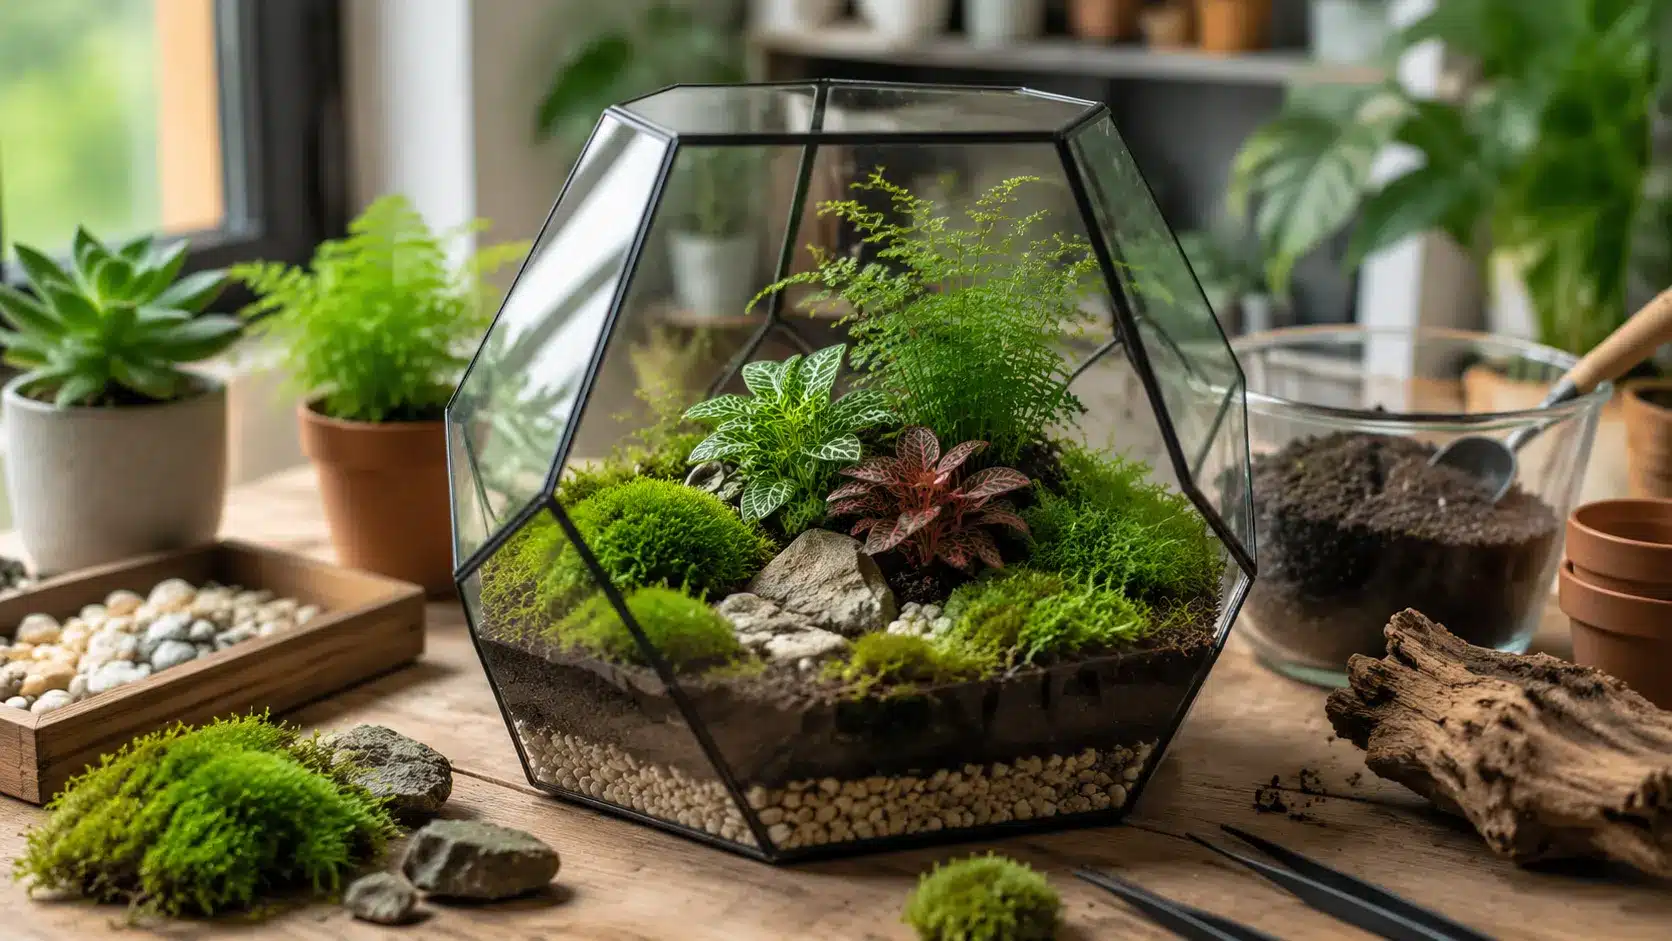

Have you ever looked at a beautiful terrarium and wondered how a tiny garden can survive inside a glass container?
A DIY terrarium is more than just adding plants to a jar. The right layers, moisture level, and plant choices create a small ecosystem that can stay healthy with very little care.
The tricky part is knowing what goes inside and why each piece matters. Too much water, poor drainage, or the wrong location can quickly turn your green project into a messy experiment.
Ready to build your own miniature indoor garden? Keep reading to learn the simple steps, materials, and tips on how to make a plant terrarium.
What Is a Terrarium and How Does It Work?
A terrarium is a small indoor garden built inside a clear glass container. It creates a controlled space where plants, soil, air, and moisture work together to keep the environment balanced.
If you’re learning how to build a terrarium, understanding this balance is the first step. Some terrariums have a lid, while others stay open. Closed setups hold humidity and recycle water, while open containers allow more airflow and work better for plants that prefer drier conditions.
Inside a closed terrarium, water follows a simple cycle. Moisture rises from the soil, collects on the glass, and slowly drips back down to the roots. This process repeats and helps the plants stay hydrated.
Terrariums are popular because they add greenery to indoor spaces without needing daily care. Once the setup is balanced, they usually only need occasional trimming, small adjustments, and a little attention.
How Do You Layer and Build a Terrarium Step by Step
Here’s how to build a terrarium in clear layers, starting with drainage and charcoal, then adding soil, plants, and finishing touches to support healthy roots, balanced moisture, and long-lasting growth indoors.
Tools and Materials You’ll Need
Tools:
- long tweezers
- scissors
- a misting/spray bottle
- a mixing tub
- a smaller measuring cup
- a display LED light (optional)
Materials:
- a glass container with a lid (roughly 2 liters or larger)
- leca (or pea gravel/small stones) for drainage
- window screen mesh
- cocoa fiber brick
- sphagnum moss
- orchid bark
- charcoal
- worm castings
- hardscape pieces (such as spiderwood and slate stone)
- a moss of your choice (fern, cushion, or mood moss)
- small tropical plants (such as fittonia, peperomia, and hydrocotyle)
- springtails
Step 1: Choose Your Container

Pick a glass container with a lid that gives you enough room to work. A wide mouth lets you get your hands or tweezers in comfortably, and a lid with a tight seal (like a rubber gasket) will keep humidity locked in so you don’t have to water often.
Repurposed cookie jars, large drinking glasses with a fitted acrylic disc, or dedicated terrarium jars all work well for a first build.
Before you start layering, check the glass for a visible seam line running down the sides. Turn the container so that the seam faces the back or sides rather than the front, since it can be distracting once the terrarium is finished and on display.
Step 2: Build the Drainage Layer and Barrier

Add a layer of small stones, pea gravel, or leca to the bottom of the container. This is where excess water will collect so plant roots don’t sit in soggy substrate.
For a container this size, two to three centimeters of drainage material is enough; leca is a good choice because it’s lightweight and holds extra water within its porous texture.
Once the drainage layer is in, cut a piece of window screen mesh to fit the shape of your container and lay it directly on top of the stones. This barrier keeps the substrate from washing down into the drainage layer over time.
Step 3: Mix and Add the Substrate

Build your substrate in a mixing tub using this ratio: 1 part rehydrated cocoa fiber, 2 parts chopped sphagnum moss, ¼ part orchid bark, ¼ part charcoal, and ¼ part worm castings.
Rehydrate the cocoa fiber in water first (it expands significantly), then combine all the ingredients until evenly mixed. This blend retains moisture, resists compacting, supplies nutrients, and still drains well.
Scoop the finished mix onto the mesh barrier and gently pat it down. Raise the substrate at the back and slope it toward the front to create depth and give taller plants more space.
Step 4: Design the Hardscape

Select hardscape pieces that complement each other in color and texture; combinations like spiderwood with slate stone or dragonstone with lava rock tend to look striking.
Before placing anything permanently, lay your pieces out on the substrate and experiment with different arrangements until you land on a layout that feels balanced rather than just scattered.
Once you’re happy with the arrangement, set the pieces aside temporarily so you have clear access to the substrate for planting. You’ll reintroduce the hardscape once your moss is down, using it to frame and anchor the greenery that comes next.
Step 5: Add Moss and Plant

Choose moss based on the look you want. Fern moss creates a layered forest feel, while cushion or mood moss forms a denser carpet. Remove debris, split it into smaller sections, and trim the thick base so it sits flat on the substrate.
With the moss in place, use tweezers to make small holes through it into the substrate. Add plants one at a time, placing taller specimens toward the back and smaller accents like hydrocotyle around the front and sides.
Stick to plants that naturally thrive in humid, tropical conditions, since these adapt best to a sealed terrarium environment. Reintroduce your hardscape pieces around the plants once everything is positioned.
Step 6: Add Springtails and Set Up Care

Introduce a small population of springtails into the substrate so they’ll break down mold and decaying plant matter, converting them into fertilizer and creating a self-sustaining miniature ecosystem.
Give the whole terrarium a light misting with a spray bottle, erring on the side of underwatering; the substrate should feel damp, not wet, and a sealed lid means very little moisture escapes over time.
For lighting, place the terrarium in bright, indirect sunlight or run a dedicated LED grow light on a 12-hour-on, 12-hour-off cycle. Open the lid every 1 to 2 weeks to refresh the air inside and check on plant health; expect to water only occasionally.
For a complete walkthrough of the process, check out the video tutorial below:
What Are the Most Common Terrarium Mistakes to Avoid?
Most terrarium failures come down to two things: too much water with nowhere to go, or the wrong plant in the wrong light.
- Too Much Water: The problem often starts during the build. Skipping layers like the drainage layer, charcoal layer, or mesh barrier can trap water at the bottom. The soil stays too wet, which can lead to mold. Overwatering after sealing can cause the same issue, even with the correct layers.
- Wrong Lighting: Light problems usually appear later. Plants that need direct sun may start declining when placed in indirect light. A properly built terrarium can still fail if the plant is not getting the right amount of light.
- Terrarium Type Mismatch: Different terrarium types require different conditions. Closed tropical terrariums require a proper moisture balance, while open succulent terrariums need drier soil and more airflow. Too much moisture in an open setup can quickly cause root rot.
The mistakes that harm a closed tropical terrarium are often the opposite of what an open, dry terrarium needs to survive.
How Do You Know Your Terrarium Is Working?
A healthy closed terrarium usually gives you two early signs that things are going well: condensation that comes and goes, and fresh plant growth within the first few weeks.
The condensation cycle shows how well the terrarium is working. Moisture should collect on the glass during warmer periods and clear as temperatures drop, showing the water cycle is balanced.
If the glass stays covered in fog all day and never clears, there is probably too much moisture trapped inside.
I’ve seen this happen when people add a little extra water “just to help it along.”
In a closed terrarium, that small extra amount can quickly lead to mold. Open the lid for a few hours and let some moisture escape.
On the other hand, completely dry glass usually means the terrarium needs a little more water. Add a light mist, reseal the container, and check how it looks the next day.
New growth is another good sign. If you don’t see any changes after two to three weeks, the issue is often light. Move the terrarium to a brighter spot and give the plants another week before making bigger changes.
Conclusion
Building a DIY terrarium is genuinely one of those projects I think anyone can pull off, even if you’ve never successfully kept a houseplant alive before.
Once you get the layers right and choose plants that actually belong in a humid, sealed environment, the whole thing starts taking care of itself naturally.
That self-sustaining water cycle never gets old to watch. My advice? Start with a jar you already own, keep your plant selection small, and resist overwatering after sealing.
Give it a week, watch for that condensation cycle, and you’ll know pretty quickly whether your little ecosystem is truly thriving inside the glass.
Frequently Asked Questions
How Long Do Terrariums Typically Last?
A: Closed terrariums with proper sealing can last for years with minimal intervention since they recycle their own water and nutrients inside the jar. Individual plants may eventually outgrow the space or need trimming, and soil nutrients get replenished occasionally, but the ecosystem itself doesn’t have a fixed expiration date.
Is It Cheaper to Make Your Own Terrarium?
Yes, in most cases, a DIY terrarium built from a repurposed jar, basic gravel or sand, activated charcoal, potting soil, and small plant cuttings typically costs less than a pre-made kit, since kits bundle the container, substrate, and decor at a markup. Container choice and specialty plants are what raise the price.
What Is the Difference Between a Terrarium and A Vivarium?
A terrarium is built around plants, using layered soil and moisture to support a closed or open indoor garden ecosystem. A vivarium is designed to house living animals such as reptiles or amphibians, prioritizing substrate, heating, humidity control, and enclosure security suited to that animal rather than to plant growth alone.


