
The spooky season is the perfect time to spark kids’ imaginations with hands-on creative projects.
Arts and crafts give children a fun way to express themselves while strengthening coordination, focus, and problem-solving skills.
If you’re planning a cozy afternoon at home or preparing a classroom activity, these easy crafts will fill any space with excitement and color.
Using simple materials found around the house, little artists can create their own festive decorations that capture the playful spirit of the holiday.
It’s a wonderful opportunity to spend quality time together while encouraging creativity, confidence, and joyful expression through every handmade creation.
Why Choose Halloween Arts and Crafts for Kids
The best Halloween crafts for preschoolers are simple, safe, and engaging. They rely on everyday materials you already have at home, making it easy to jump right into the fun without extra prep.
Clear, step-by-step instructions allow children to participate with little guidance, while younger kids can enjoy extra help from adults.
Safety always comes first. Using non-toxic supplies, child-safe scissors, and washable paints ensures a worry-free experience.
Quick, rewarding projects that take about twenty minutes help maintain focus and excitement.
When the activity ends with minimal cleanup, everyone can appreciate the creativity, confidence, and joy that come from crafting something festive together.
Halloween Crafts for Preschoolers
Simple, sensory, and hands-on crafts designed to build creativity and coordination through colorful, tactile projects perfect for short attention spans.
1. Handprint Pumpkin Faces
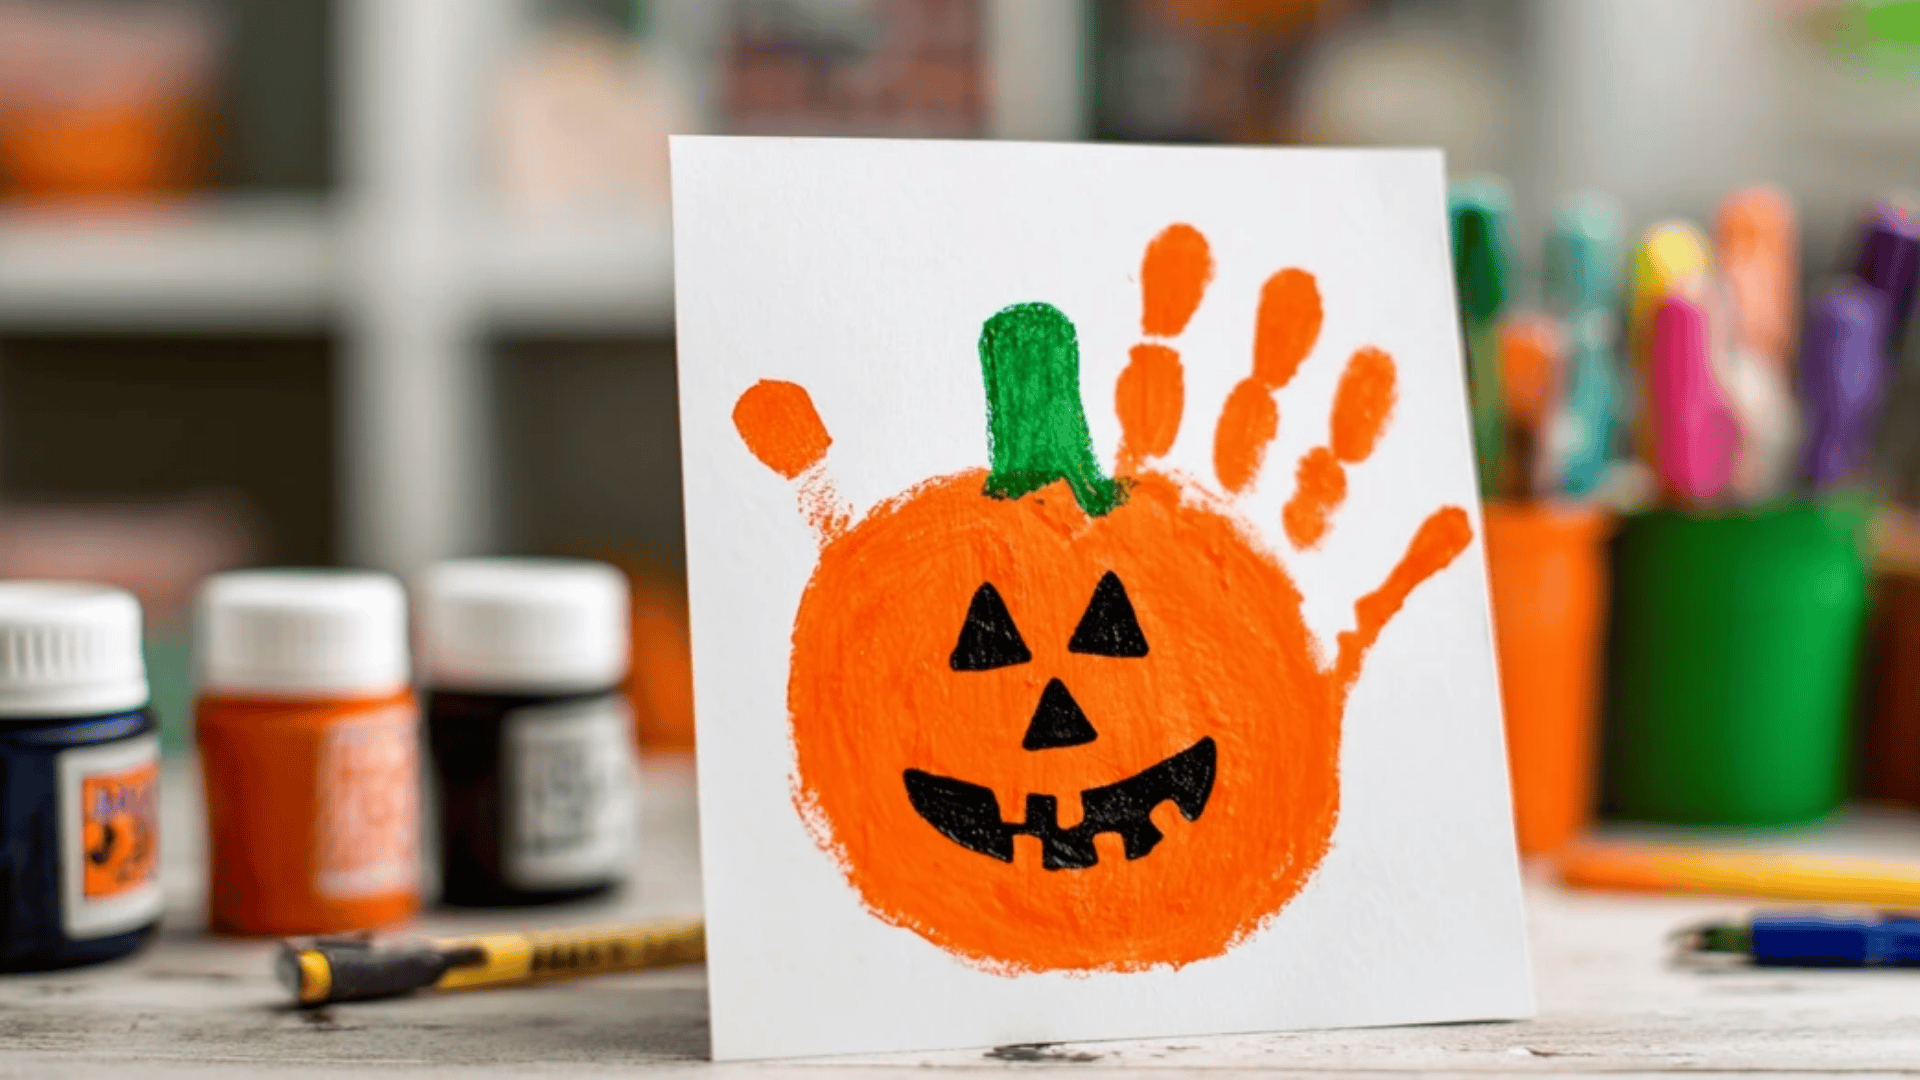
Create adorable keepsakes using white paper, orange washable paint, paintbrushes, black markers, and green crayons for stems and jack-o-lantern details.
- Pour orange paint onto a paper plate and have your child press their hand into it evenly, covering all fingers.
- Press the painted hand firmly onto white construction paper, making sure all fingers make contact for a clear handprint.
- Let the handprint dry completely for about ten to fifteen minutes before adding any decorative details to prevent smudging.
- Draw a green stem at the wrist area using a green crayon or marker to complete the pumpkin shape.
- Add jack-o-lantern face details with black markers, including triangle eyes, a triangle nose, and a jagged smiling mouth.
This sensory activity helps toddlers investigate textures, develop hand-eye coordination, and create precious keepsakes that grandparents will treasure for years.
2. Paper Plate Ghost Mask
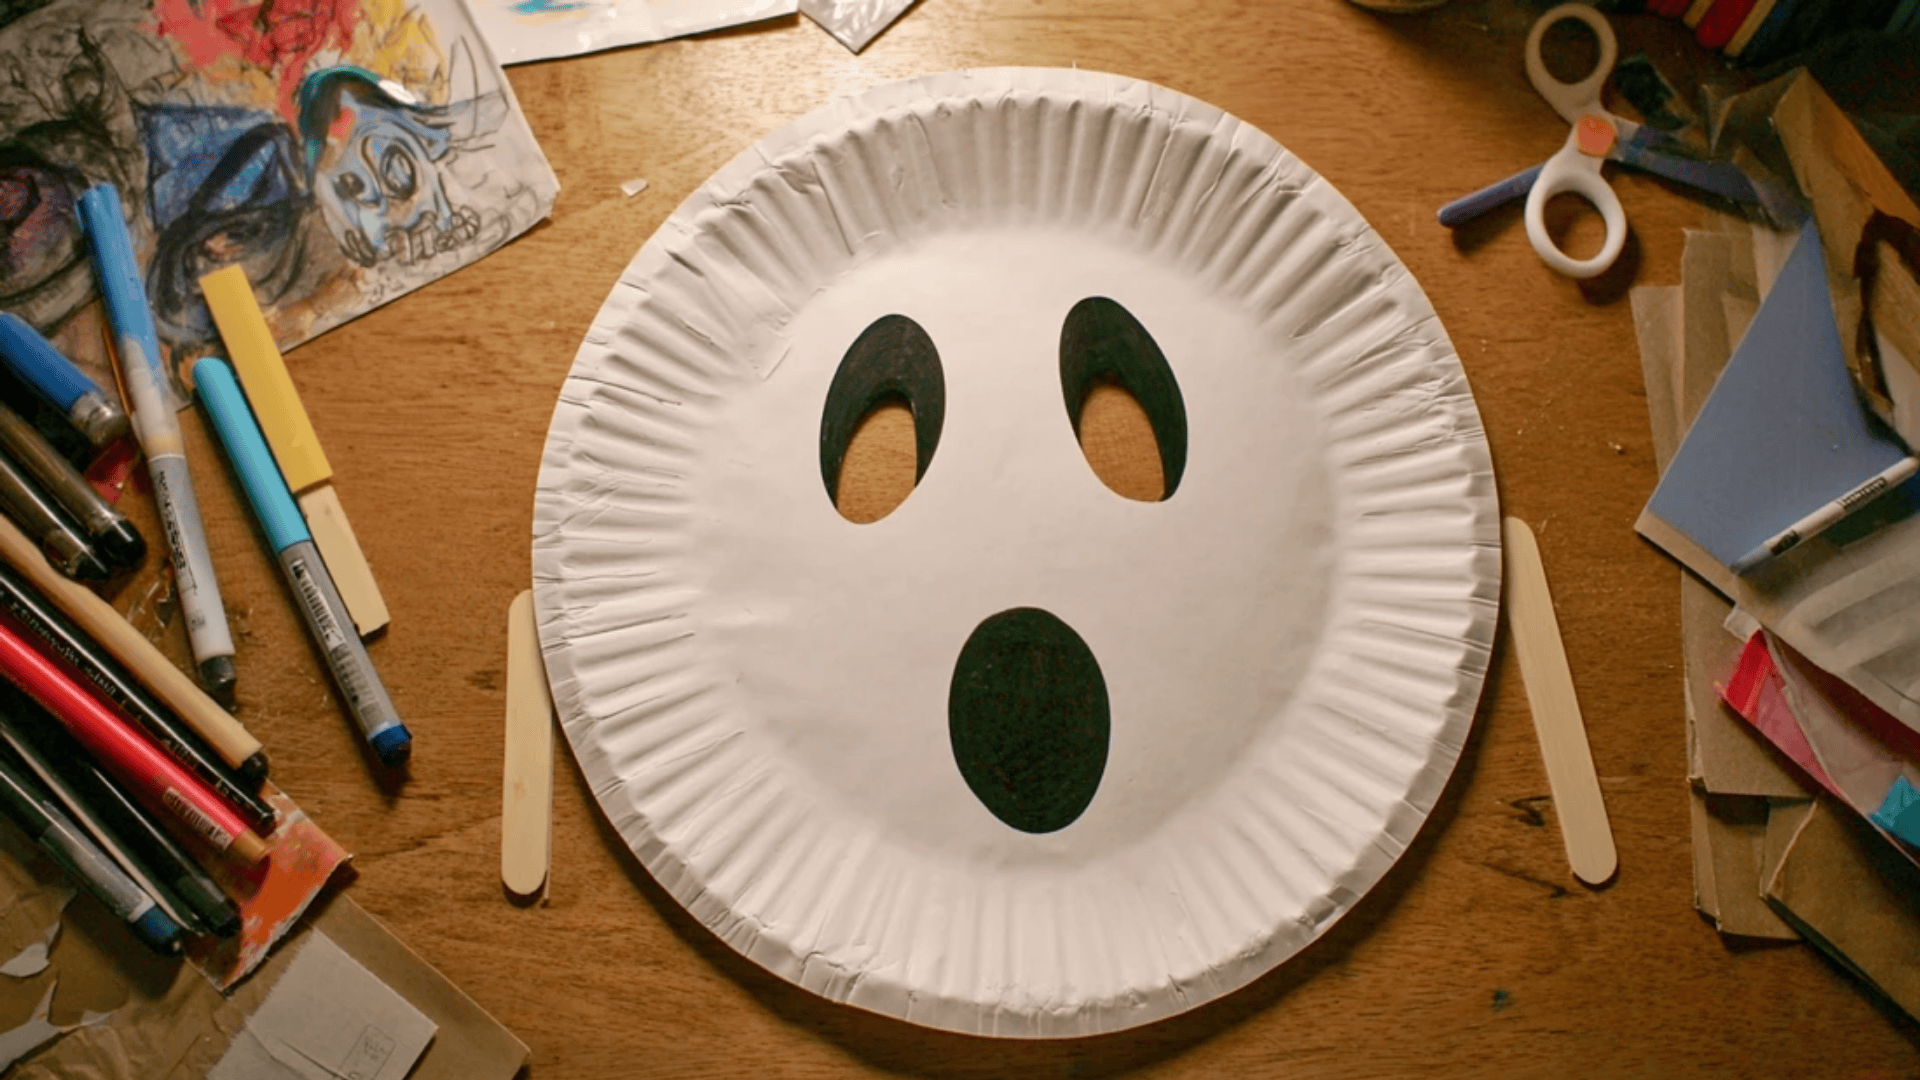
Convert white paper plates into wearable masks with markers, scissors, and popsicle sticks for handles, for spooky fun.
- Use scissors to carefully cut two eye holes in a white paper plate, positioning them where the child’s eyes will align.
- Let children decorate the plate with black markers, drawing ghost expressions such as surprised, happy, scary, or silly.
- Add extra ghost details, such as flowing edges drawn around the plate rim or simple curved lines to suggest ghostly draping.
- Attach a popsicle stick handle to one side of the plate using strong glue or tape for easy holding.
- Let the glue dry completely before children hold the masks up to their faces for imaginative ghost play.
This quick craft requires minimal materials and provides instant dress-up fun that encourages imaginative play and storytelling throughout the Halloween season.
3. Cotton Ball Spider Craft
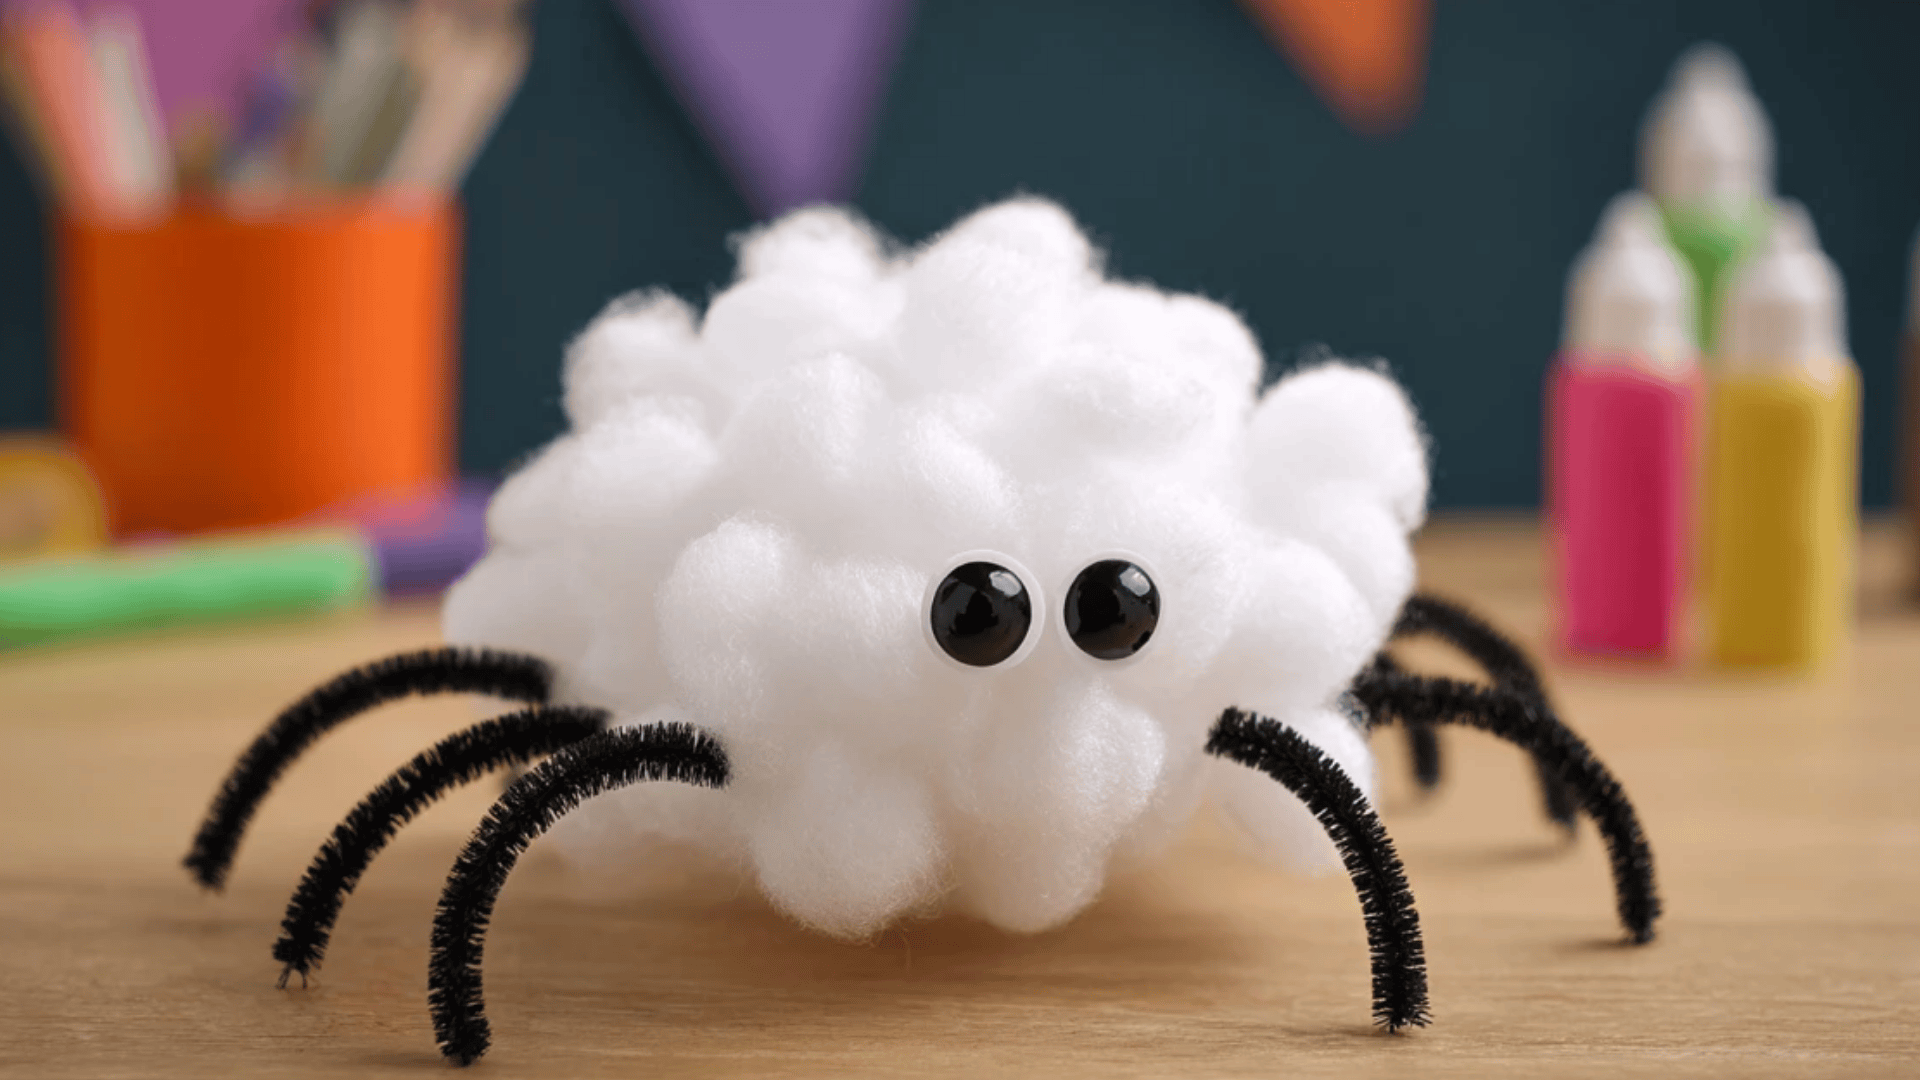
Build fine motor skills using black construction paper, white cotton balls, googly eyes, black pipe cleaners, and glue to create fluffy, touchable spiders.
- Pull apart white cotton balls to make them fluffier and more textured, creating a soft, spider-like body.
- Glue three to four cotton balls onto black construction paper, clustering them together to form the spider’s body.
- Once the glue dries slightly, attach two googly eyes to the top cotton ball to create the spider’s face.
- Cut eight black pipe cleaners to equal lengths and attach them as spider legs, four on each side.
- Bend the pipe cleaner legs at angles to create a crawling position that makes the spider look three-dimensional.
This craft introduces counting as kids attach eight legs to each spider body, while the soft cotton texture appeals to sensory-seeking preschoolers.
4. Torn Paper Candy Corn
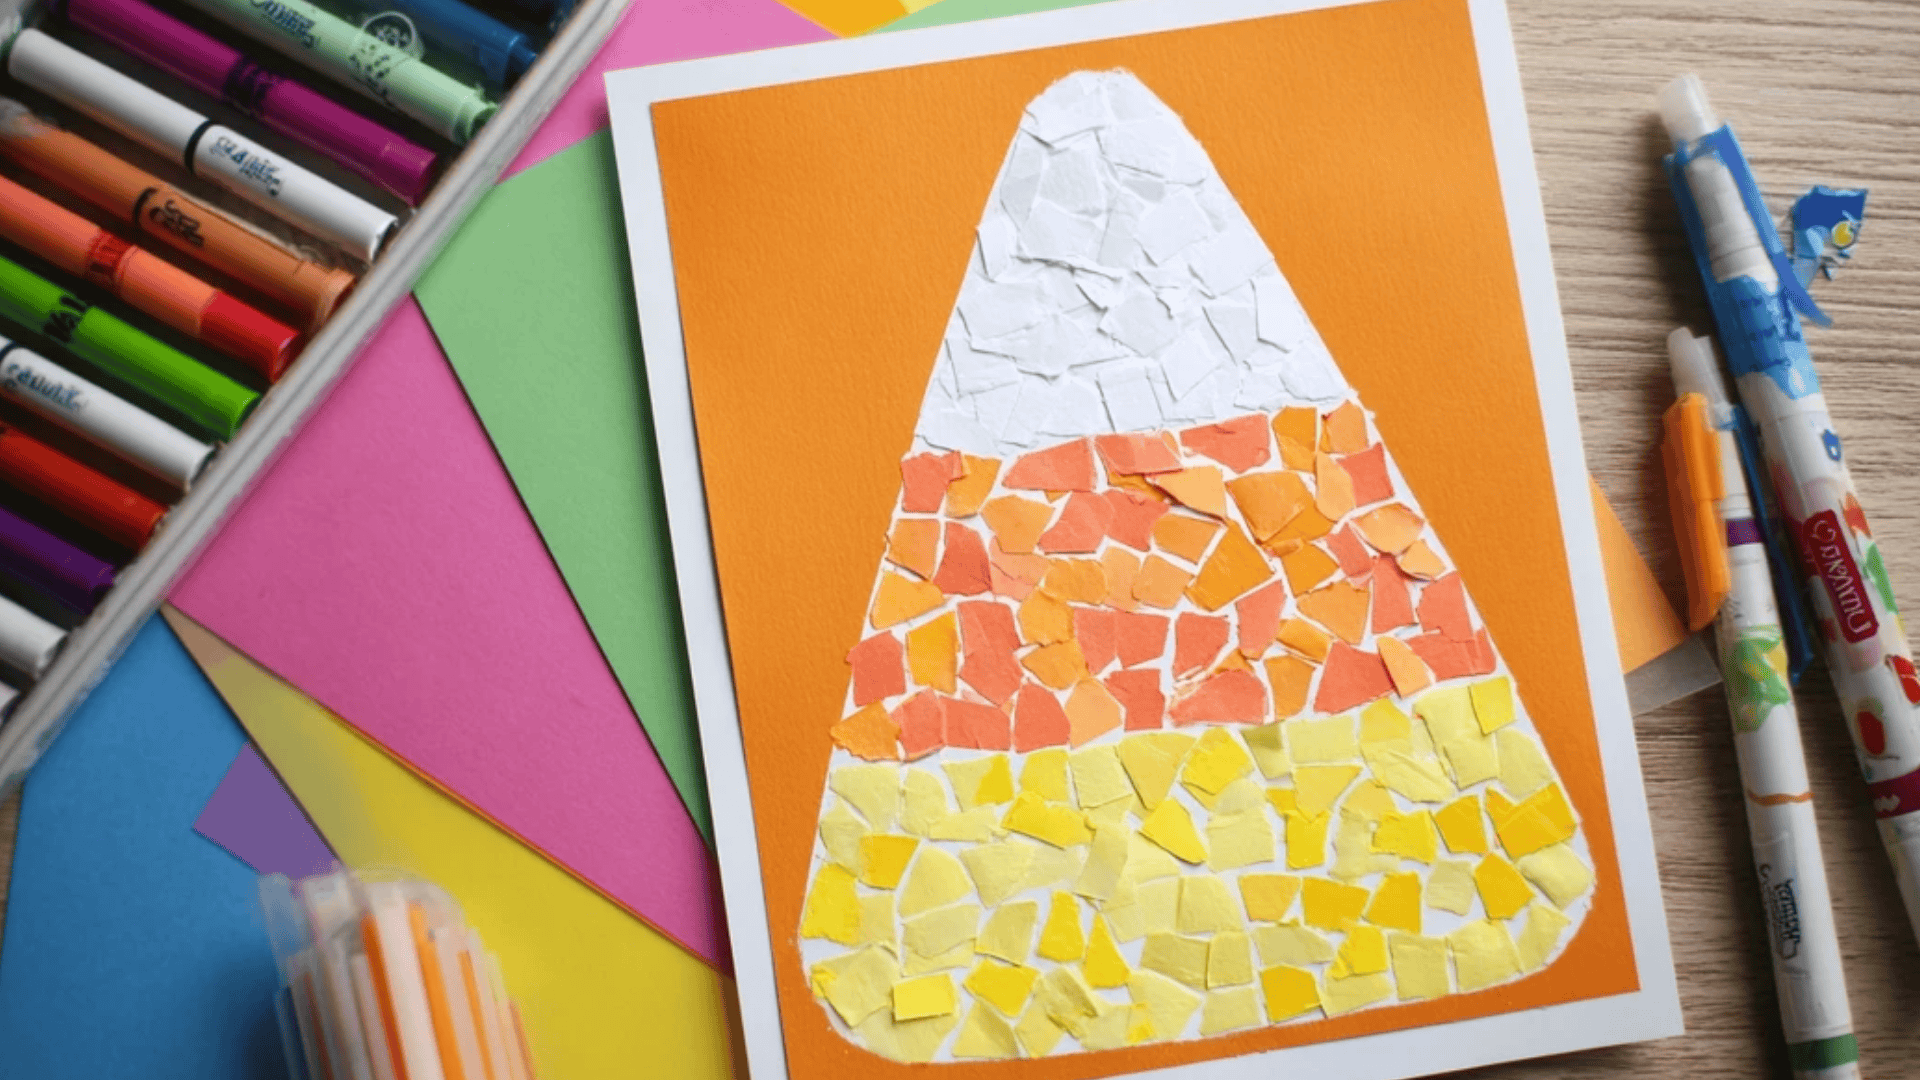
Develop hand strength without scissors using white, orange, and yellow construction paper, glue sticks, cardstock, and markers for outlining candy corn shapes.
- Draw a large candy corn outline on white cardstock using markers, creating a triangle with a rounded bottom edge.
- Show children how to tear construction paper into small pieces without using scissors, making this truly safe and frustration-free.
- Start with white paper pieces at the top, then orange in the middle, and yellow at the bottom.
- Apply glue stick inside each color section and let children press torn paper pieces onto the glue, overlapping slightly.
- Continue filling the entire outline with torn paper until no white cardstock shows through, creating a colorful, textured mosaic.
This mess-friendly project teaches color sequencing and spatial awareness while building hand muscles needed for future writing skills through tearing motions.
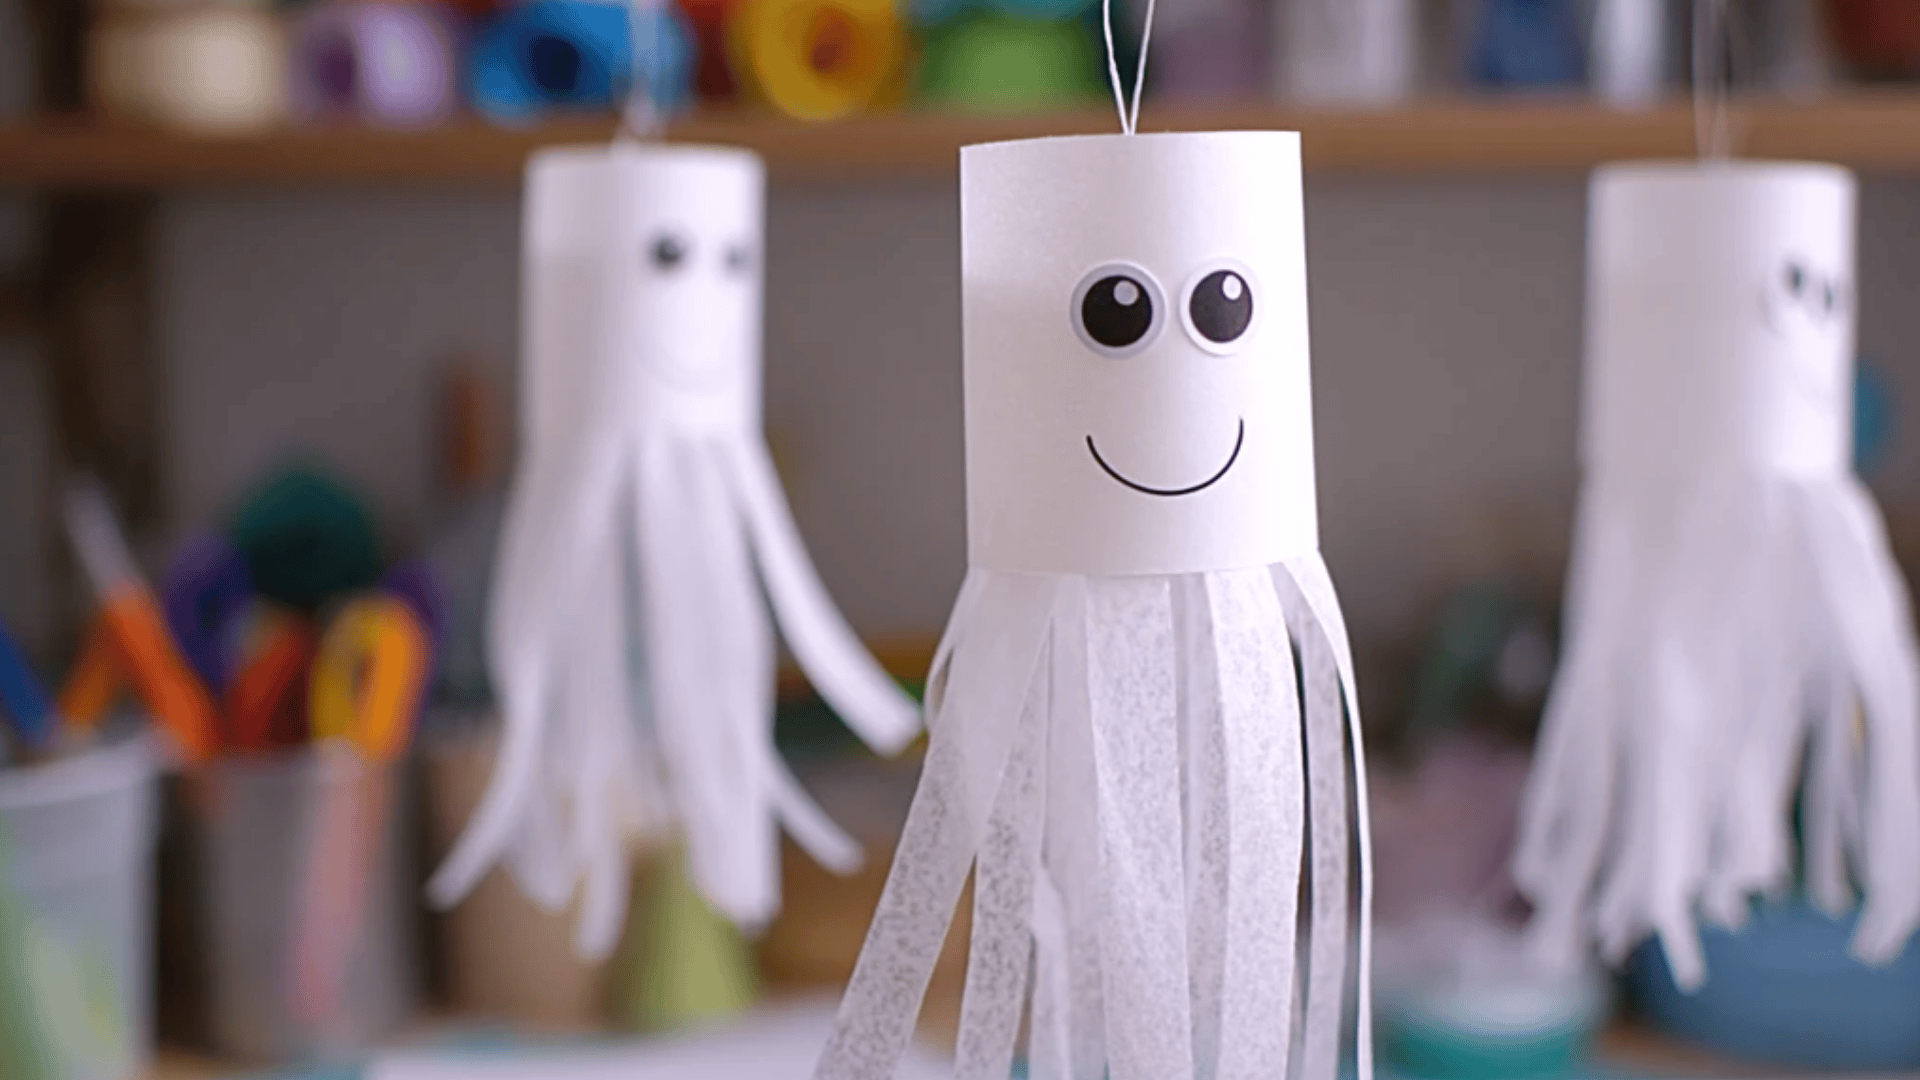
5. Paper Cup Monster
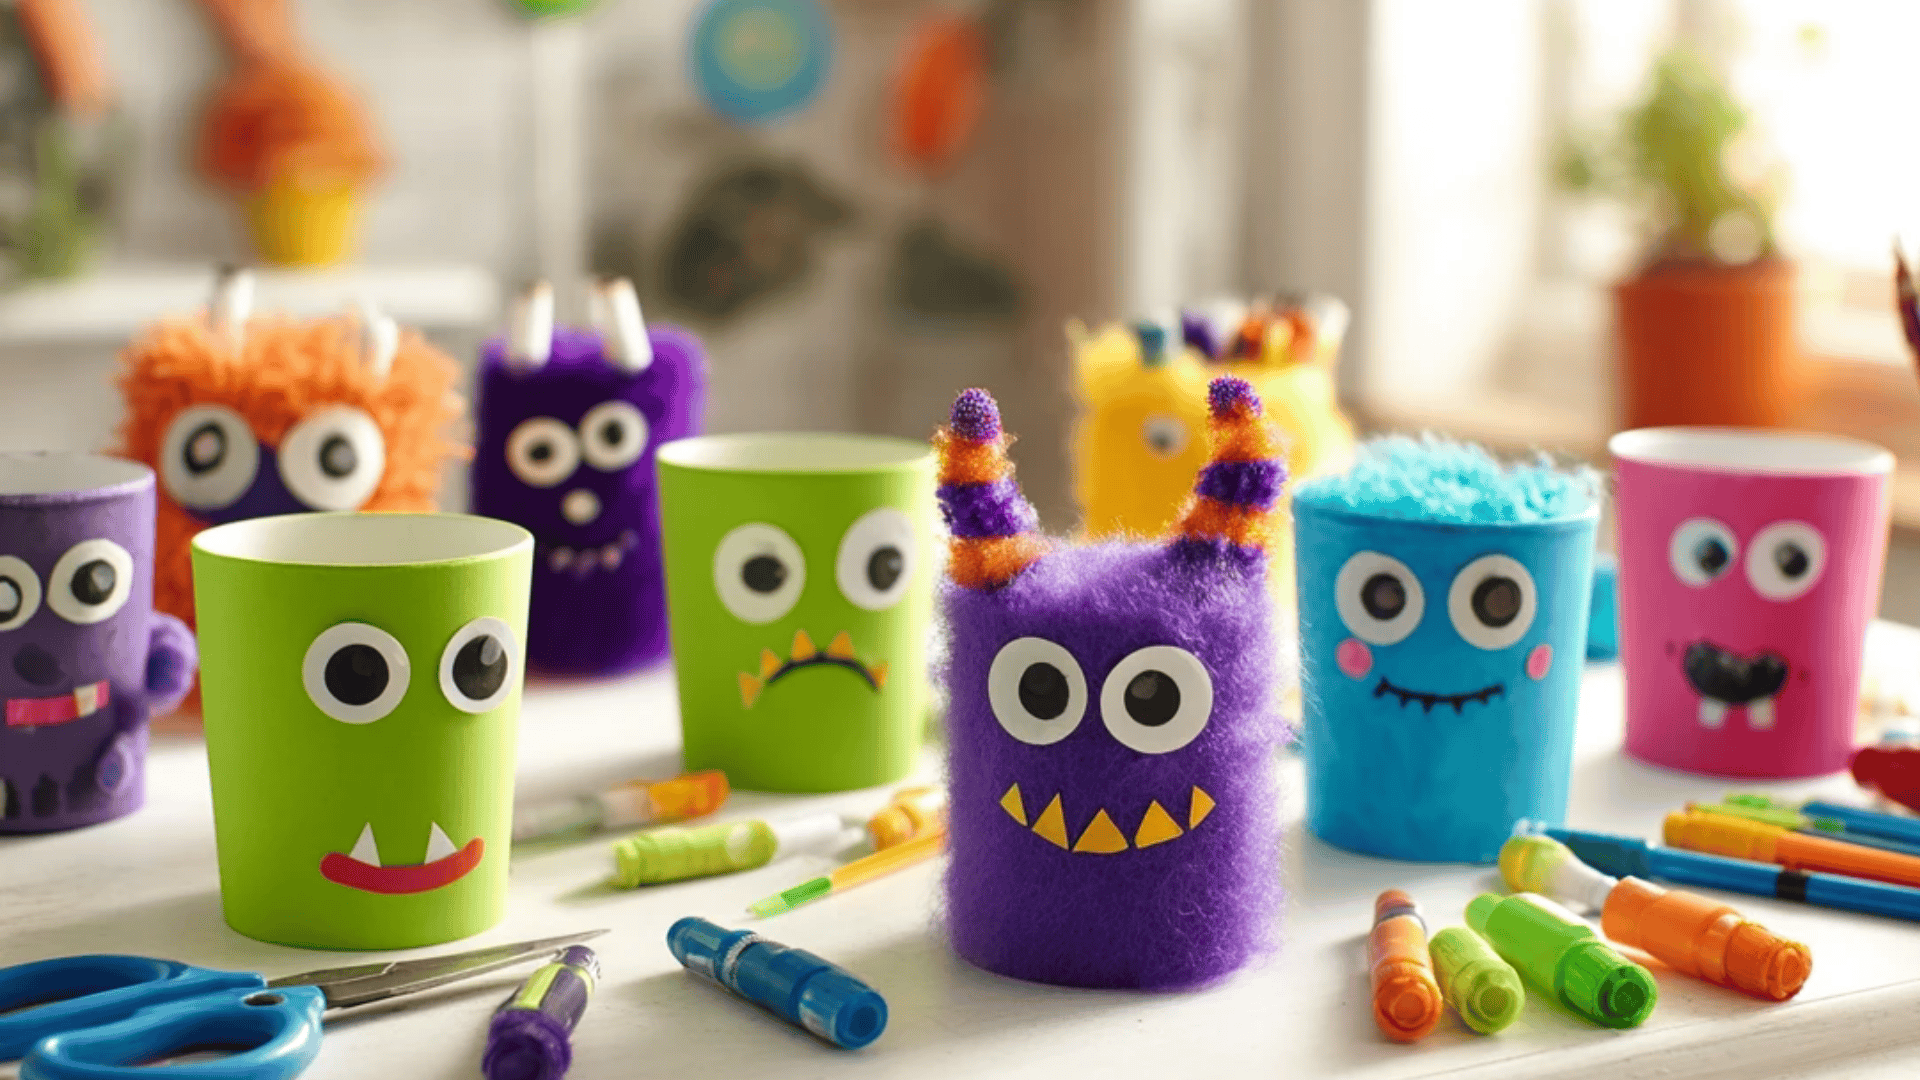
Turn disposable cups into silly creatures using paper cups, washable paint, googly eyes, construction paper, glue, and markers for creative monster faces.
- Let children paint paper cups in bright monster colors like purple, green, orange, or blue, and set aside to dry.
- Once the paint is completely dry, help children attach googly eyes using glue, using one, two, three, or more eyes.
- Cut construction paper into monster features, horns, teeth, ears, tongues, or wild, spiky hair, in various colors.
- Glue the paper features onto the cup to create unique monster personalities with different expressions and characteristics.
- Display finished monsters on shelves, use them as party decorations, or attach a string to hang them from ceilings.
These lightweight three-dimensional monsters help young children understand how flat materials can become sculptural objects while encouraging creative character design decisions.
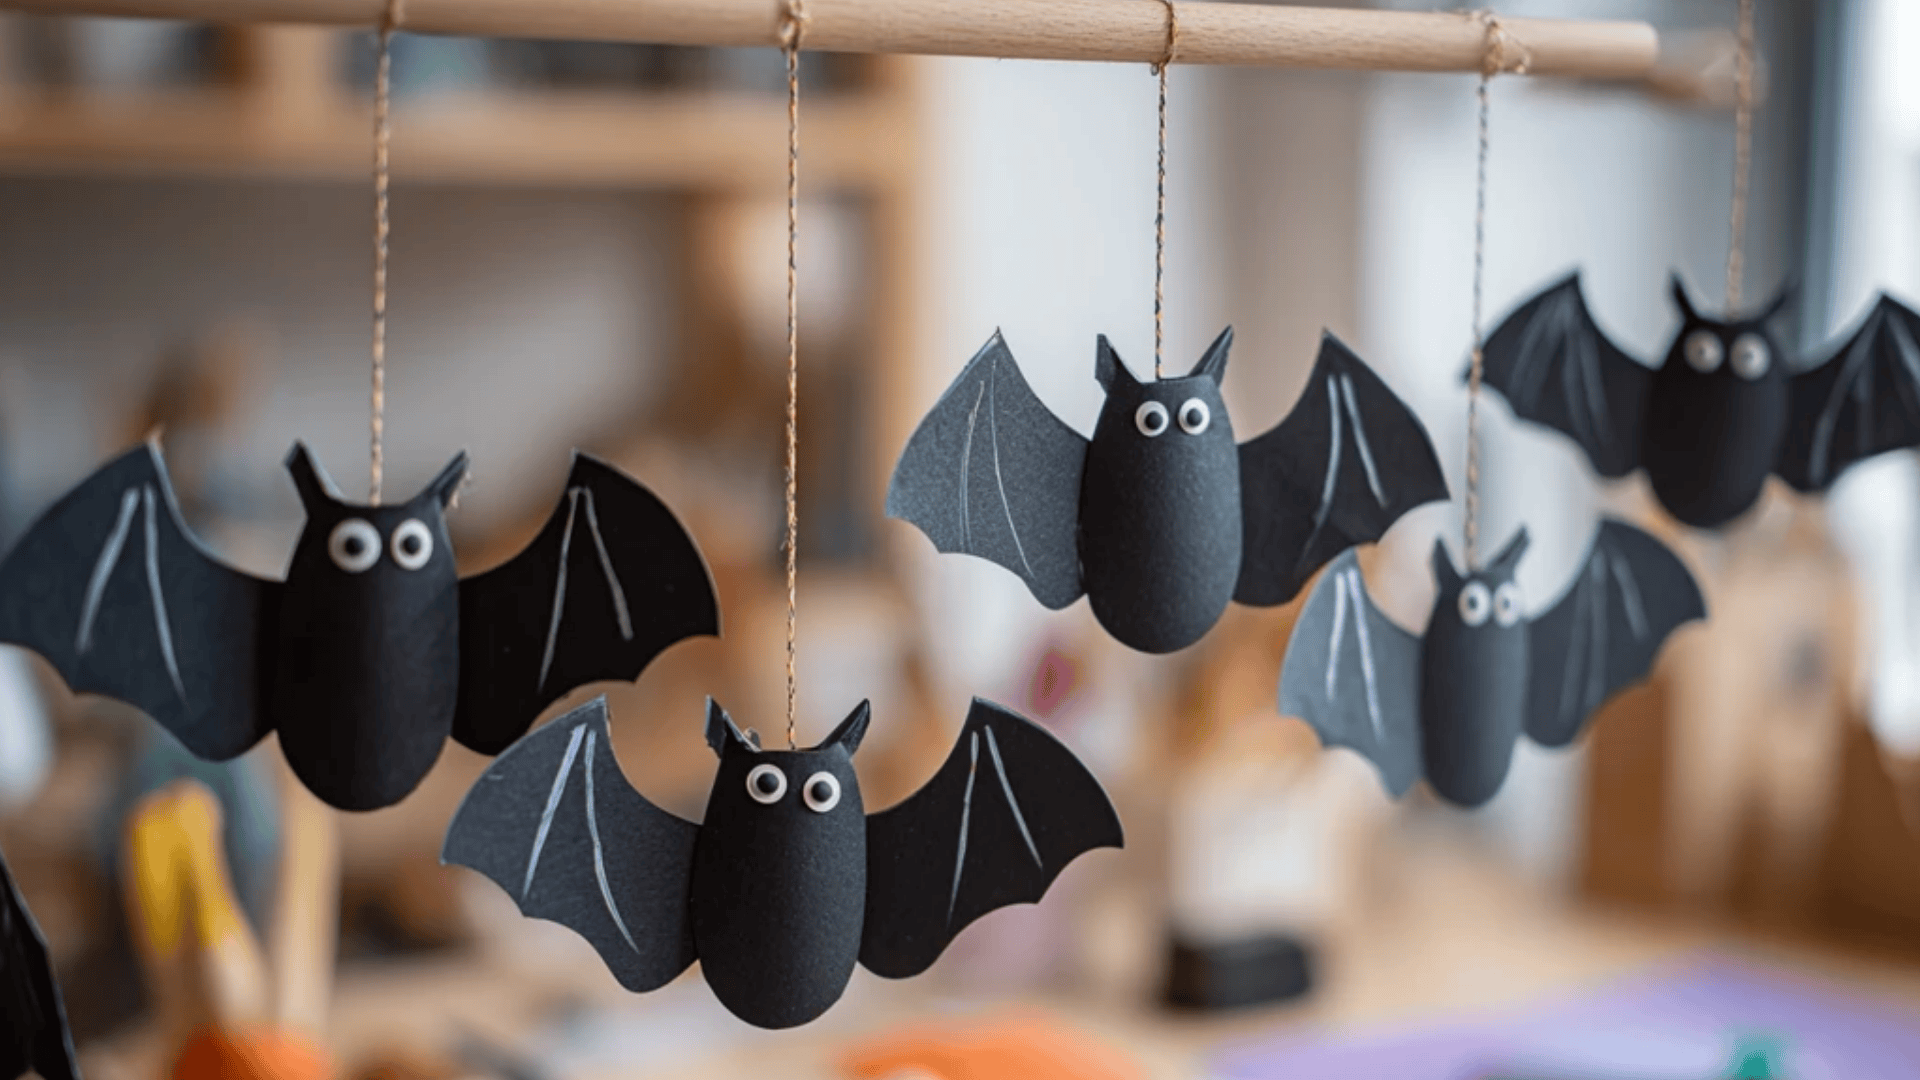
6. Toilet Paper Roll Bats
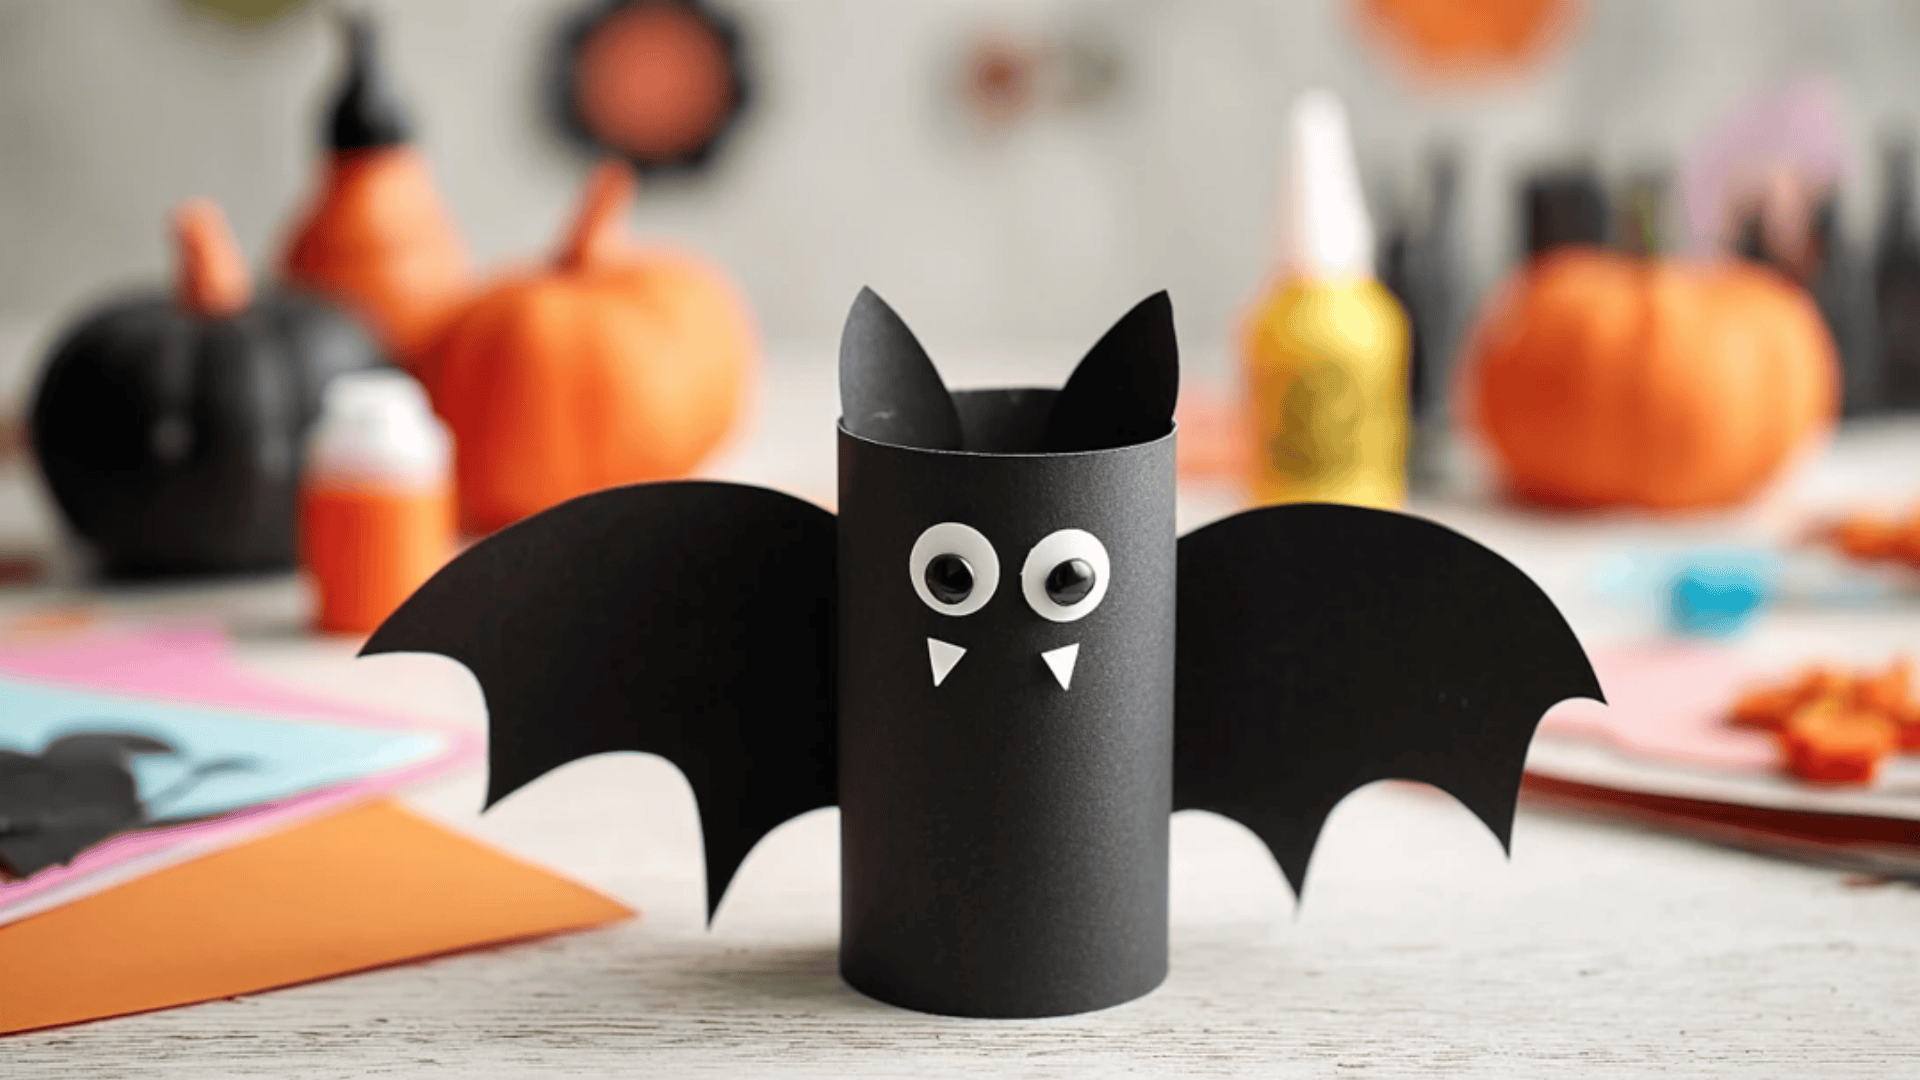
Create adorable flying bats using empty toilet paper rolls, black paint or construction paper, googly eyes, glue, and black cardstock for wings.
- Paint the toilet paper rolls black, or wrap them tightly in black construction paper and secure with glue along the seam.
- Cut bat-wing shapes from black cardstock, making them wide and slightly curved for a realistic flying appearance.
- Glue the wings to both sides of the toilet paper roll, positioning them in the middle section.
- Attach two googly eyes near the top of the roll, leaving space between them for a spooky look.
- Draw small white fangs with a paint marker or white correction pen at the bottom edge of the roll.
These adorable bats work well for preschoolers and elementary-age children, requiring minimal supervision once the materials are prepared and taking under 20 minutes to complete.
7. Egg Carton Halloween Creatures

Recycle cardboard egg cartons into tiny creatures using scissors, paint in various colors, googly eyes, pipe cleaners, glue, and felt scraps for creative details.
- Cut individual cups from cardboard egg cartons using scissors, creating separate sections for each creature you plan to make.
- Paint each cup in Halloween colors, black for spiders, orange for pumpkins, purple for monsters, and let dry thoroughly.
- Once dry, glue googly eyes onto each painted cup, using different sizes for varied creature personalities.
- For spiders, poke small holes on each side and insert pipe cleaner legs, bending them at angles for a crawling effect.
- Add extra details like felt wings for bats, paper fangs for vampires, or glitter for sparkly decorative touches.
These three-dimensional creatures are great for children four and up, encouraging recycling awareness while creating lightweight decorations that can hang as festive garland.
8. Pom-Pom Eyeball Monsters
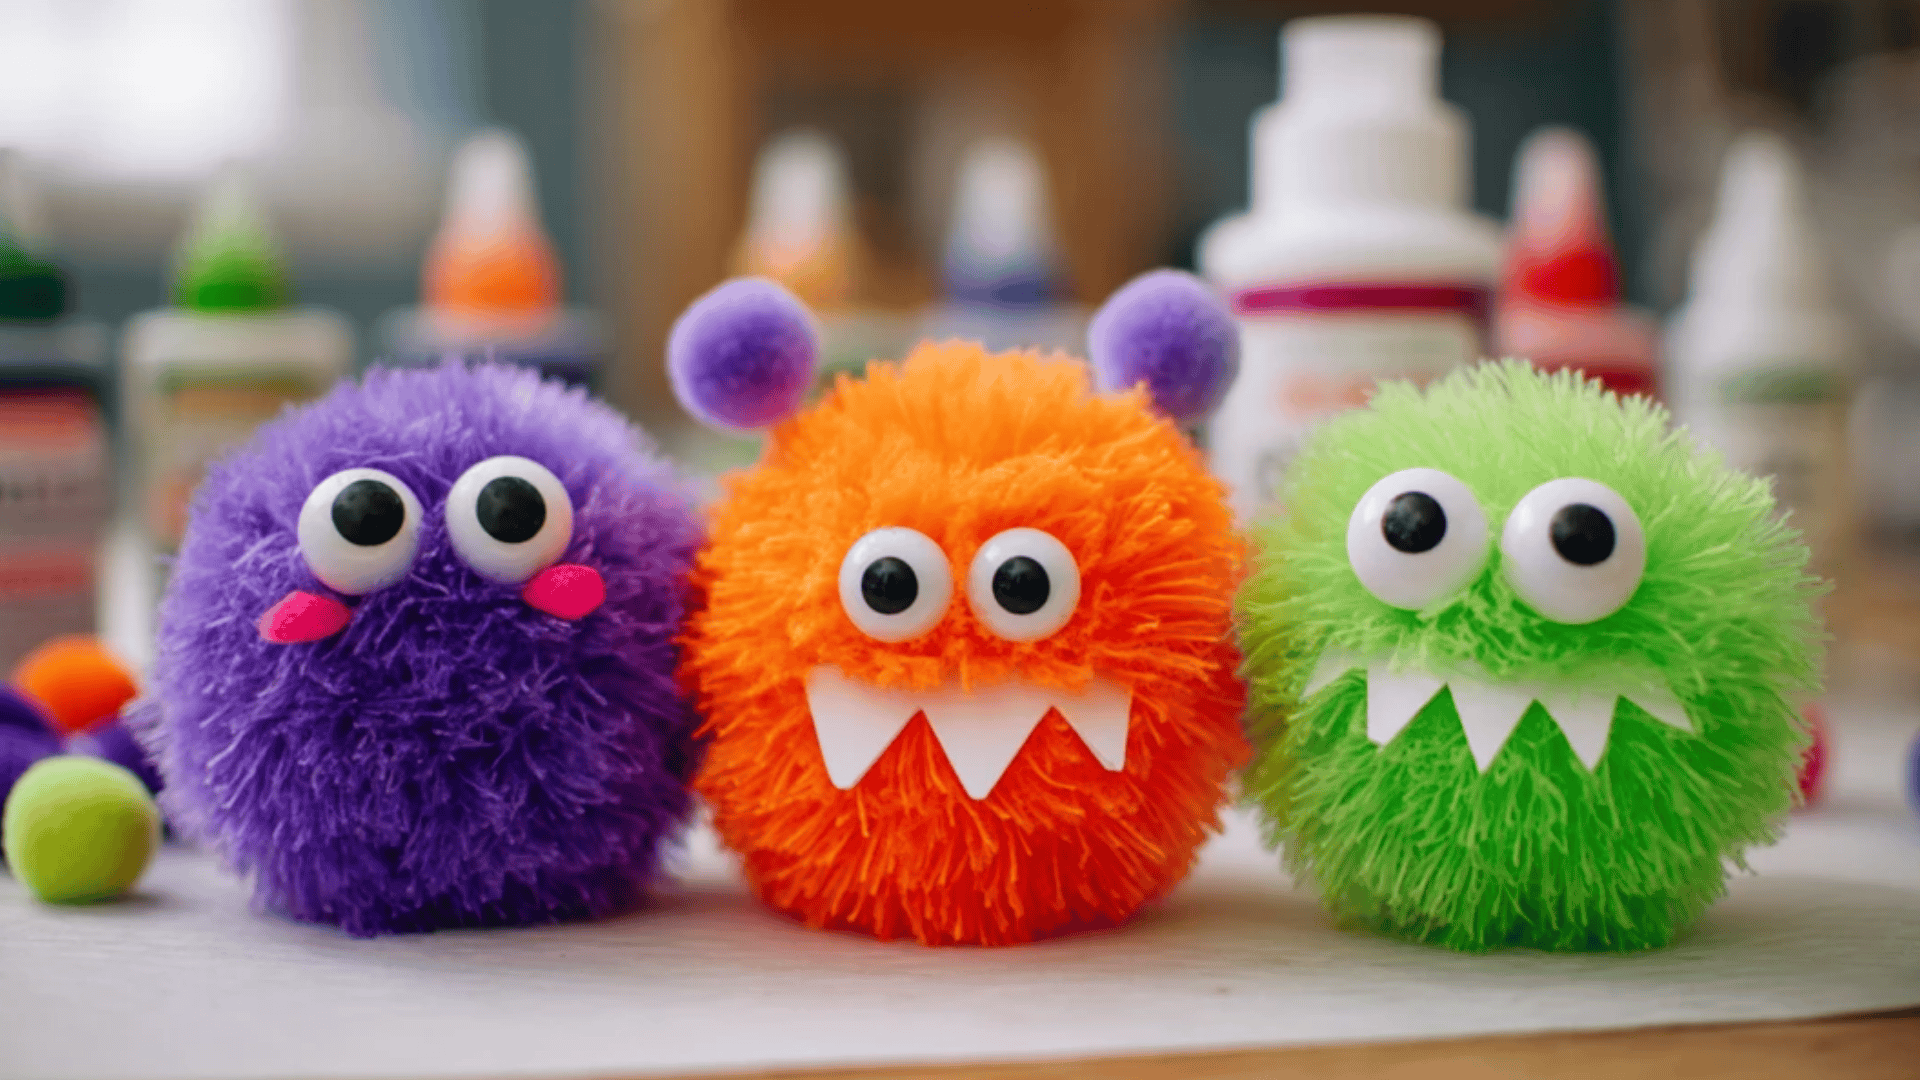
Create fluffy creatures using large craft pom-poms in Halloween colors, oversized googly eyes, construction paper, glue, and markers for silly faces.
- Provide pom-poms in various Halloween colors like purple, orange, green, and black, and let children choose their favorites for monsters.
- Glue pom-poms onto cardstock paper, using one large pom-pom or clustering several together for bigger monster bodies.
- Attach oversized googly eyes to the pom-poms, using anywhere from one to five eyes for silly multiple-eyed effects.
- Cut small pieces of construction paper for mouths, teeth, tongues, or other facial features, using various bright colors for contrast.
- Let children arrange and glue features onto their pom-pom monsters, creating unique personalities and funny expressions that make them laugh.
This low-mess craft develops gluing skills and creative decision-making while the fuzzy pom-poms provide gentle sensory input that preschoolers enjoy.
9. Paper Plate Mummies and Spiders
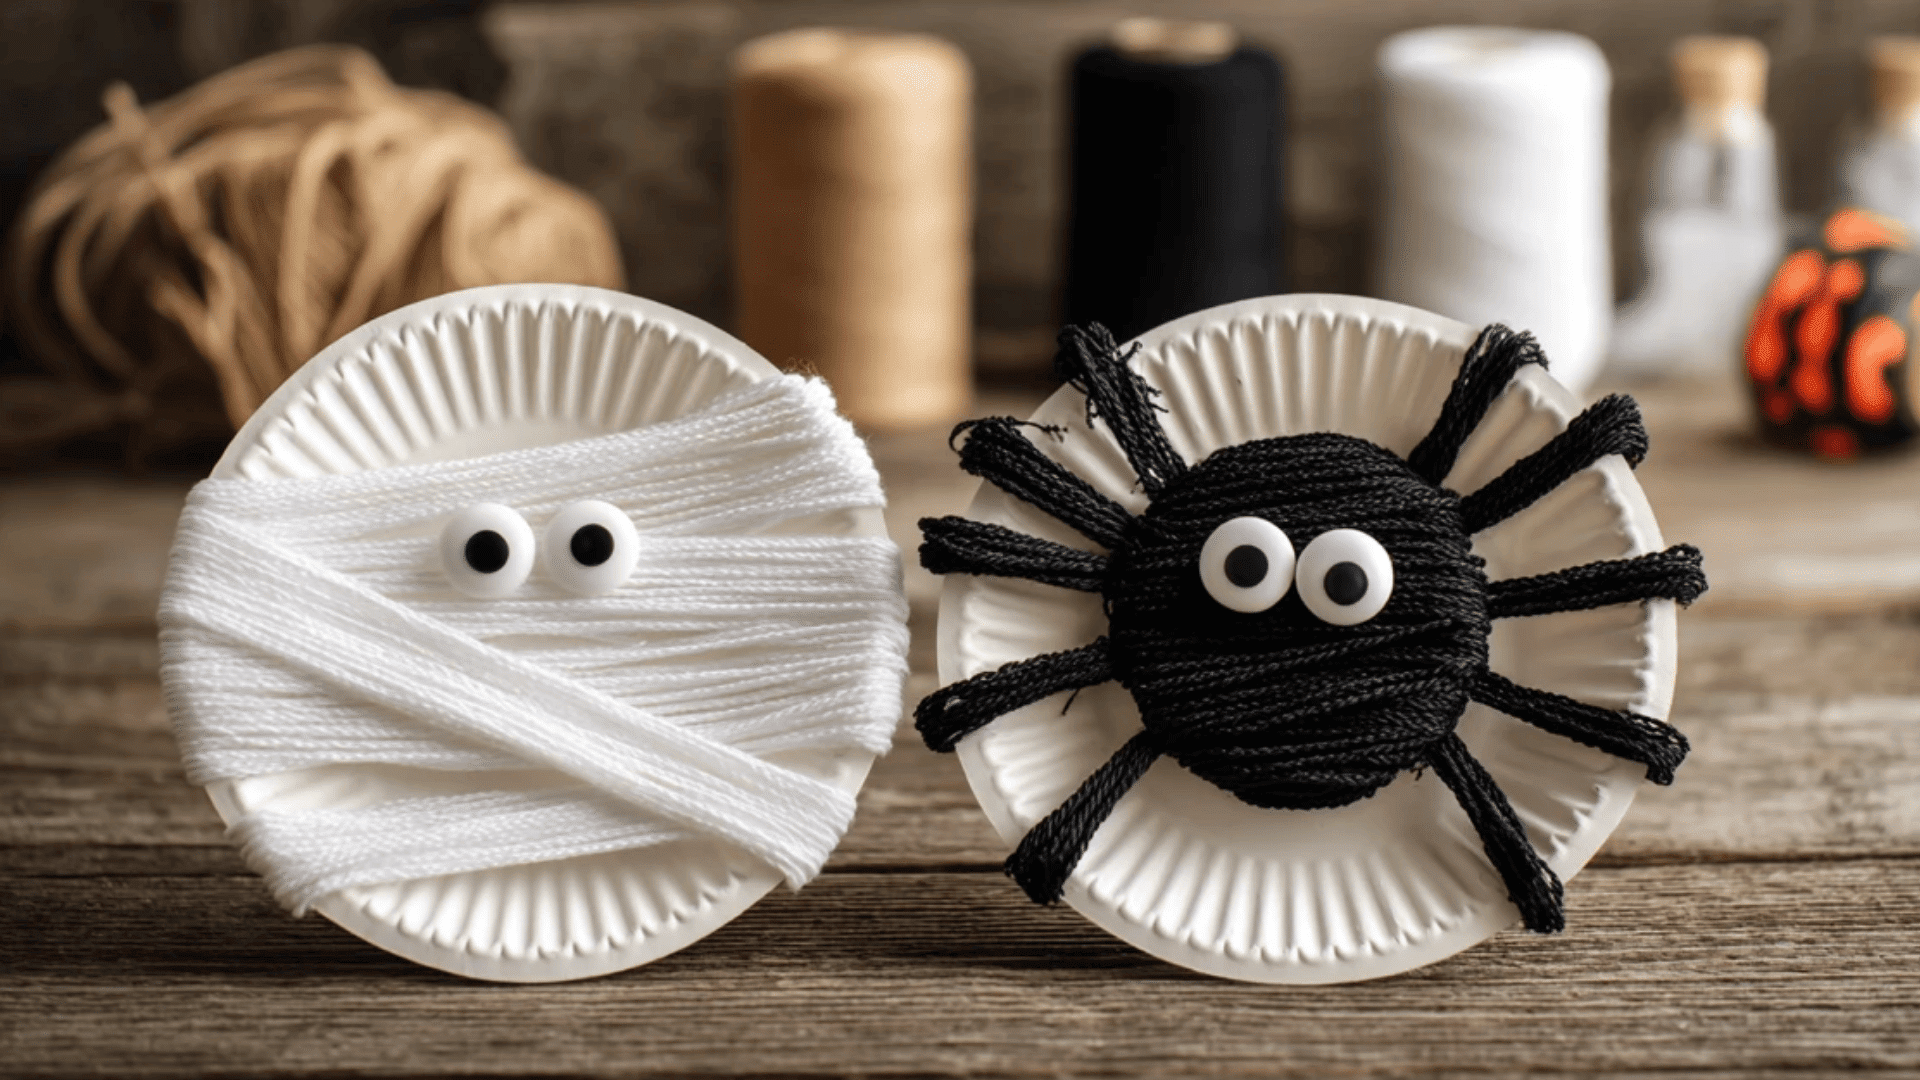
Change paper plates into spooky creatures using white yarn or paper strips, googly eyes, glue, black paint, and black pipe cleaners for spider legs.
- For mummies, wrap white yarn around a paper plate in random crisscross patterns, leaving an open space in the center.
- Secure the yarn ends to the back of the plate with tape or glue, making sure the wrapping is secure.
- Glue two googly eyes in the open space between the yarn wrappings to create the mummy’s face.
- For spiders, paint the paper plate black and let it dry, then glue googly eyes in the center.
- Attach eight black pipe cleaners around the plate edges as legs, bending them into creepy crawling positions.
10. Paper Witch Hat Craft
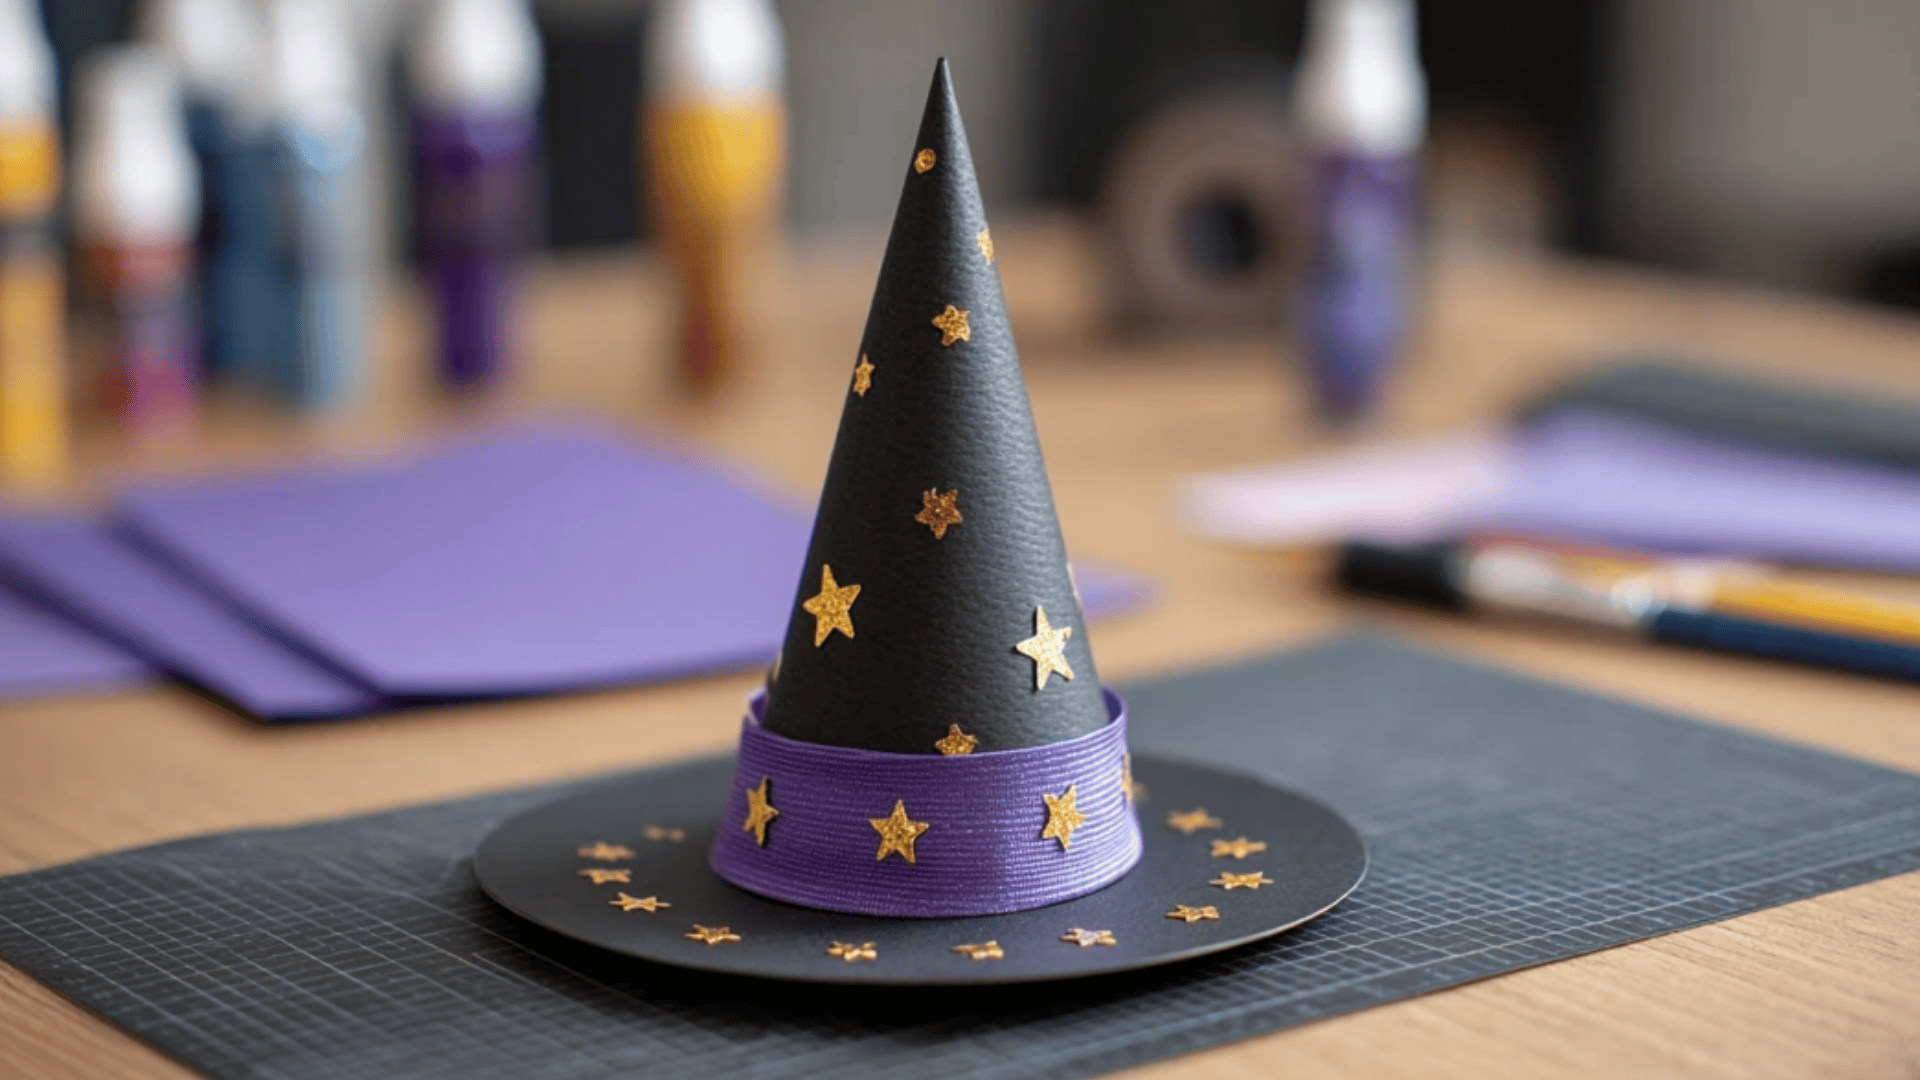
Craft miniature witch hats with black construction paper, purple or orange cardstock, scissors, glue, tape, and decorative stickers or markers for festive finishing touches.
- Roll a piece of black construction paper into a cone, adjusting the size to your desired hat height, and secure it with tape.
- Trim the bottom edge of the cone evenly so it sits flat when placed on a table.
- Cut a circle from black paper (about 5-6 inches in diameter) and cut a smaller circle in the center to create the hat brim.
- Insert the cone through the center hole and glue the cone base to the brim, securing it firmly around the rim.
- Add a colorful hatband cut from purple or orange cardstock, plus decorative star stickers, glitter, or drawn buckles for personality.
These charming hats are suitable for children 4 and older and make wonderful decorations for dolls, stuffed animals, or Halloween party table settings.
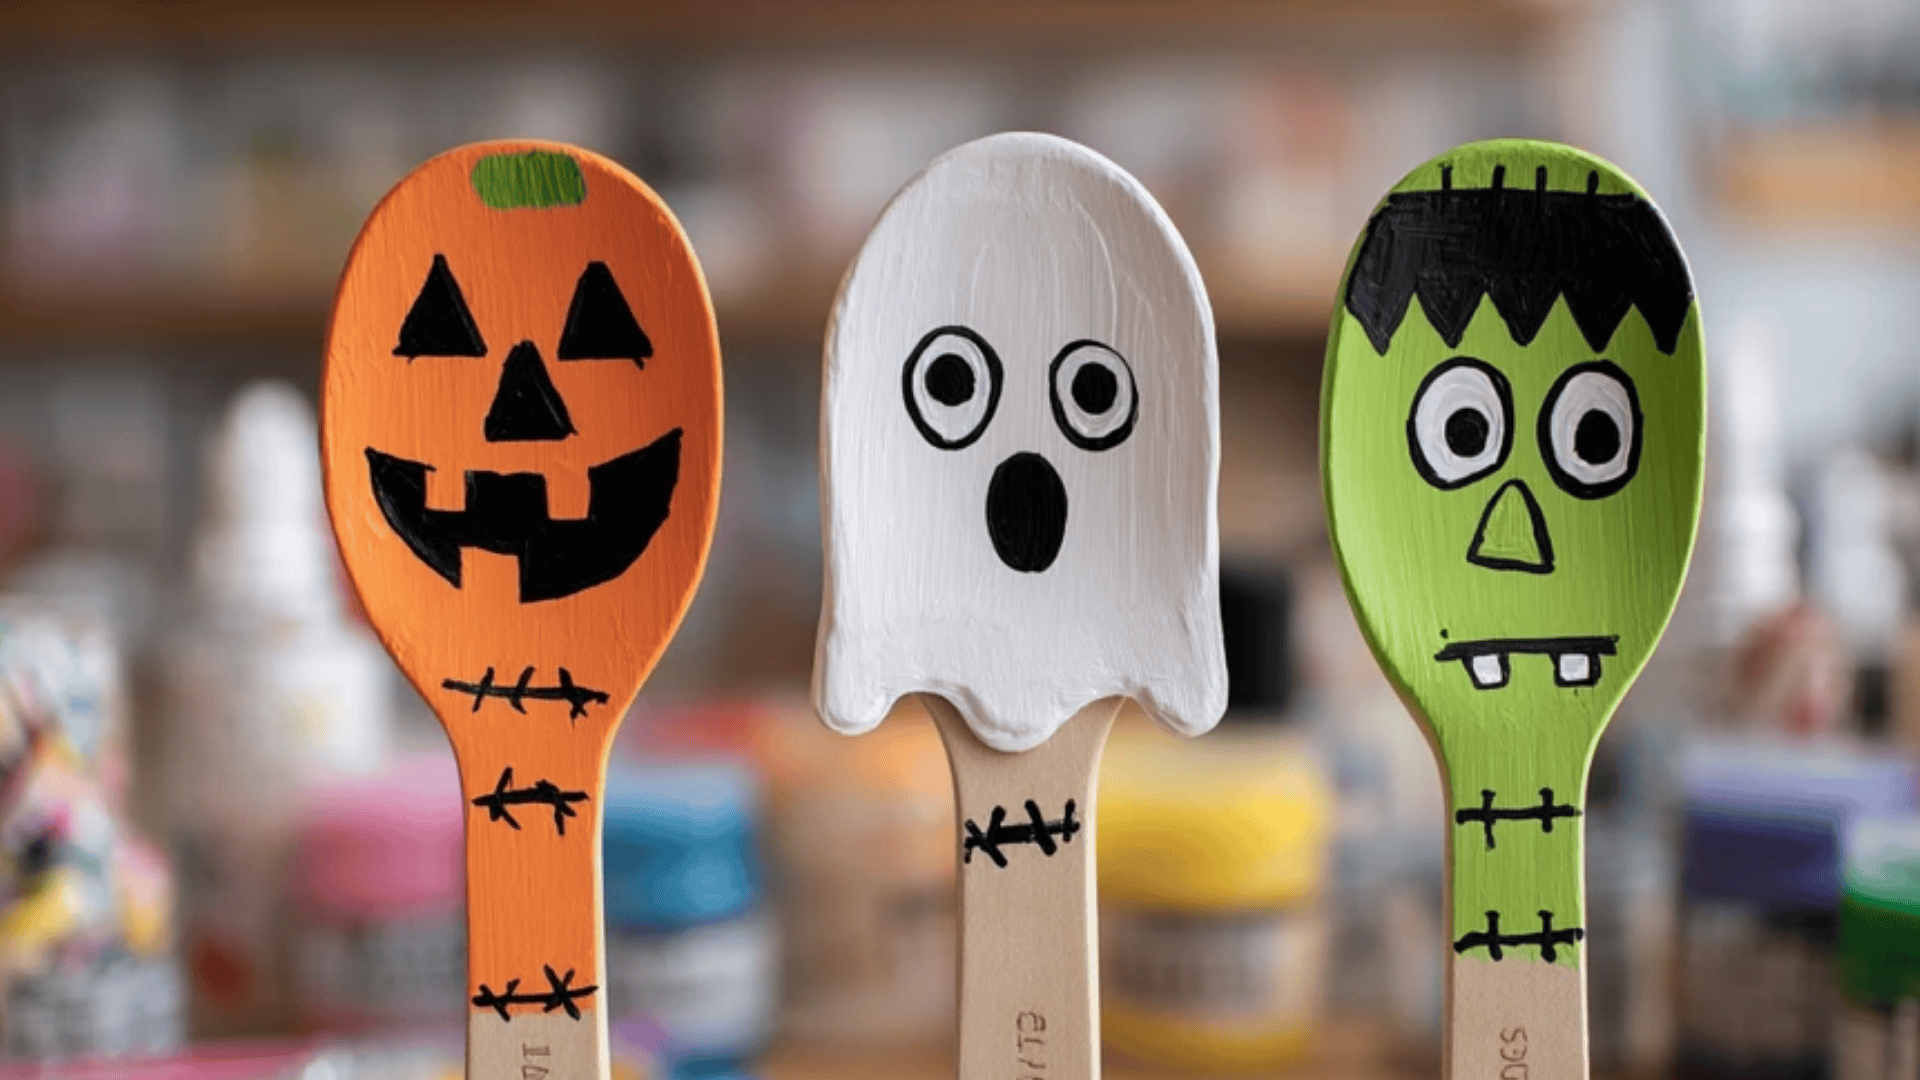
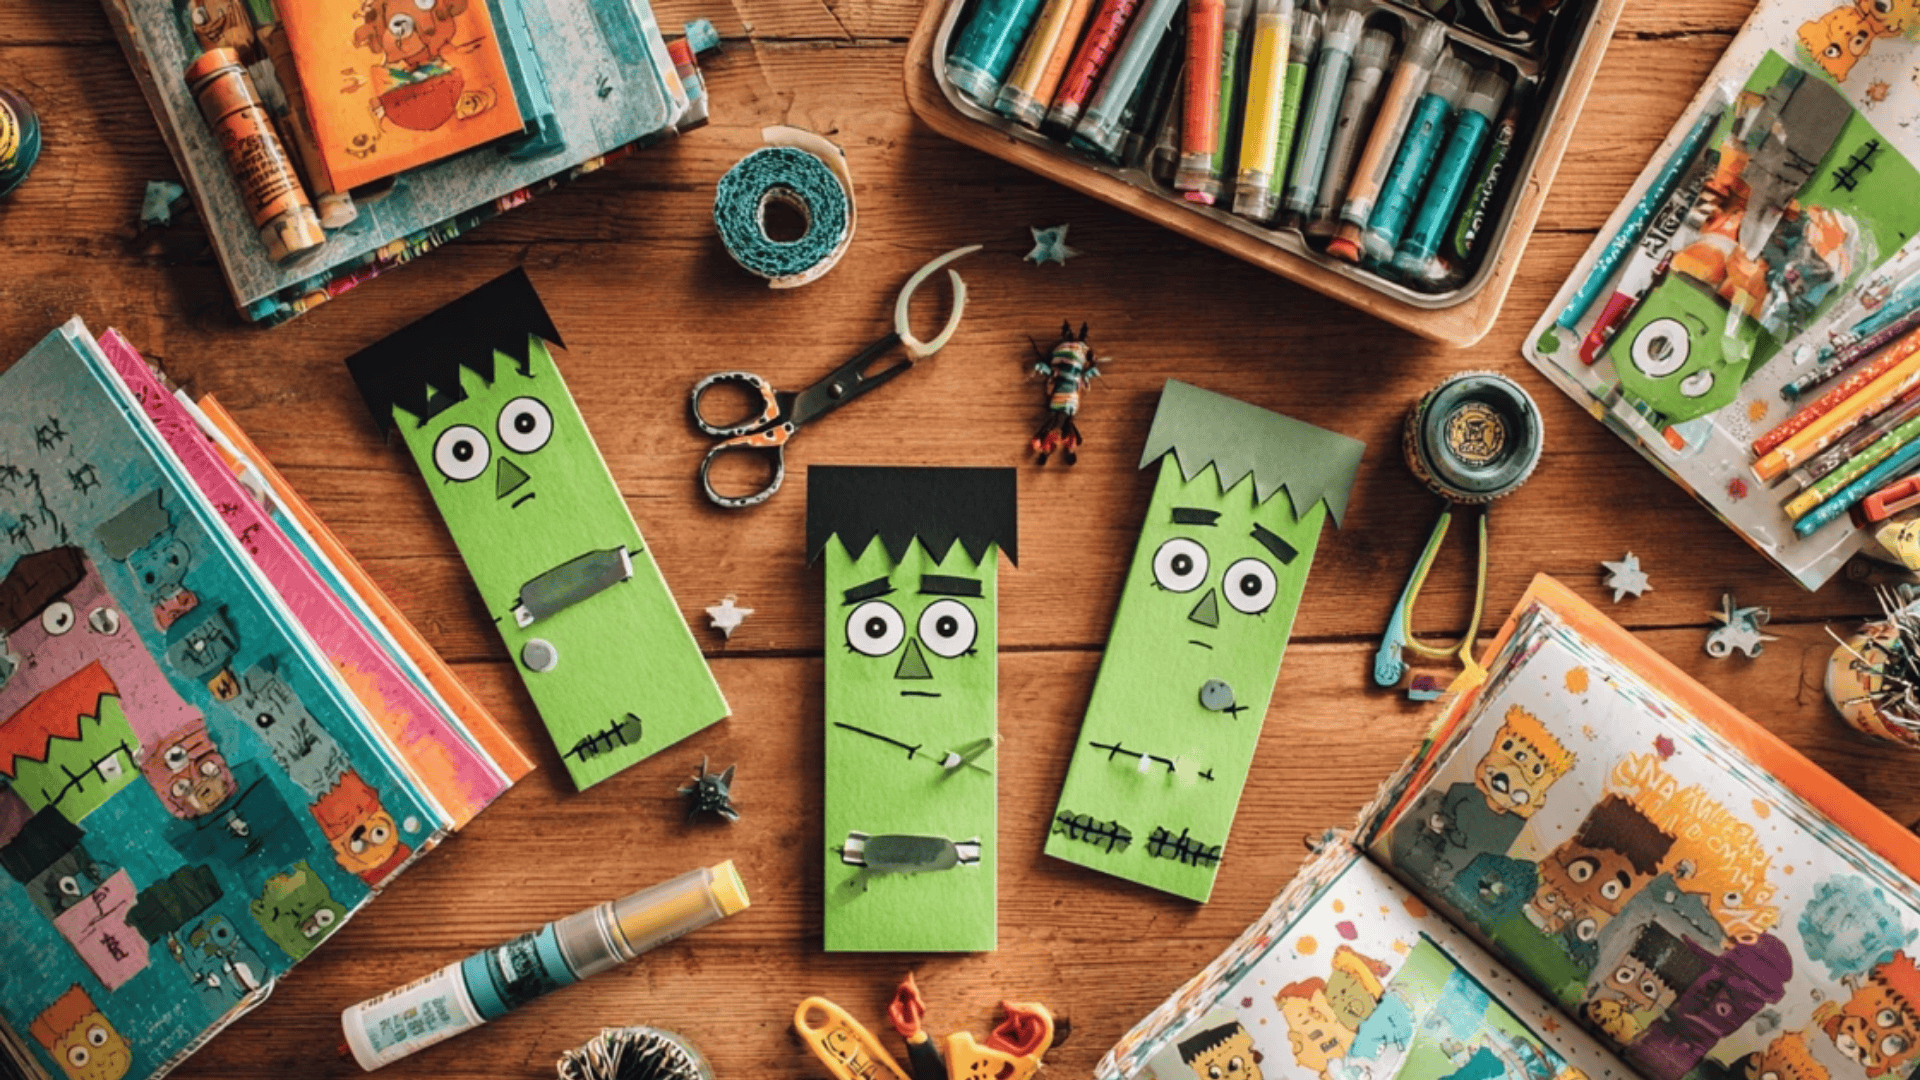
11. Popsicle Stick Halloween Characters
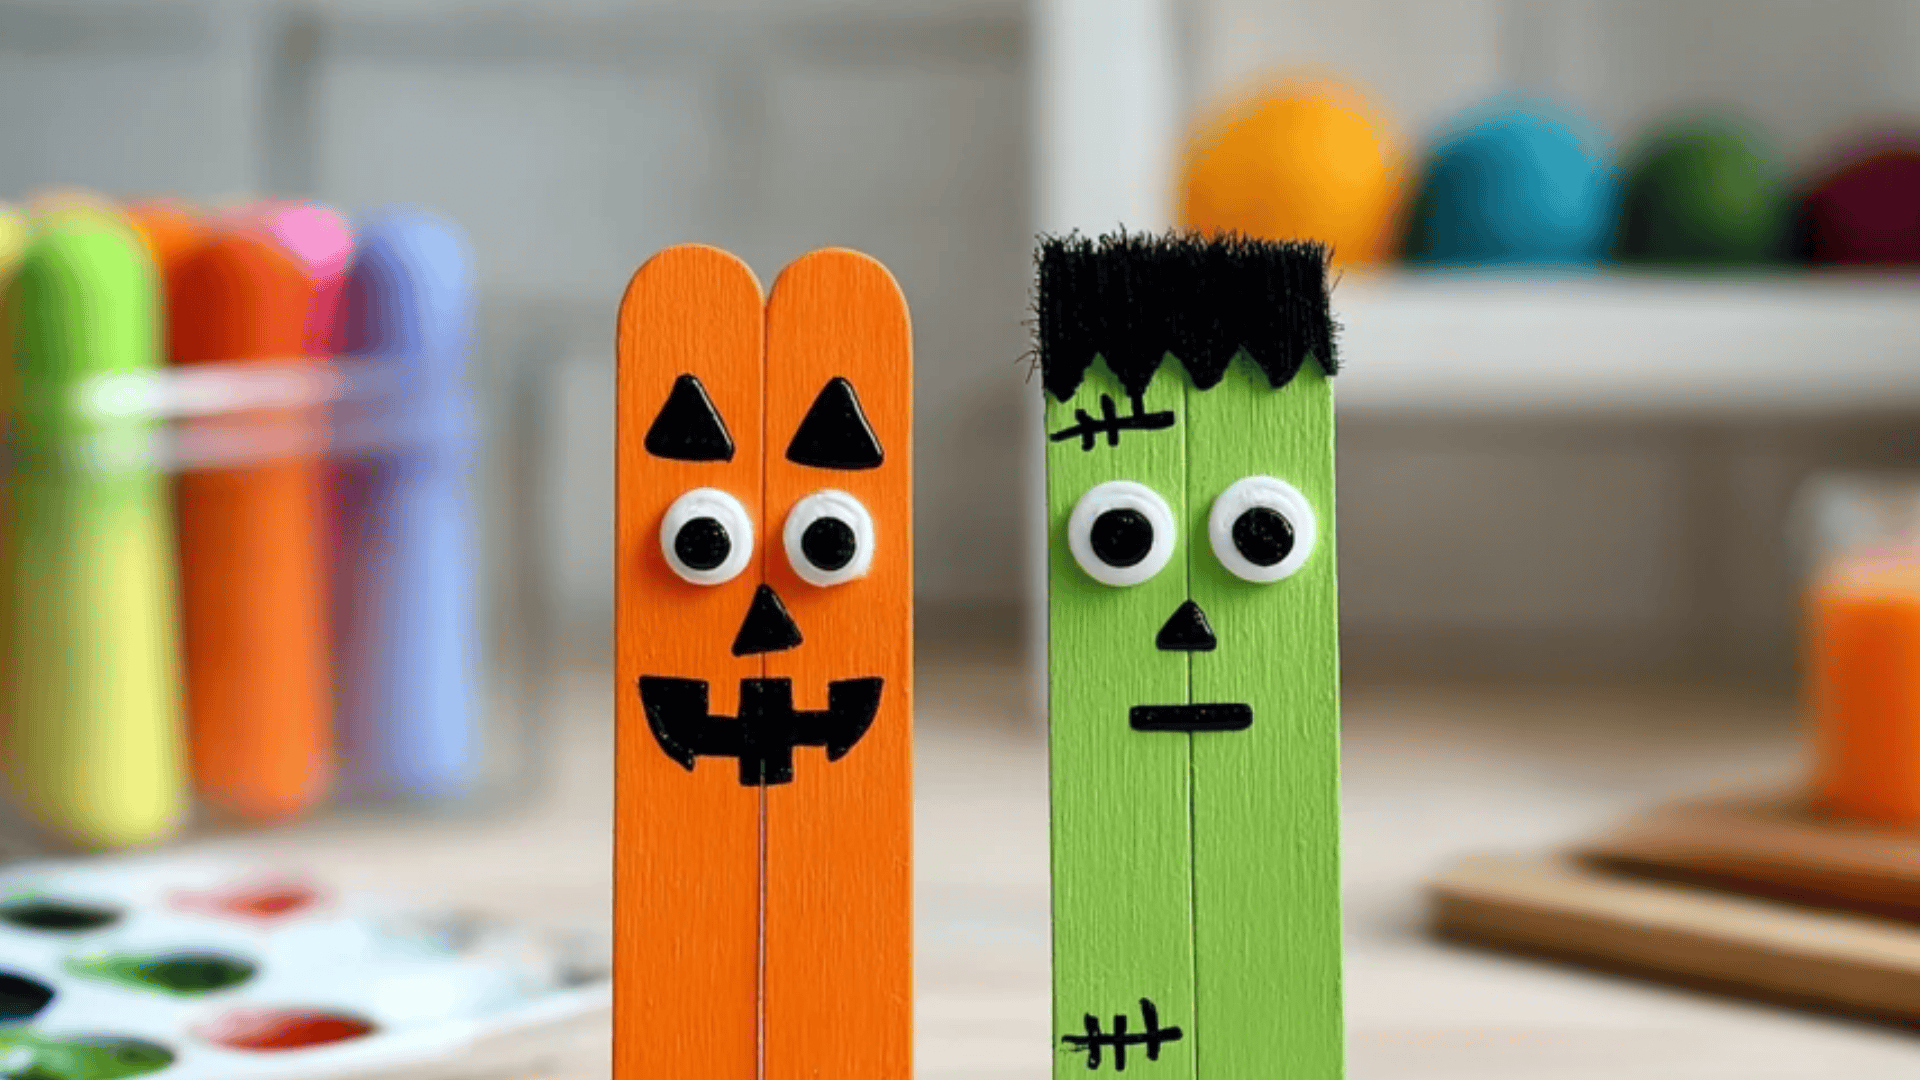
Make colorful Halloween bookmarks or magnets with craft sticks, orange/green/white paint, markers, googly eyes, yarn, and glue for endless creative possibilities.
- Paint craft sticks in Halloween colors: orange for pumpkins, green for Frankenstein, and white for ghosts, and let them dry completely.
- Once dry, add facial features with black markers: eyes, mouths, noses, or scars, depending on the character.
- Glue googly eyes on top of the painted features for added dimension and a fun, playful appearance.
- Cut small pieces of yarn and glue to the top as hair for Frankenstein or witches, or leave bare for pumpkins.
- Add finishing touches like orange stems for pumpkins or green bolts for Frankenstein, using markers or small paper cutouts.
This craft is ideal for children five and older who can handle painting and small detail work, though younger kids can participate with assistance.
12. Spider Web Weaving Plate
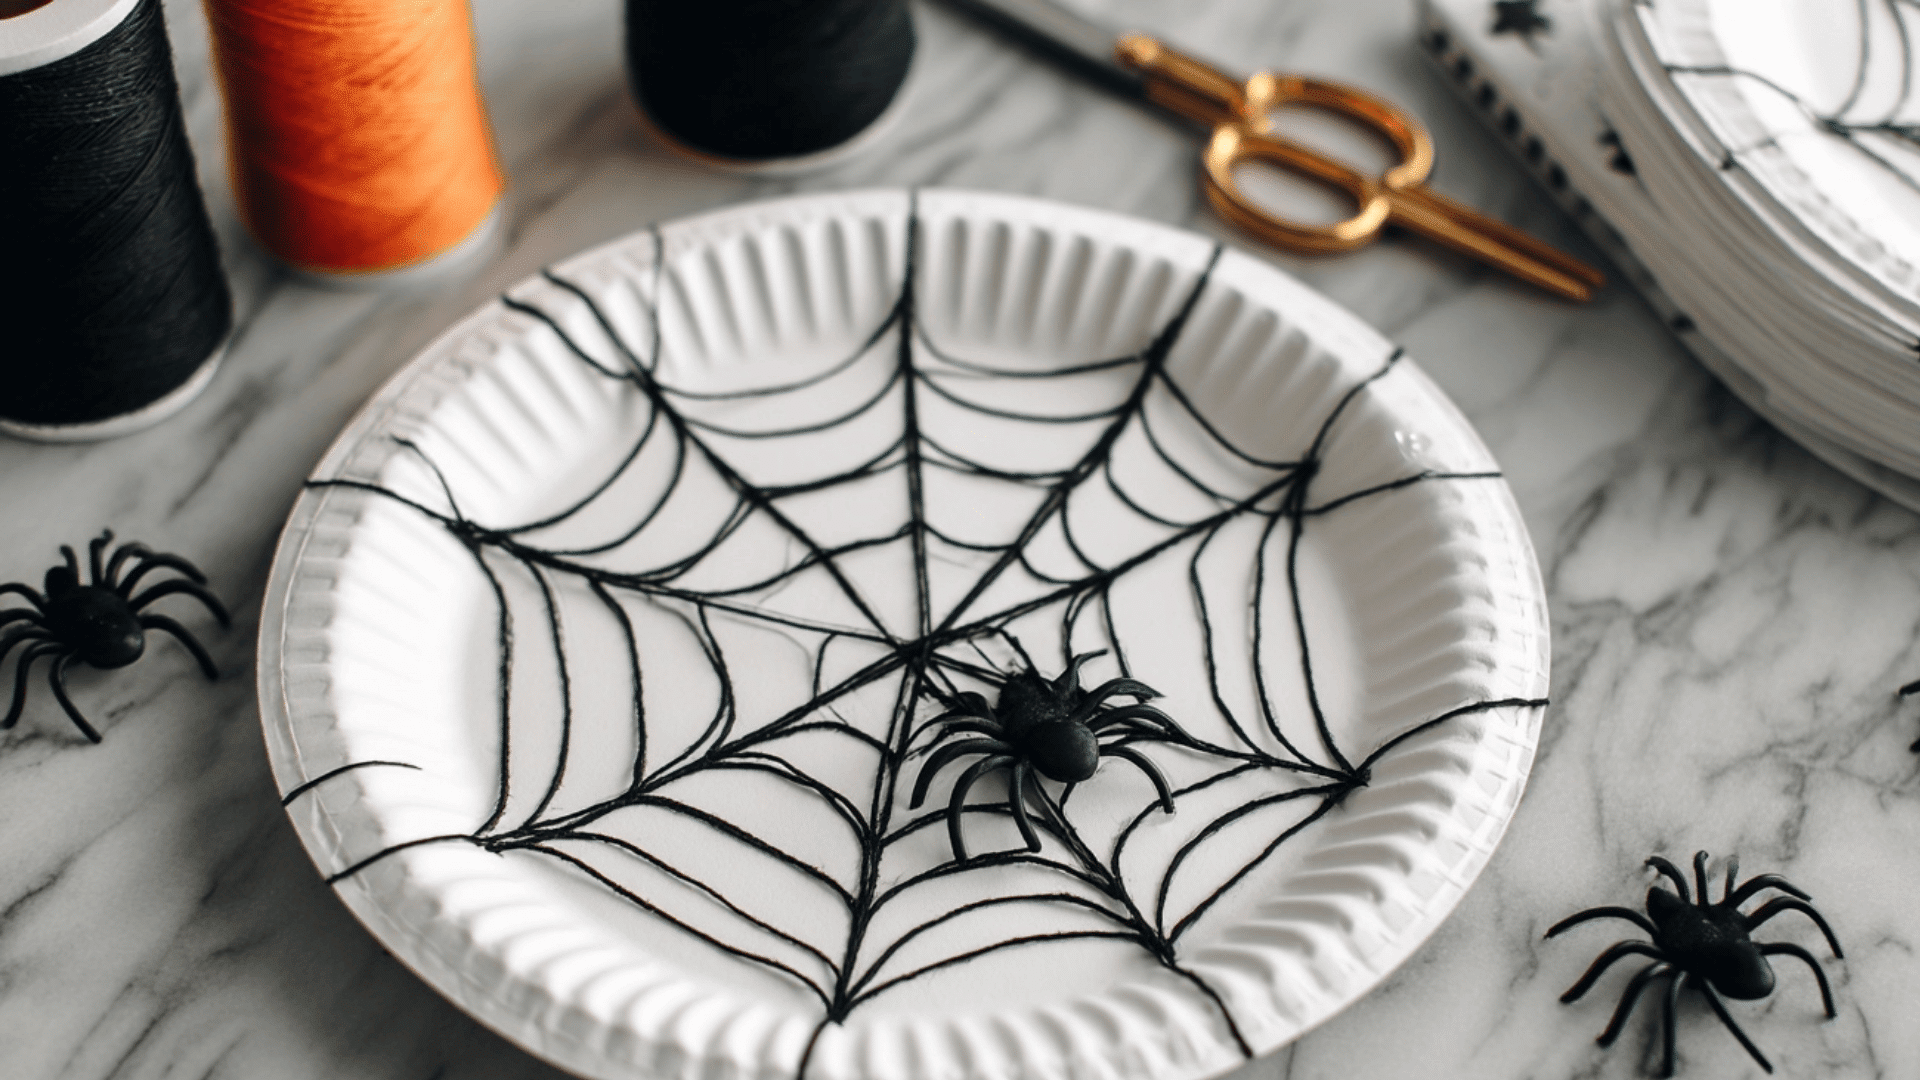
Teach basic weaving with paper plates, yarn or string, scissors, tape, and an optional plastic spider for this interactive skill-building craft.
- Cut small notches (about 1/2 inch deep) evenly around the entire edge of a paper plate, spacing them roughly an inch apart.
- Tape one end of the yarn securely to the back of the plate, bringing it through one notch to the front.
- Stretch the yarn across the plate to the opposite side, catching it in a notch, then bring it back across at a different angle.
- Continue weaving the yarn back and forth through different notches, creating a web pattern that can be tight or loose.
- When satisfied with the web design, tape the yarn end on the back and glue a plastic spider in the center.
This craft is perfect for children five and older, developing hand-eye coordination and teaching the basics of weaving while creating impressive Halloween decorations for windows or walls.
13. Paper Chain Ghost Garland
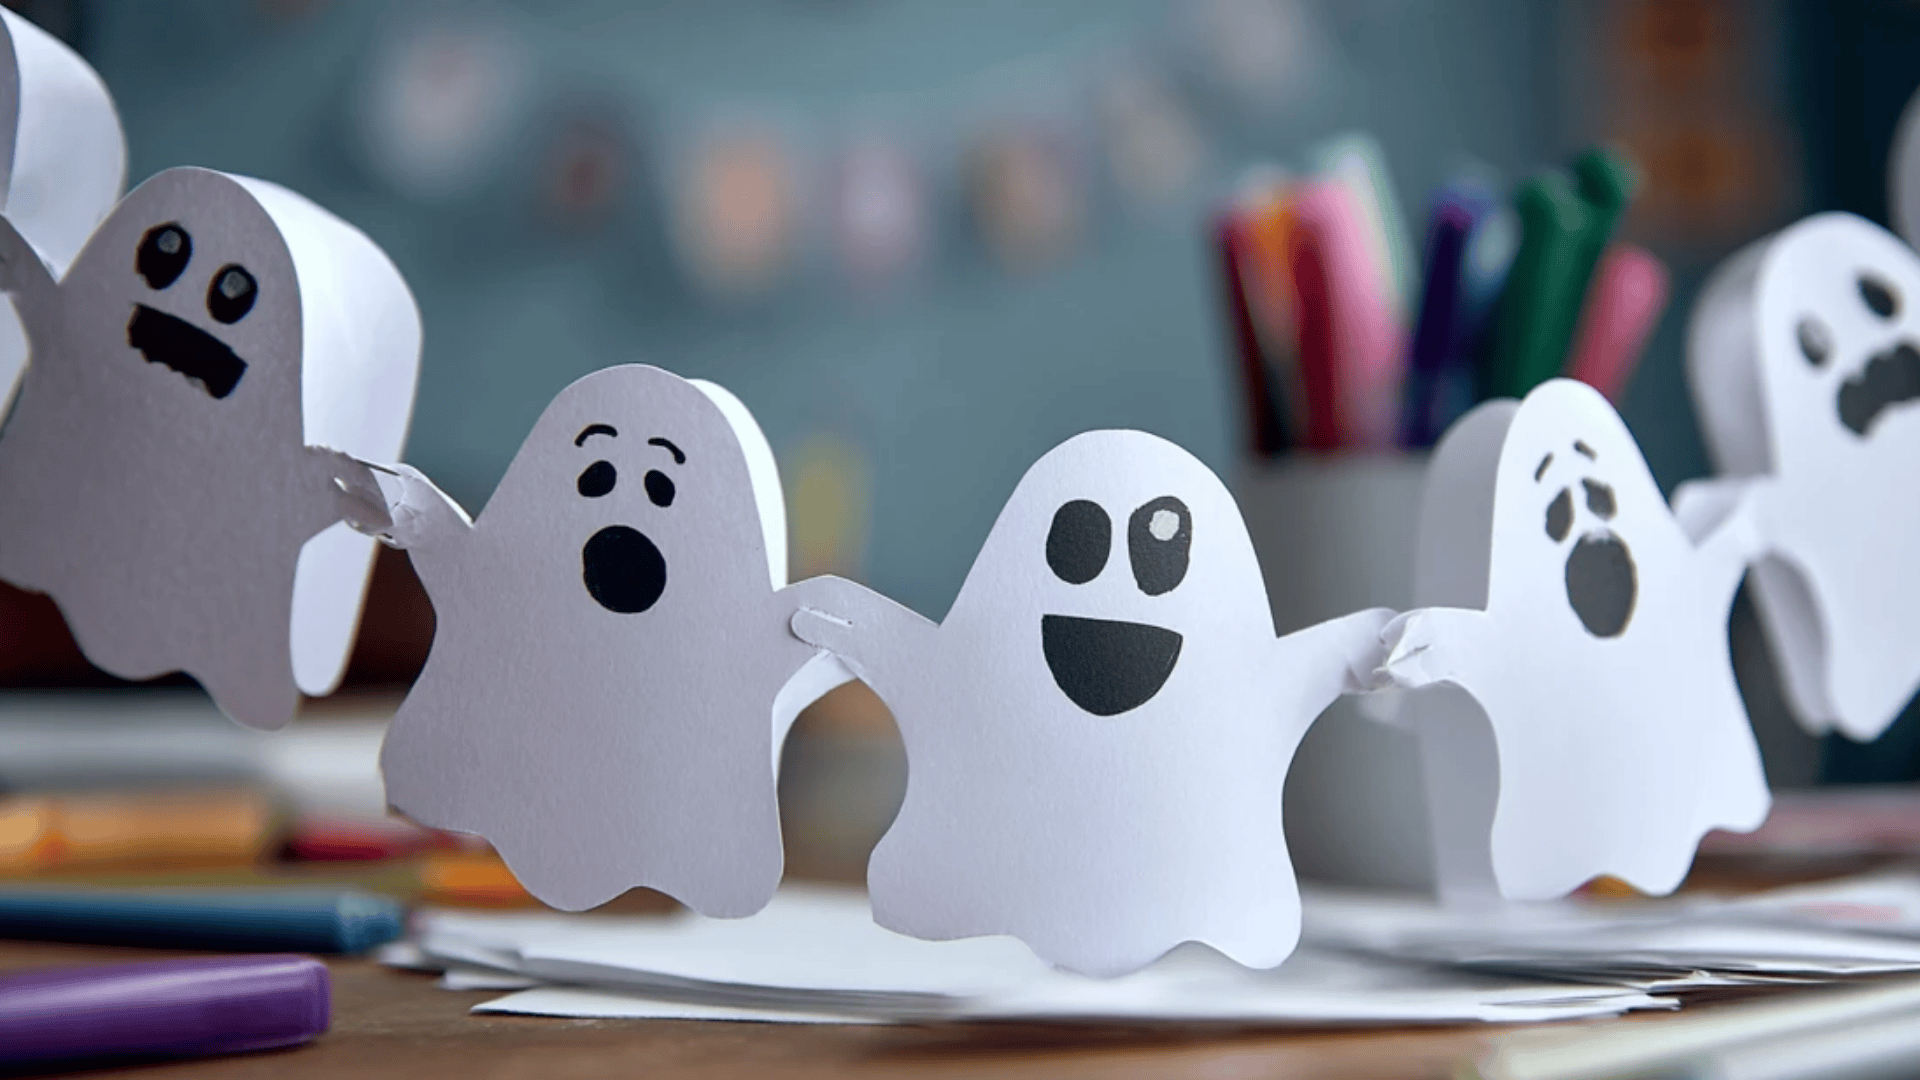
Make festive chains using white construction paper strips, markers for faces, a stapler or glue, and string for hanging decorative ghost garlands.
- Cut white construction paper into strips about one inch wide and six inches long to create the paper chain links.
- Have children draw simple ghost faces on each strip using black markers before connecting them into a chain.
- Form the first strip into a circle and staple or glue the ends together to create the initial chain link.
- Thread the next strip through the first circle before connecting its ends, creating an interlocking chain pattern that continues growing.
- Continue adding decorated ghost face links until the chain reaches the desired length for hanging across doorways or walls.
This repetitive craft is perfect for developing fine motor skills while creating decorations and children love seeing their chain grow longer with each link.
14. Cotton Swab Skeleton
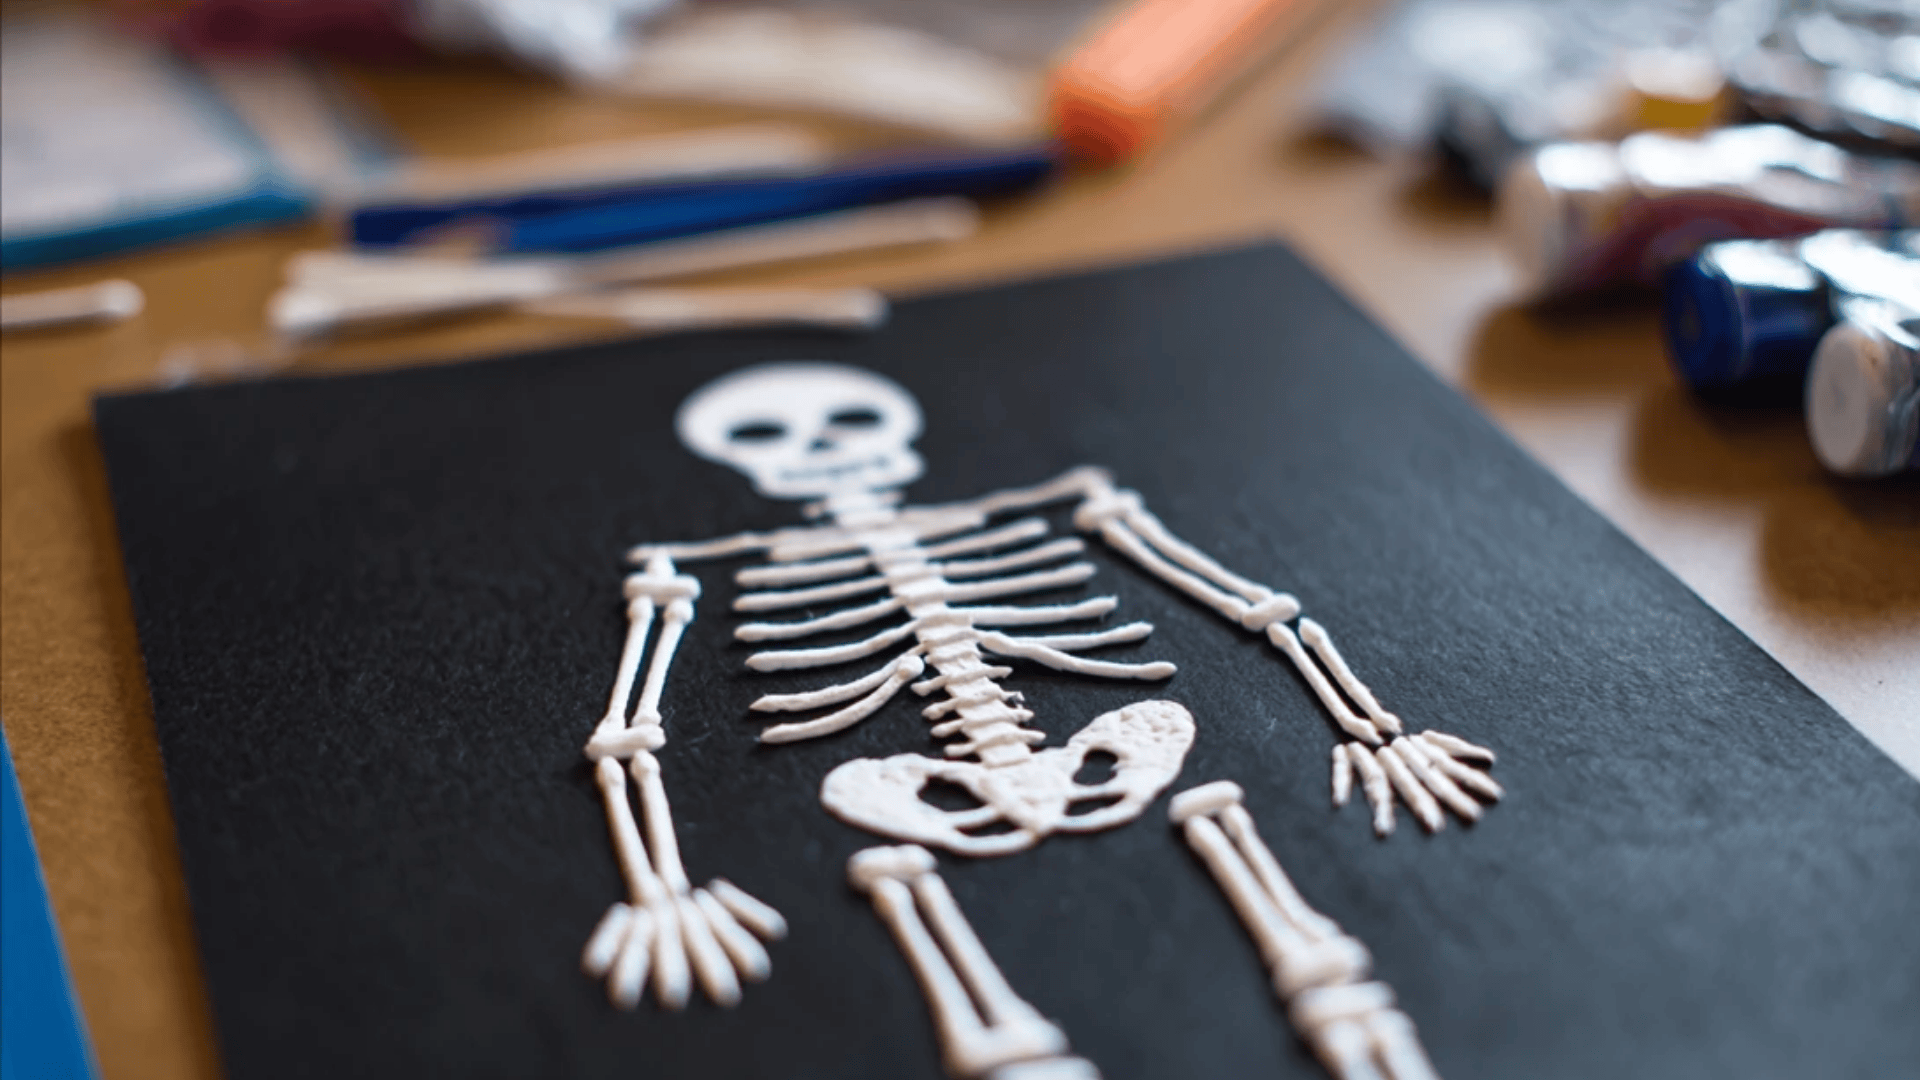
Build basic anatomy using black construction paper, white cotton swabs (Q-tips), glue, and scissors for creating simple skeleton shapes on dark backgrounds.
- Cut cotton swabs into different lengths to represent various bones, including long bones for arms and legs, and shorter pieces for ribs.
- Show children the basic skeleton structure by pointing out where bones go in their own bodies before gluing swabs to paper.
- Start with one swab for the spine running vertically down the center of the black construction paper as the foundation.
- Add rib bones by gluing swabs horizontally across the spine area, and attach arm and leg bones extending outward from the body.
- Create a skull shape using a small paper circle or several swabs arranged in a round head shape at the top.
This craft combines science education with art as kids discover basic skeleton structure while creating striking white-on-black contrast decorations.
15. Pumpkin Watercolor Resist Art
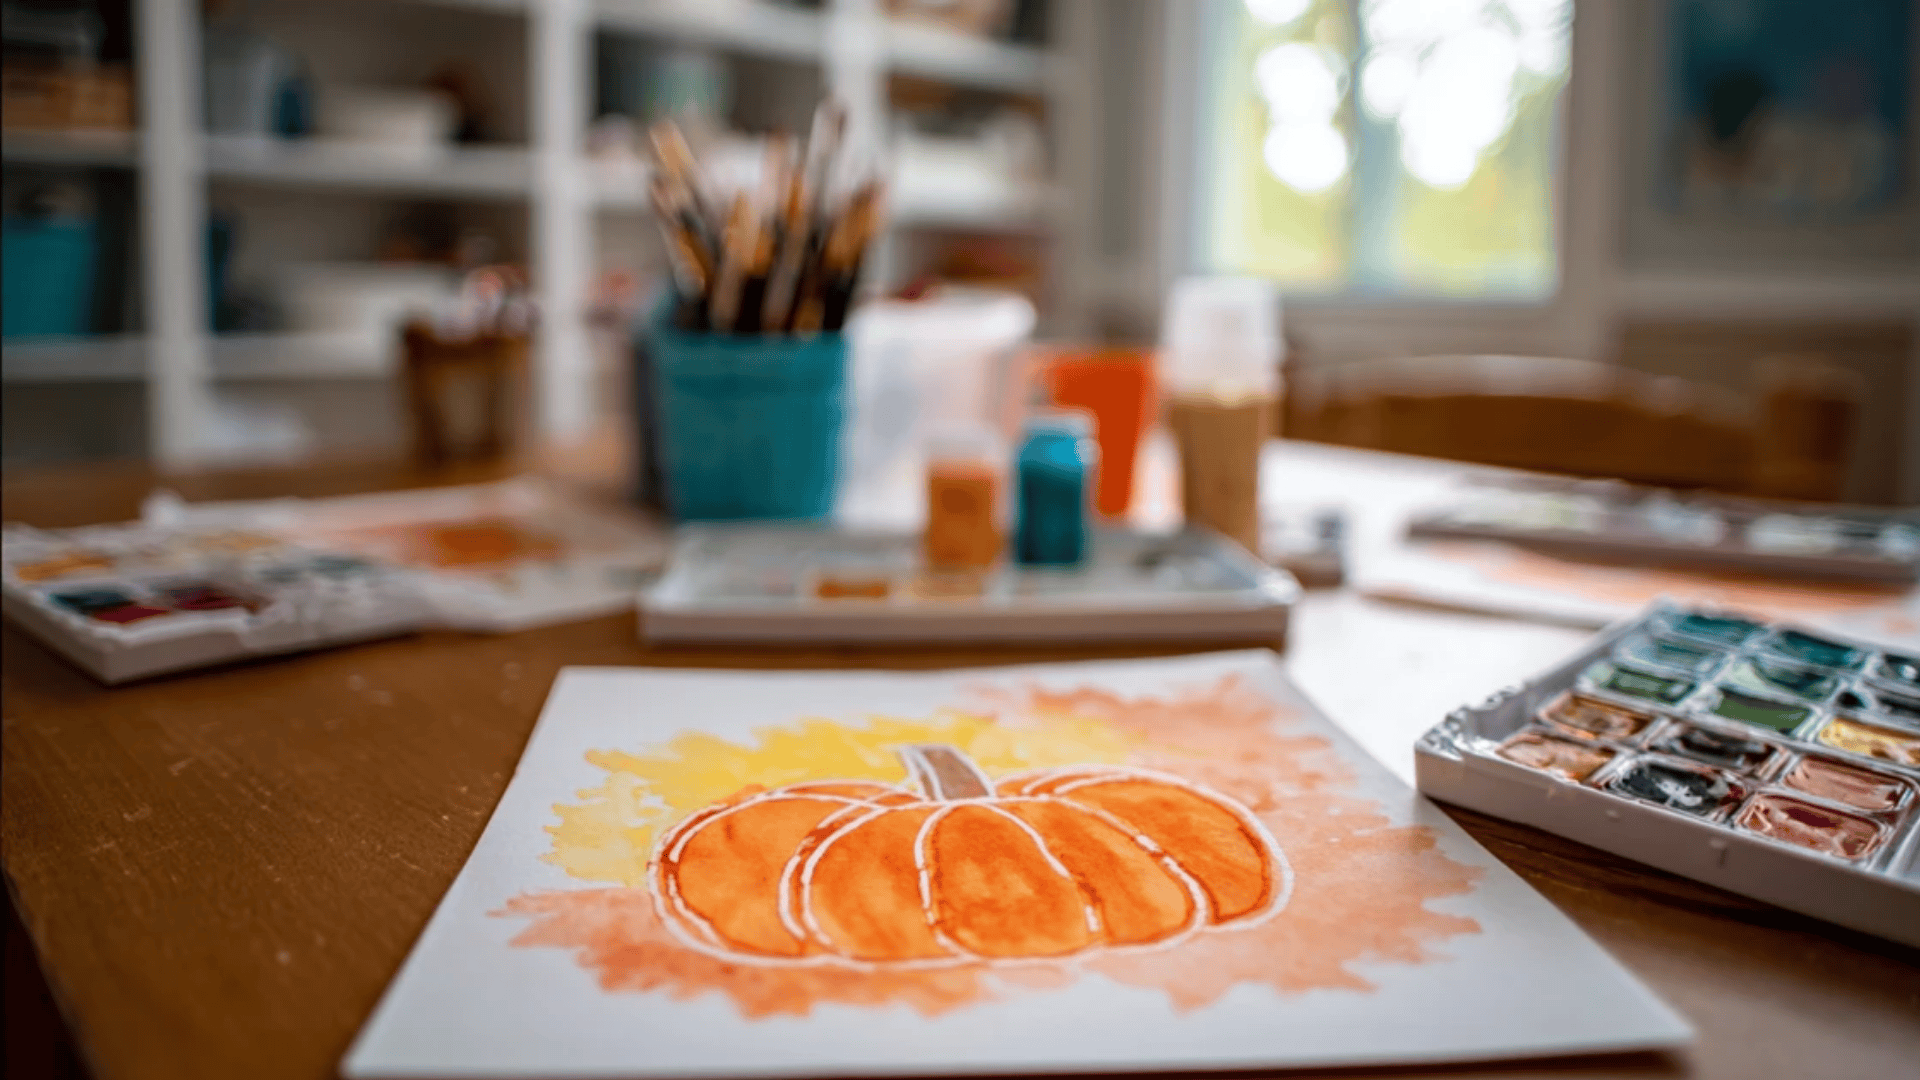
Create magical art reveals with white paper, white crayons, watercolor paints, paintbrushes, water cups, and table salt for an optional sparkly crystallized texture.
- Use white crayons to draw pumpkin outlines or spider web patterns on white paper, pressing very firmly for good wax coverage.
- Paint over the entire paper with watercolors in Halloween colors, watching the crayon drawings magically resist the paint.
- For spider webs, use blue or purple watercolors and paint the entire background while the web lines stay white.
- While the watercolor paint is still wet, sprinkle table salt over the spider webs to create frosty, crystallized textures.
- Let the artwork dry completely, then gently brush away excess salt crystals to reveal the beautiful textured web patterns.
This resist art technique fascinates children five and up, combining art and simple science to produce impressive results that look more complex than the effort required.
16. Painted Rock Monsters

Alter smooth rocks using acrylic paint in bright colors, googly eyes, paintbrushes, and permanent markers for creating permanent monster rock decorations.
- Collect smooth rocks from outside or purchase flat river rocks from craft stores, washing and drying them completely before painting.
- Paint rocks in solid bright monster colors like purple, green, orange, or blue, and let them dry completely between coats.
- Once the base coat dries, add googly eyes with strong craft glue, positioning them in funny arrangements to create monster personalities.
- Use permanent markers or paint to add details such as mouths, teeth, spots, stripes, and other monster features.
- Seal finished rocks with clear acrylic sealer spray outside to protect paint from the weather if using them as outdoor decorations.
These permanent decorations can be used year after year, and the rock-painting process is calming, producing durable keepsakes that won’t tear.
17. Paper Bag Pumpkin
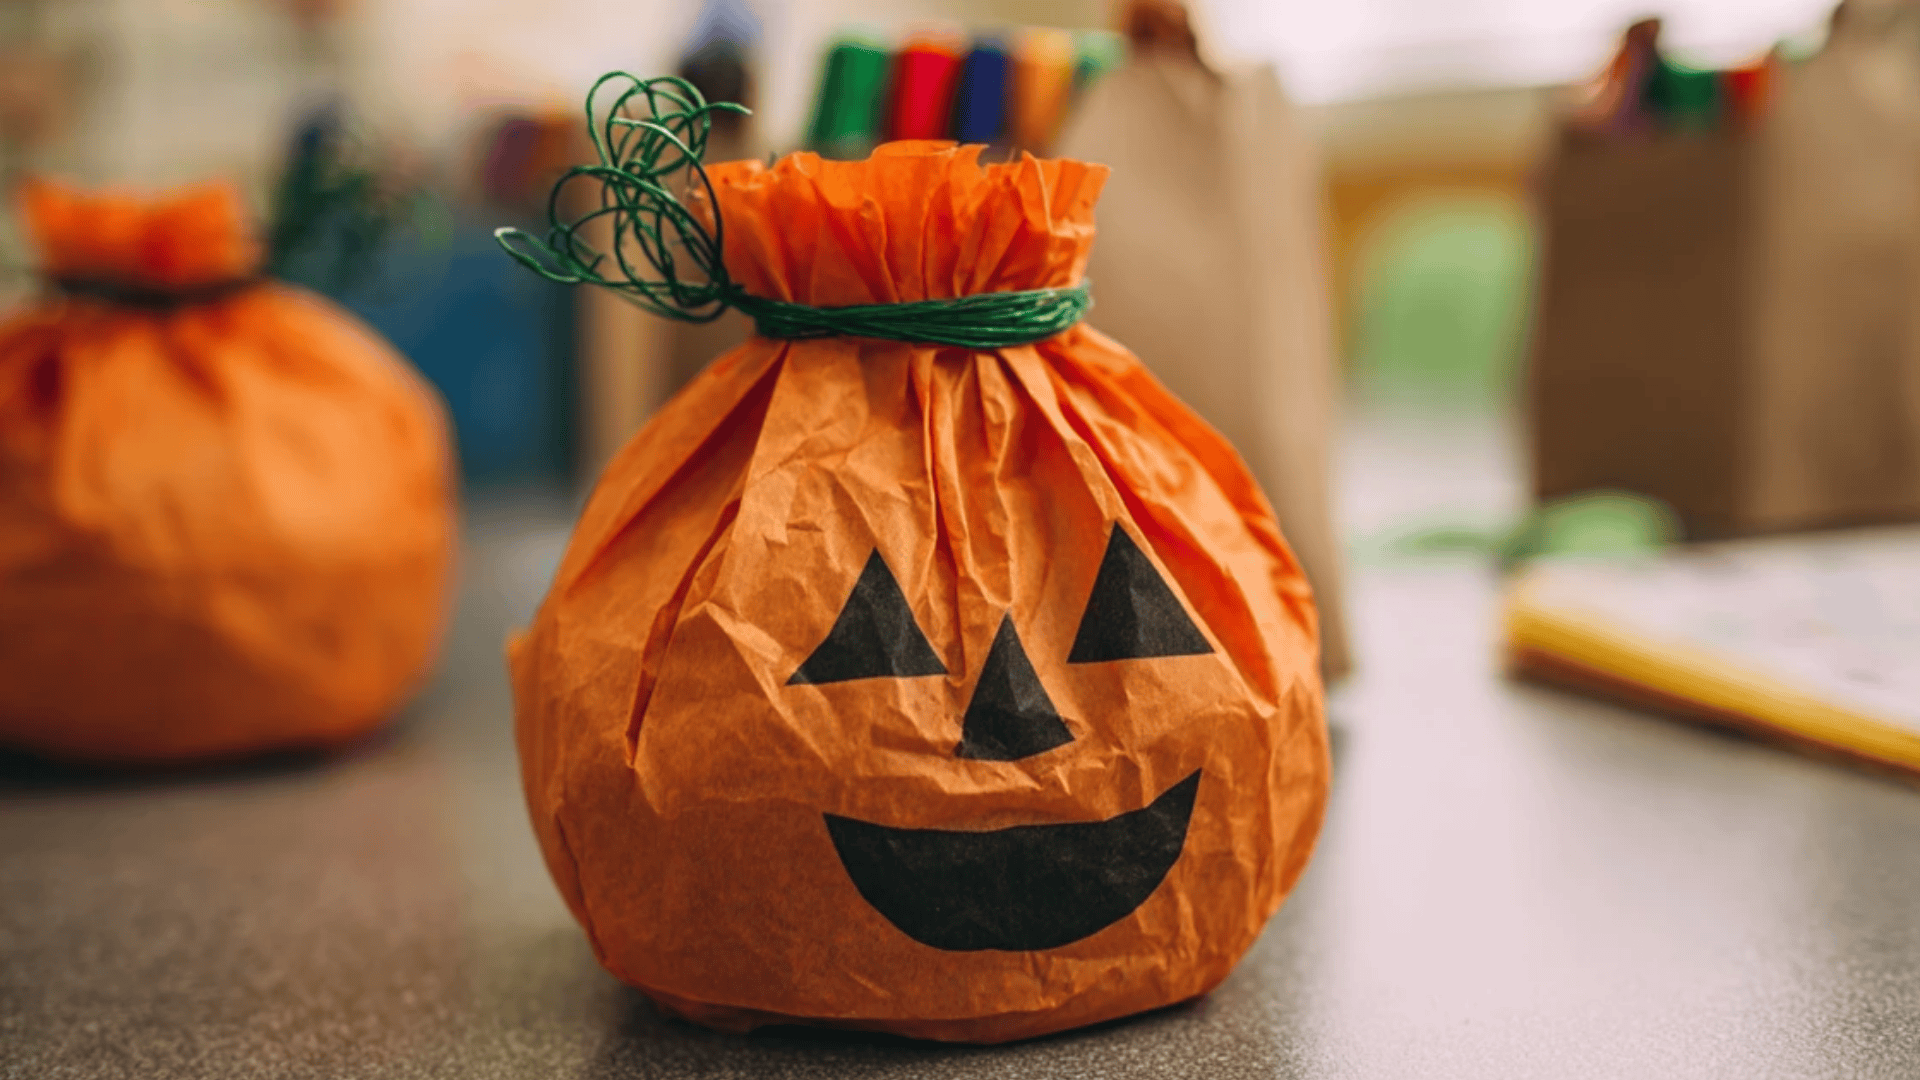
Stuff bags into three-dimensional pumpkins using orange paper bags, newspaper for stuffing, green pipe cleaners for vines, and markers for faces.
- Stuff an orange paper lunch bag with crumpled newspaper or tissue paper until it’s rounded and full, like a pumpkin.
- Twist the top of the bag closed, then secure it with a rubber band or twist tie to keep the stuffing inside.
- Wrap a green pipe cleaner around the twisted section to create a curling pumpkin vine and hide the twisted top.
- Use markers to draw jack-o-lantern faces on the front of the stuffed bag pumpkin with various expressions and designs.
- Display finished pumpkins on tables, shelves, or windowsills as three-dimensional Halloween decorations that won’t roll away like real pumpkins.
This craft creates satisfying three-dimensional pumpkins that are lightweight and safe, while teaching children how to upgrade flat materials into sculptural forms.
18. Yarn Ghost
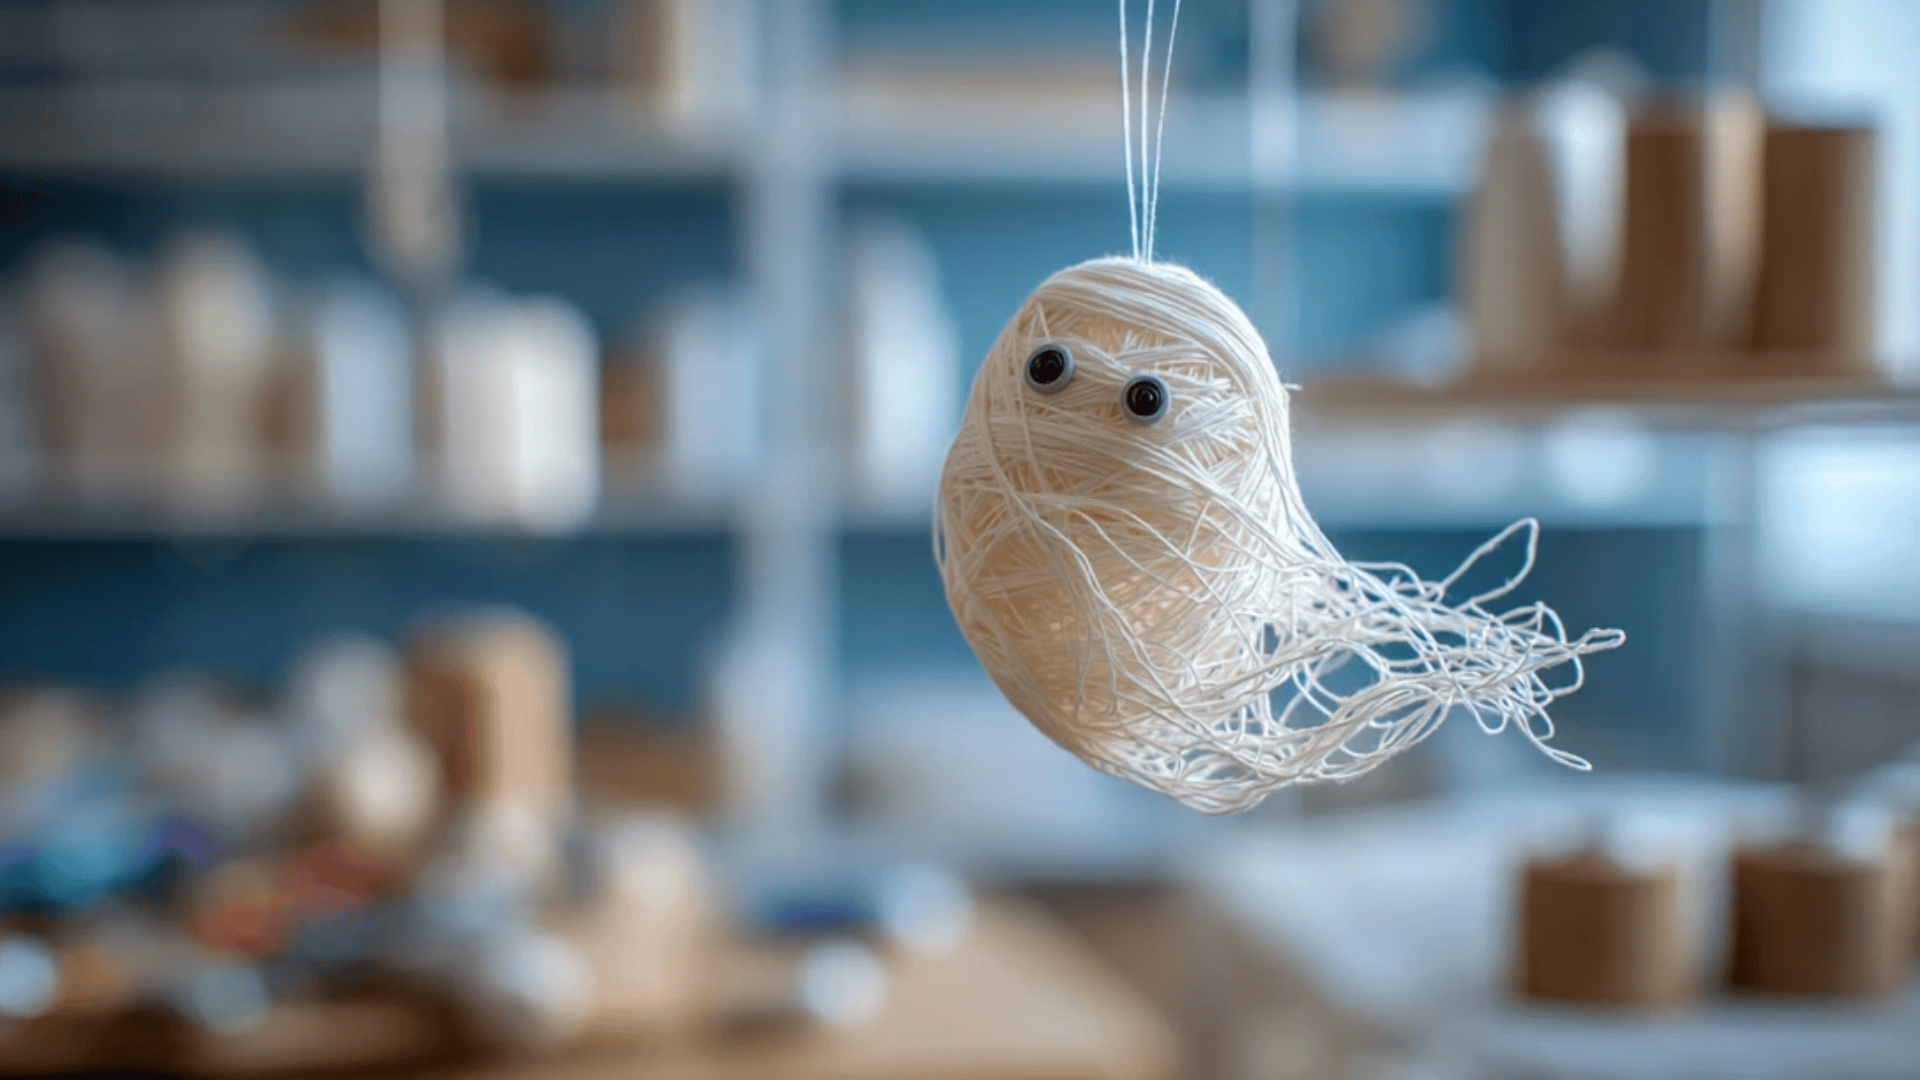
Wrap spooky shapes using white yarn, liquid starch, balloons, googly eyes, and wax paper to create stiffened hanging ghost decorations.
- Inflate small balloons to about four to five inches in diameter to create the base form for ghost shapes.
- Soak white yarn in liquid starch or diluted glue mixture until completely saturated and easy to wrap smoothly around balloons.
- Wrap the wet yarn around the balloon in random directions, leaving some open spaces for a ghostly see-through effect when dried.
- Let the yarn-covered balloon dry completely on wax paper for twenty-four hours until the yarn hardens into a solid ghost shape.
- Pop and remove the balloon carefully, then glue googly eyes onto the yarn ghost form and hang with a fishing line.
Adult supervision is required for the starch mixture, but children can help wrap yarn, and the magical conversion from floppy to stiff fascinates preschoolers.
19. Paper Plate Black Cat
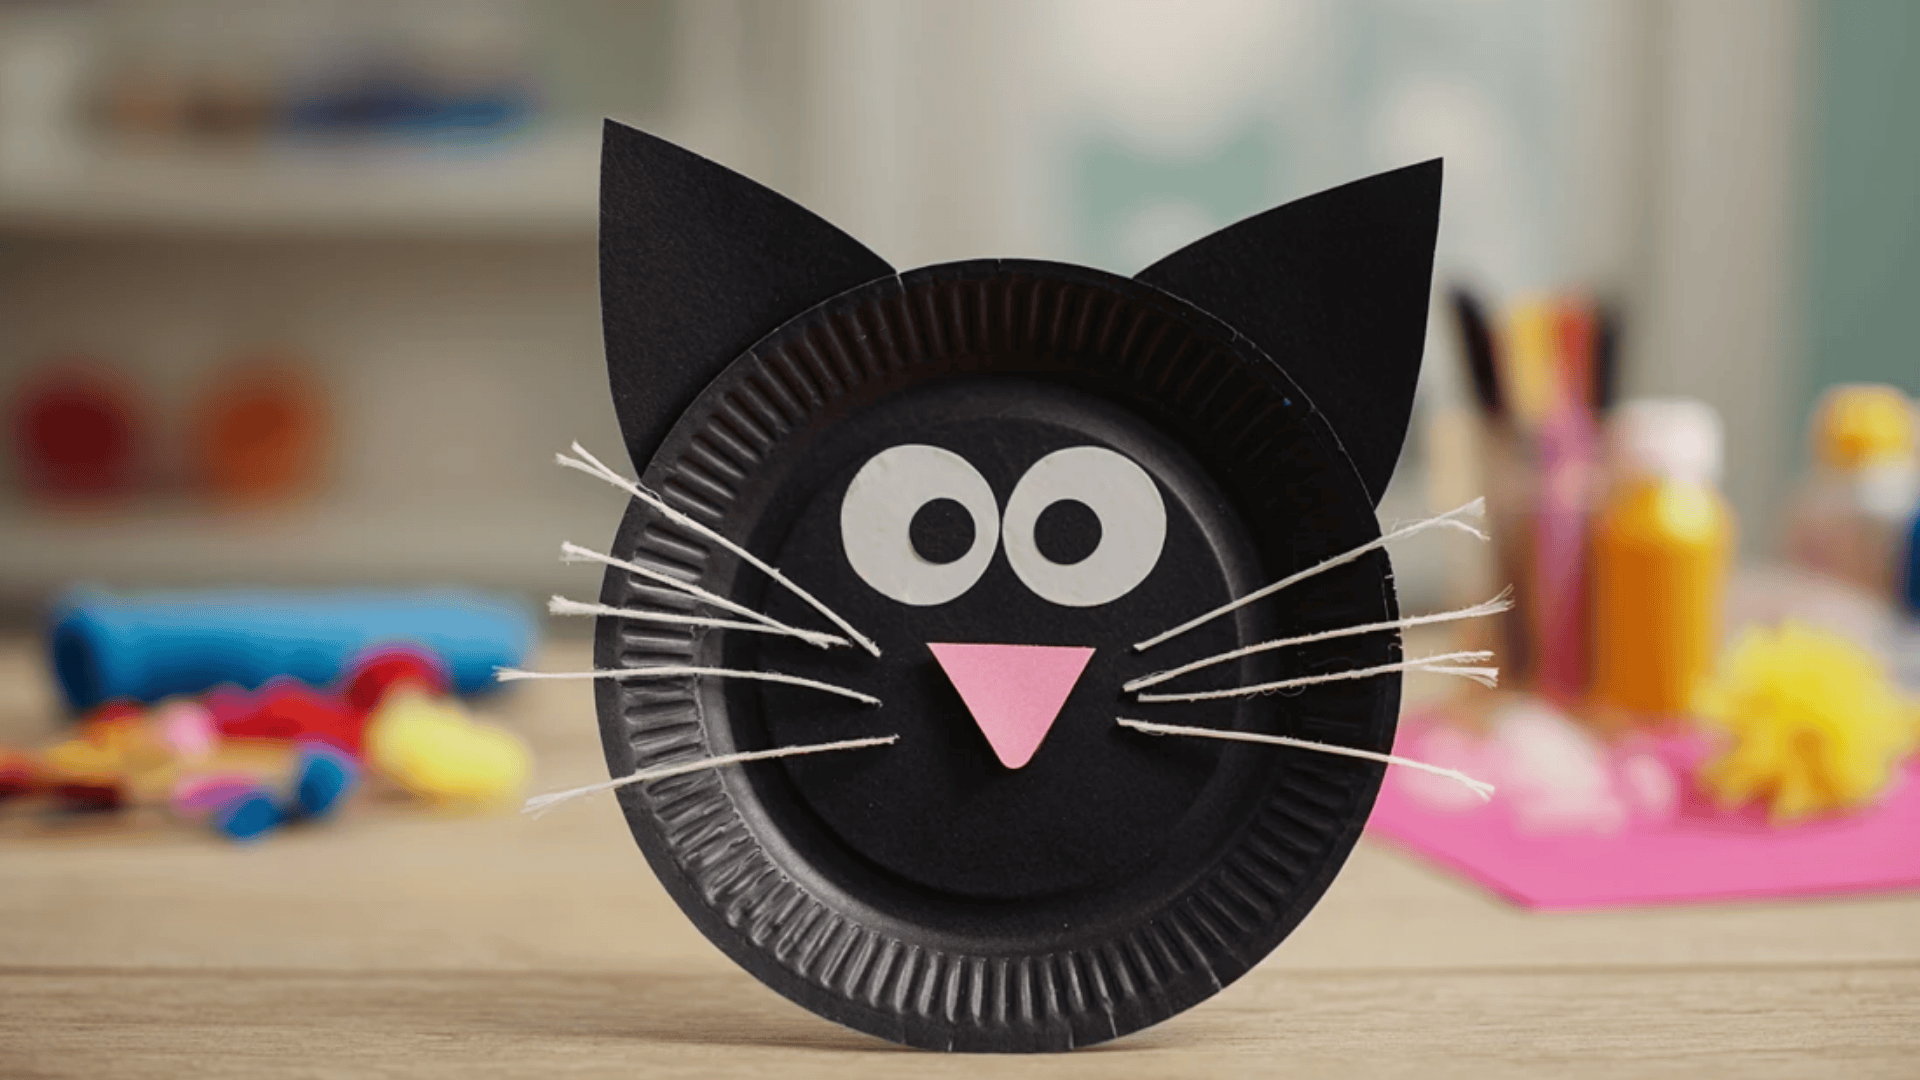
Make classic Halloween cats using paper plates, black paint, black construction paper, pink paper, googly eyes, and white pipe cleaners for whiskers.
- Paint a paper plate completely black, and let it dry for 15 to 20 minutes before adding any other decorative features.
- Cut two triangle ears from black construction paper and glue them to the top edge of the painted paper plate.
- Attach two googly eyes in the center of the plate and add a small pink paper triangle as the cat’s nose.
- Cut three white pipe cleaners in half and glue them on each side of the nose as whiskers that stick out.
- Add a black construction paper tail curling off one side of the plate to complete the classic black cat look.
This simple craft teaches about animal features and symmetry while creating a classic Halloween symbol perfect for seasonal decorations.
20. Thumbprint Pumpkin Patch
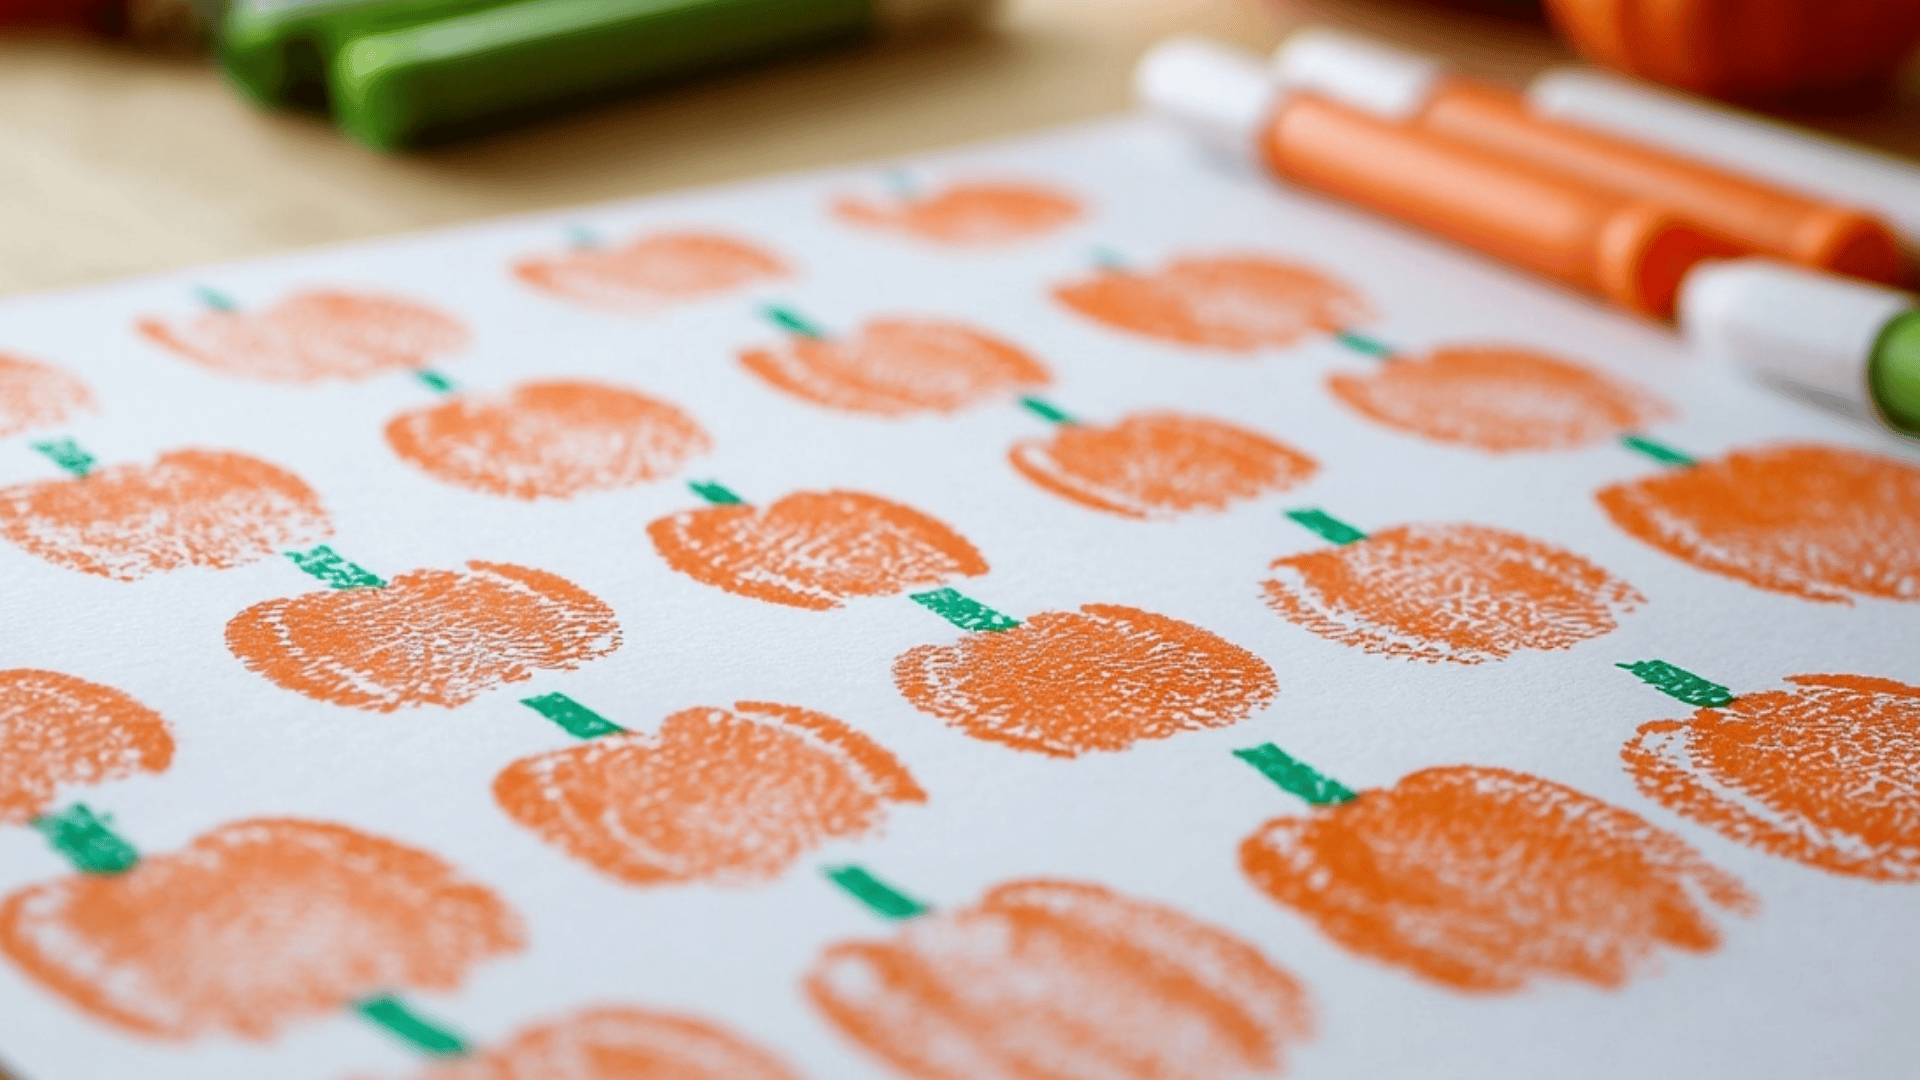
Create textured art using orange and green ink pads or paint, white paper, markers, and children’s thumbs for stamping patterns repeatedly.
- Show children how to press their thumb into an orange ink pad or paint, then stamp it onto white paper.
- Stamp multiple orange thumbprints across the paper to create a pumpkin patch with pumpkins of consistent size and shape repeated.
- Let the orange thumbprints dry completely for about ten minutes before adding any additional details with markers to prevent smudging.
- Use green markers or green thumbprints to add small stems at the top of each orange pumpkin thumbprint across the page.
- Draw simple grass lines at the bottom and a sky at the top to create a complete pumpkin patch landscape scene.
This craft is perfect for developing stamping skills and pattern recognition, while the repetitive thumbprint motion is satisfying and meditative for young children.
21. Halloween Slime (Spooky Science Craft)
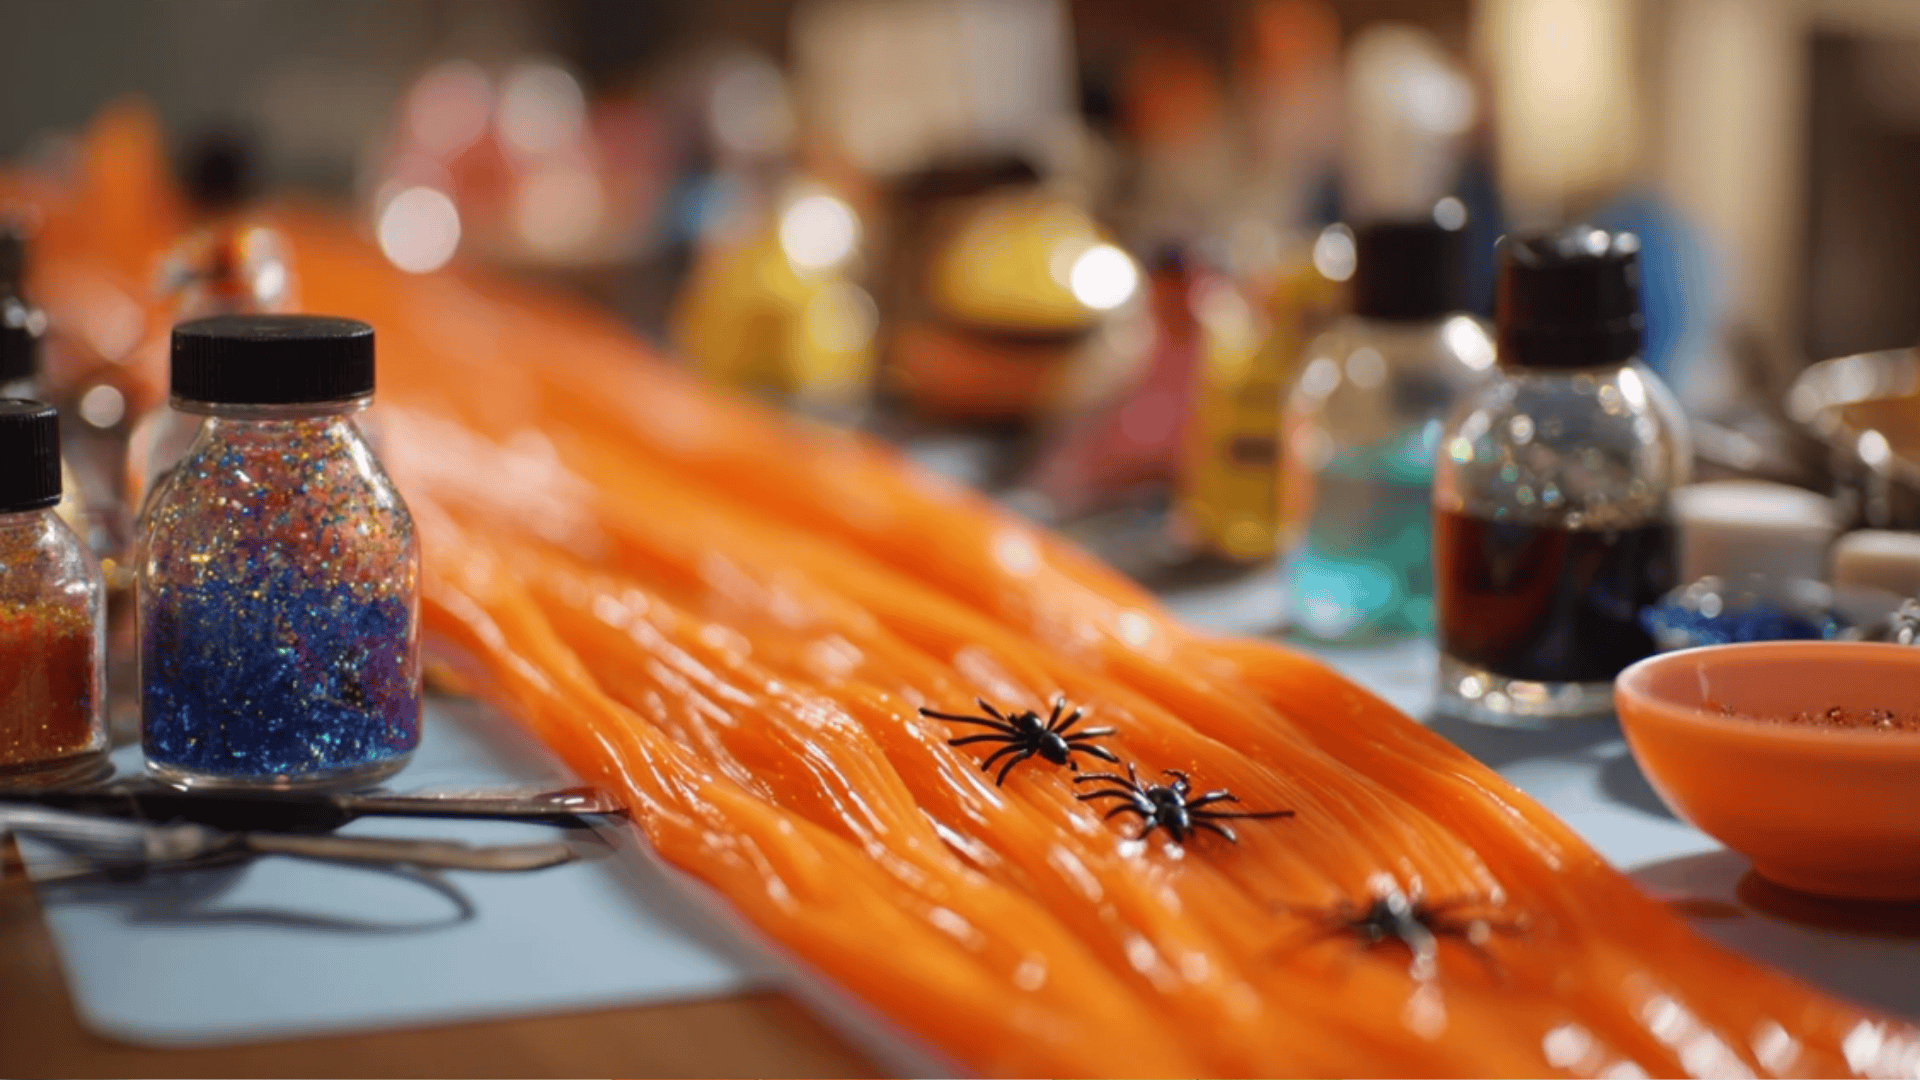
Mix up sensory fun with clear or white glue, liquid starch, or contact lens solution with baking soda, food coloring, glitter, and plastic spiders.
- Pour 4 ounces of clear or white glue into a mixing bowl and add your chosen Halloween food coloring.
- Stir in 1/2 tablespoon of baking soda if using the contact lens solution method, mixing until completely combined.
- Slowly add liquid starch or contact lens solution (about 1-2 tablespoons) while stirring continuously until a slime begins to form.
- Once the mixture pulls away from the bowl sides, knead it with your hands until it reaches the desired consistency.
- Mix in Halloween additions like glitter, plastic spiders, or eyeball beads for extra spooky, tactile sensory fun.
This chemistry-based craft works best for children six and older with close adult supervision, providing stretchy entertainment that teaches scientific concepts through hands-on experimentation.
22. Paper Tube Witch
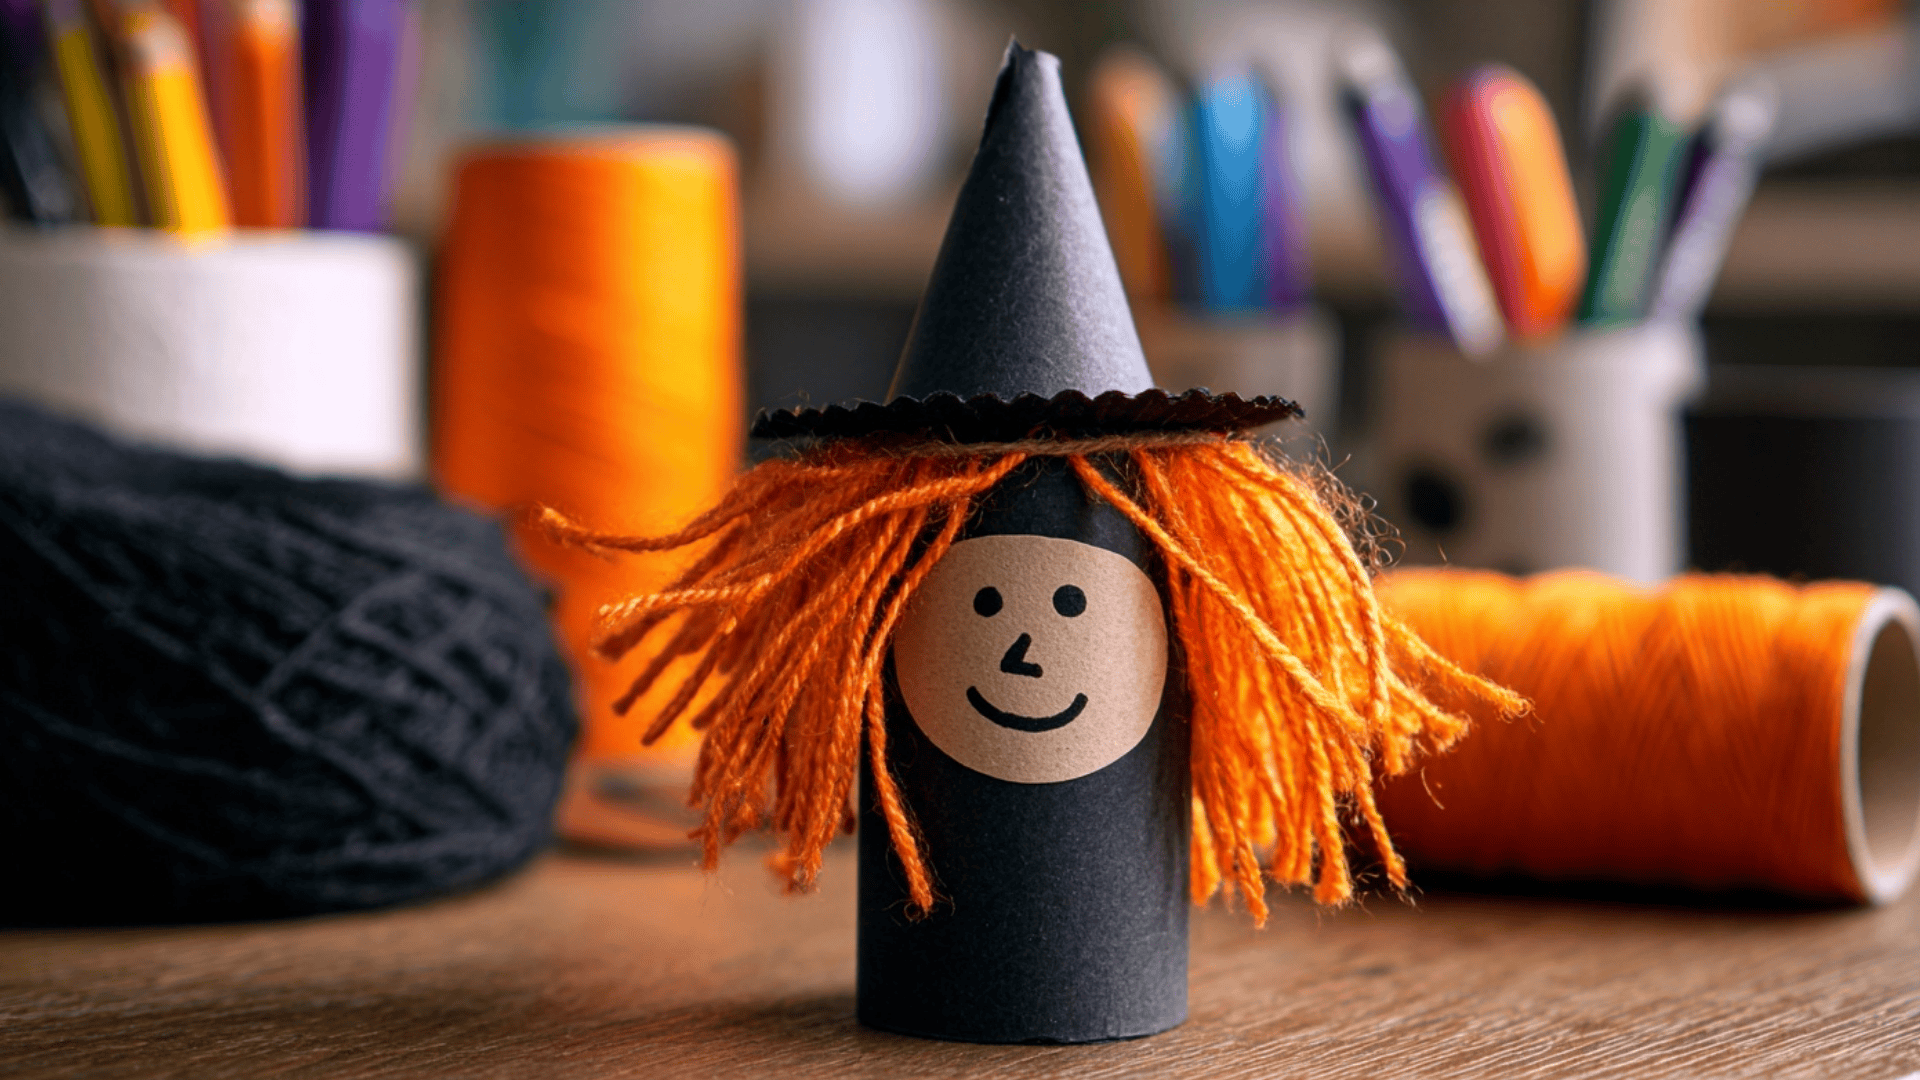
Alter toilet paper rolls using black construction paper, orange yarn for hair, markers, and triangle hats for creating standing witch figures.
- Wrap an empty toilet paper roll with black construction paper and secure with glue along the seam for the witch’s body.
- Draw or glue a simple face on the upper part of the covered roll using markers or construction paper facial features.
- Attach orange yarn pieces at the top for witch hair, gluing them inside the top rim so they hang down wildly.
- Create a small paper cone from black construction paper for the witch hat and glue it on top of the hair.
- Add construction paper arms extending from the sides and optional cape or broom details to complete the standing witch character.
These standing figures are stable decorations that won’t tip over easily and help teach children how to create three-dimensional characters from tubes.
23. Carry Bag Monster Puppets
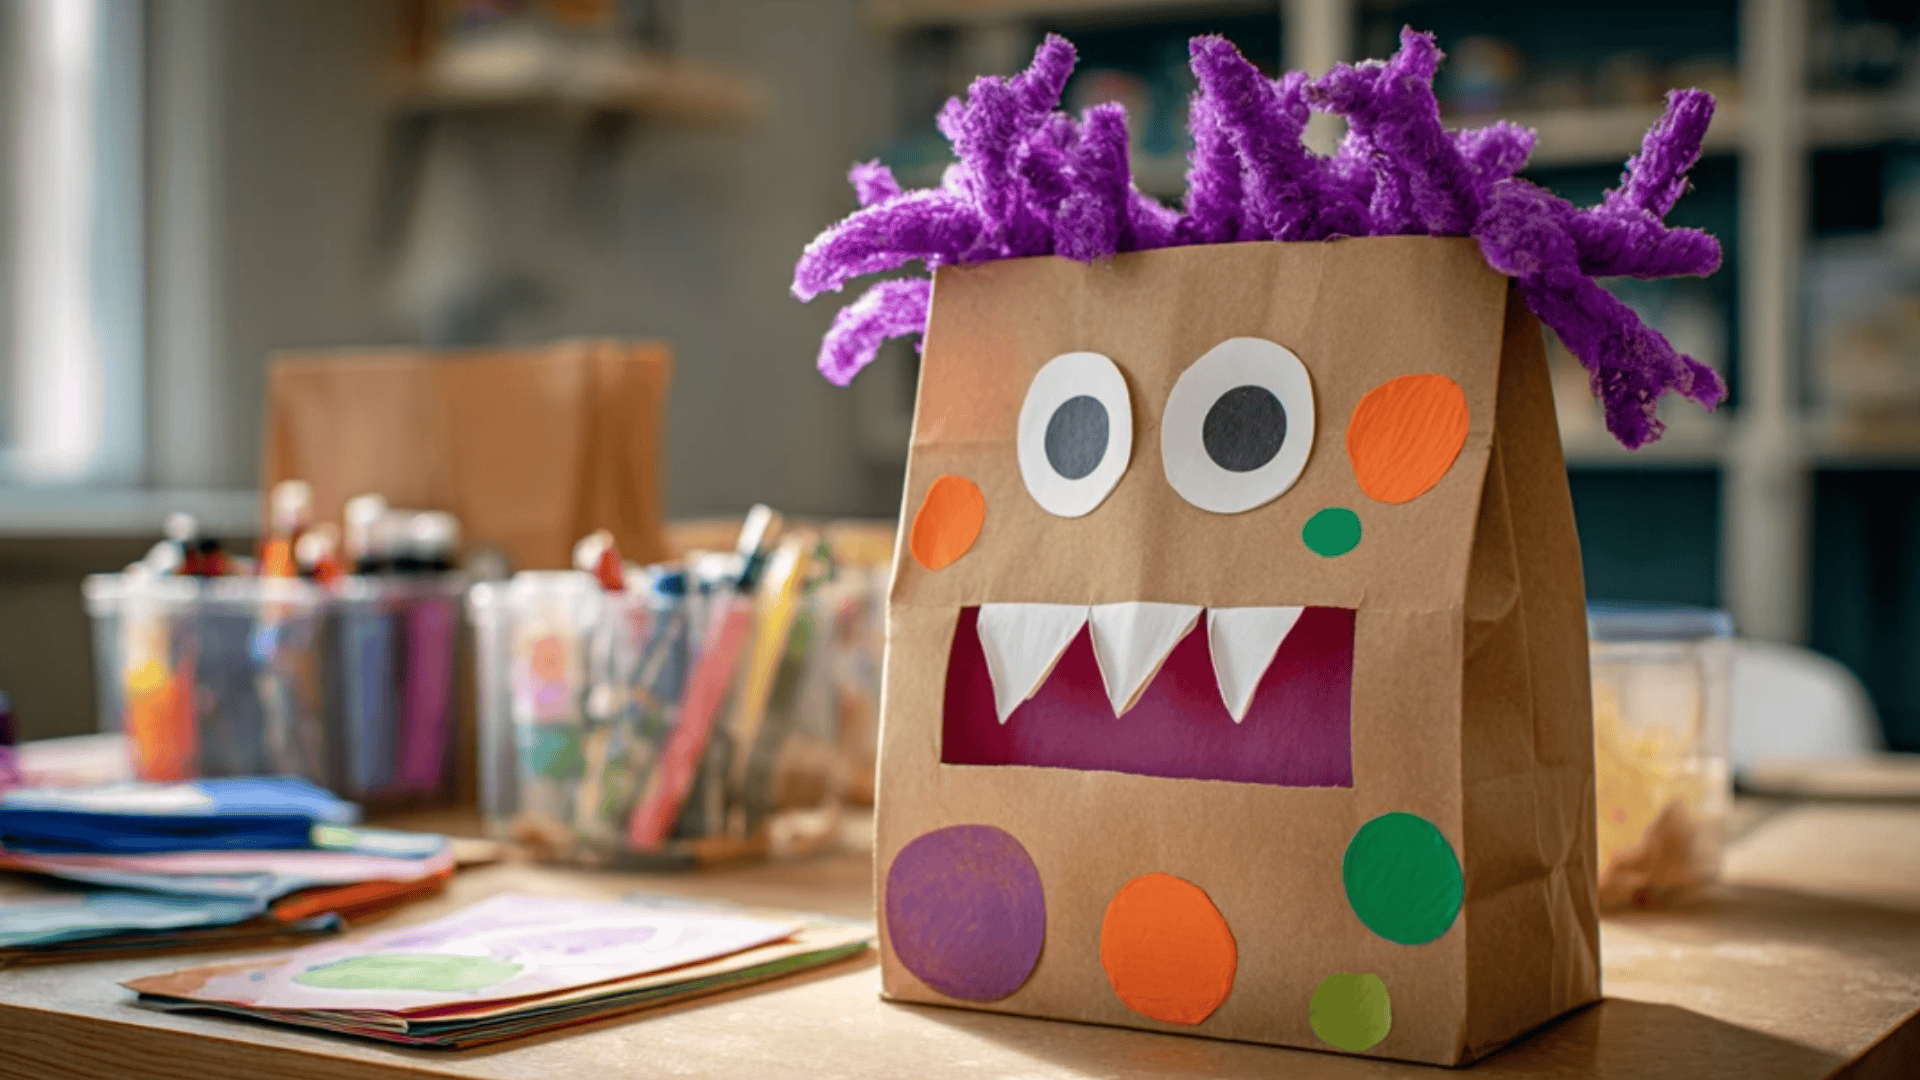
Turn lunch bags into playful puppets with brown paper bags, construction paper, markers, googly eyes, glue, scissors, and imagination for endless creative possibilities.
- Keep the paper bag folded flat with the bottom flap facing you; this flap becomes the monster’s moving mouth.
- Decorate the bottom flap as the upper mouth area, adding teeth, a tongue, or colorful designs with construction paper.
- Draw or glue features on the main bag body below the flap, creating a face that shows when the mouth closes.
- Add googly eyes above the mouth flap, wild construction paper hair on top, and colorful spots or stripes on the body.
- Let all the glue dry completely before putting your hand inside to animate your monster for puppet shows and storytelling.
These entertaining puppets work wonderfully for children three and older, encouraging imaginative play long after the crafting session ends with minimal materials and maximum creativity.
24. Paper Plate Frankenstein
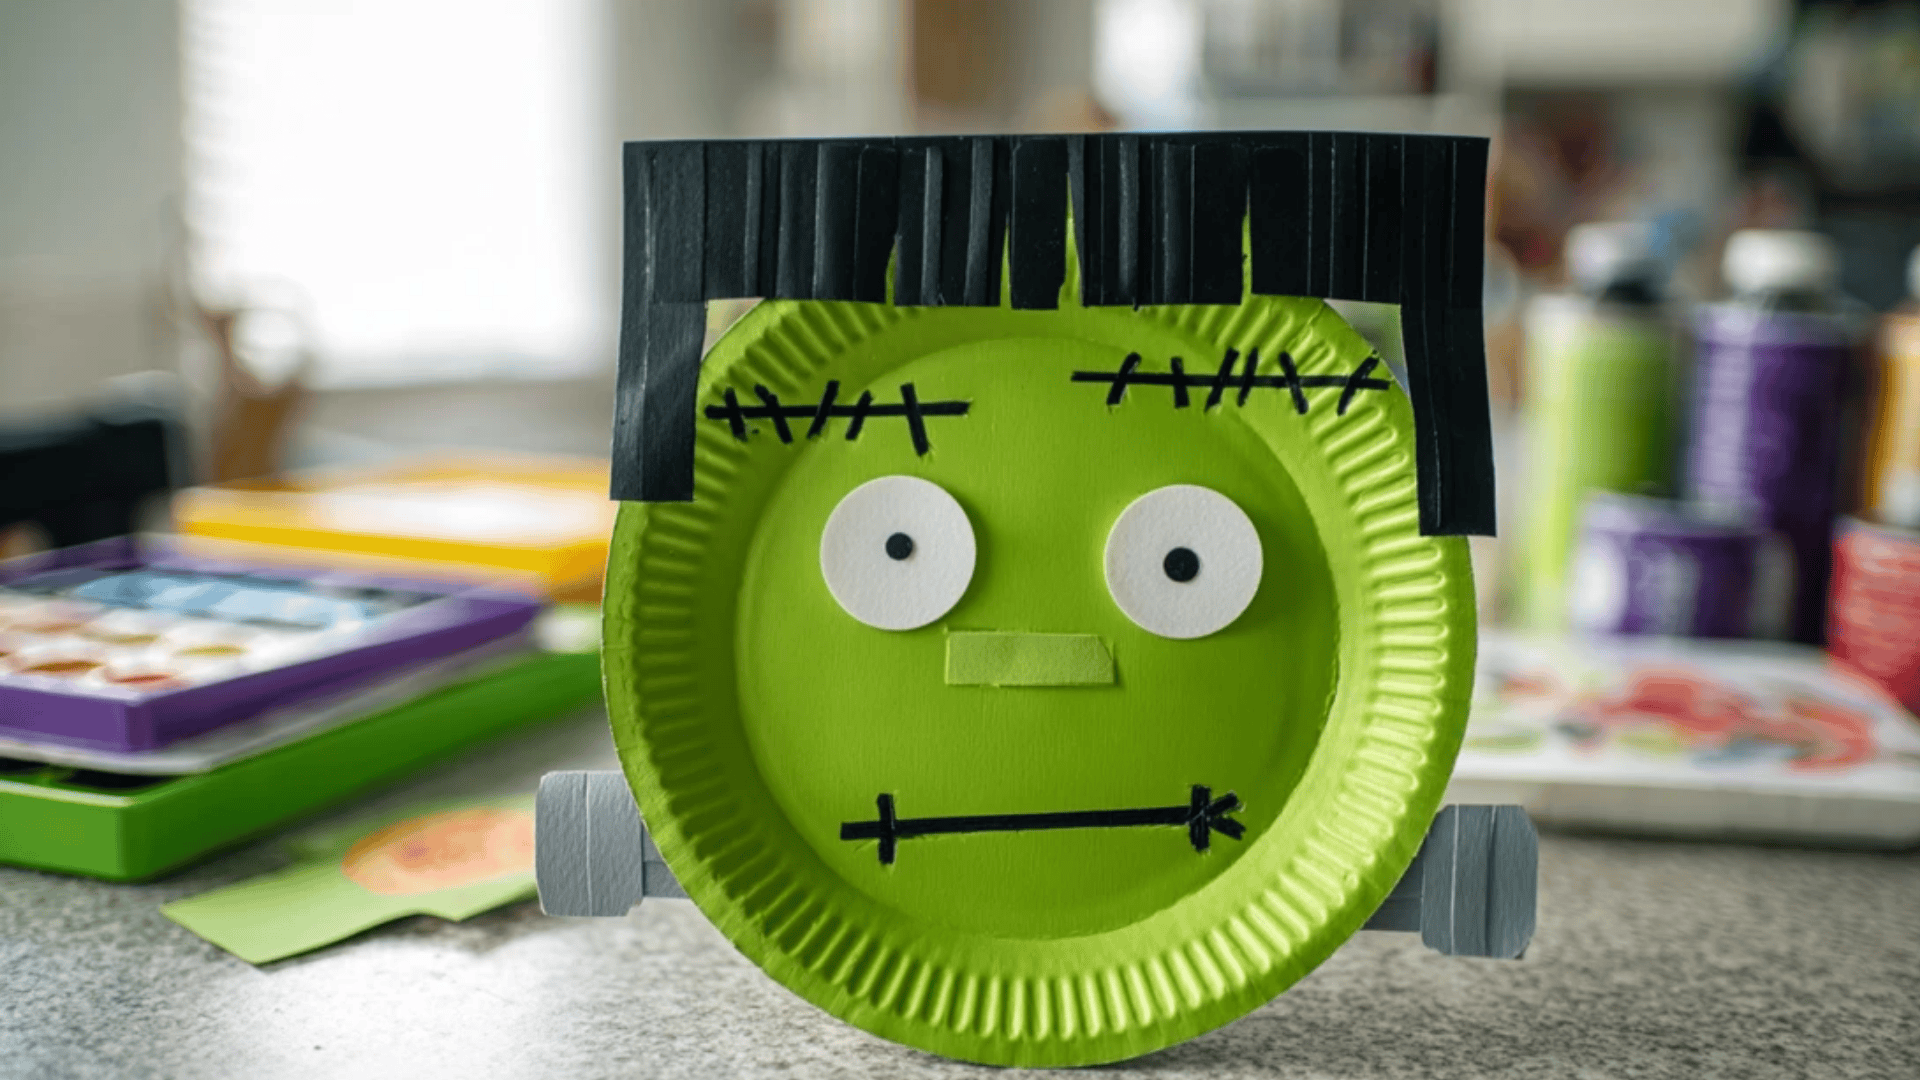
Create the classic monster using paper plates, green paint, black construction paper for hair, googly eyes, and markers for bolts and stitches.
- Paint a paper plate green and let it dry completely for about twenty minutes before adding any additional facial features or details.
- Cut black construction paper into straight strips or jagged shapes for Frankenstein’s iconic flat-top haircut, and glue them to the top edge.
- Glue googly eyes in the center of the plate and draw a simple mouth line with a black marker for expression.
- Draw stitches across the forehead and face using a black marker to show where Frankenstein is sewn together as a character.
- Add small rectangular “bolts” on each side of the plate neck area using markers or by gluing gray construction paper pieces on.
This recognizable monster character is simple enough for preschoolers while teaching them about the classic Halloween creatures and creative character design.
25. Leaf Ghost
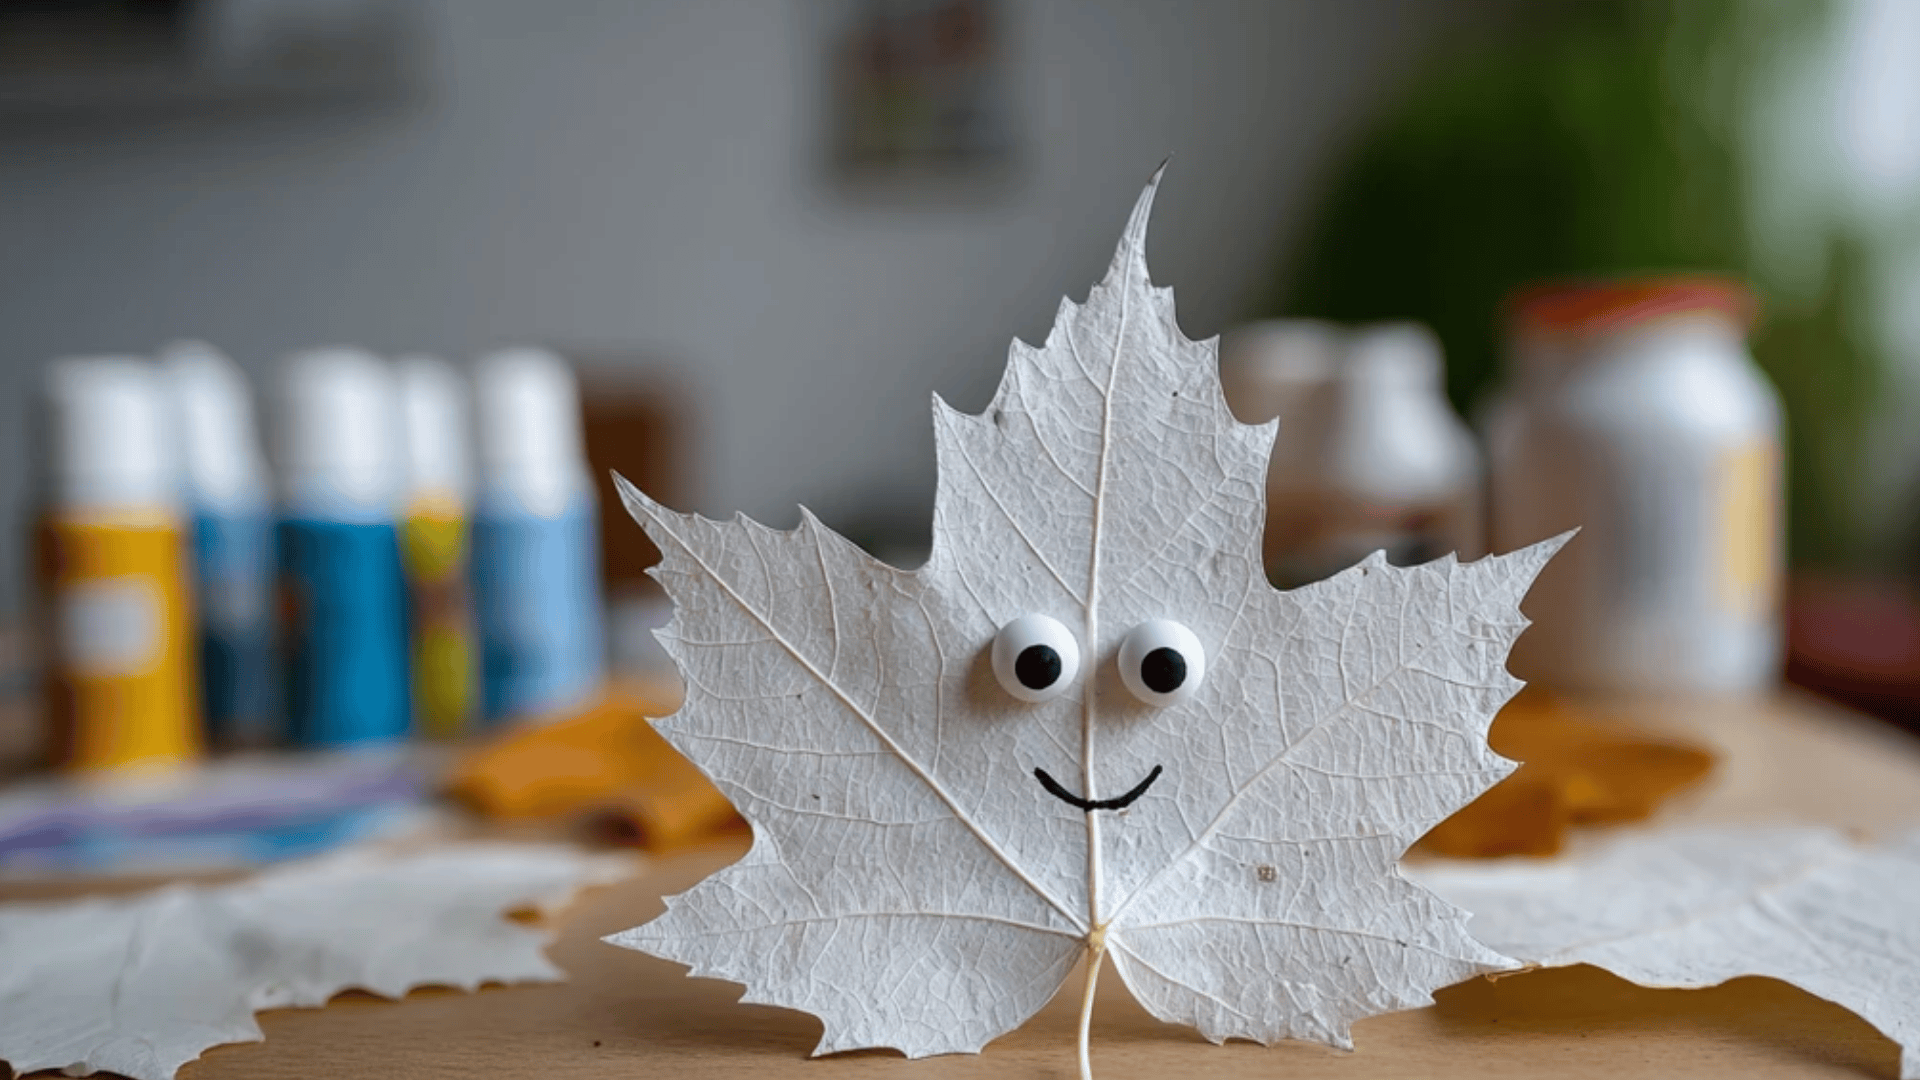
Decorate real leaves with white paint, googly eyes, markers, and clear contact paper to preserve natural materials as Halloween decorations.
- Collect large, fresh leaves from outside, choosing those with interesting shapes and ensuring they are clean and dry before painting.
- Paint the entire leaf with tempera or acrylic paint, and let it dry completely on newspaper for easier cleanup and protection.
- Once dry, glue two small googly eyes near the top of the leaf and draw a simple mouth with a black marker.
- Optional: Cover the painted leaf with clear contact paper to preserve it and prevent the leaf from drying out and crumbling.
- Attach a string to hang the leaf ghost or glue it onto paper as part of a fall-Halloween mixed nature art piece.
This craft combines nature investigation with Halloween creativity and helps children appreciate how natural materials can become art with simple conversions.
26. Pumpkin Playdough
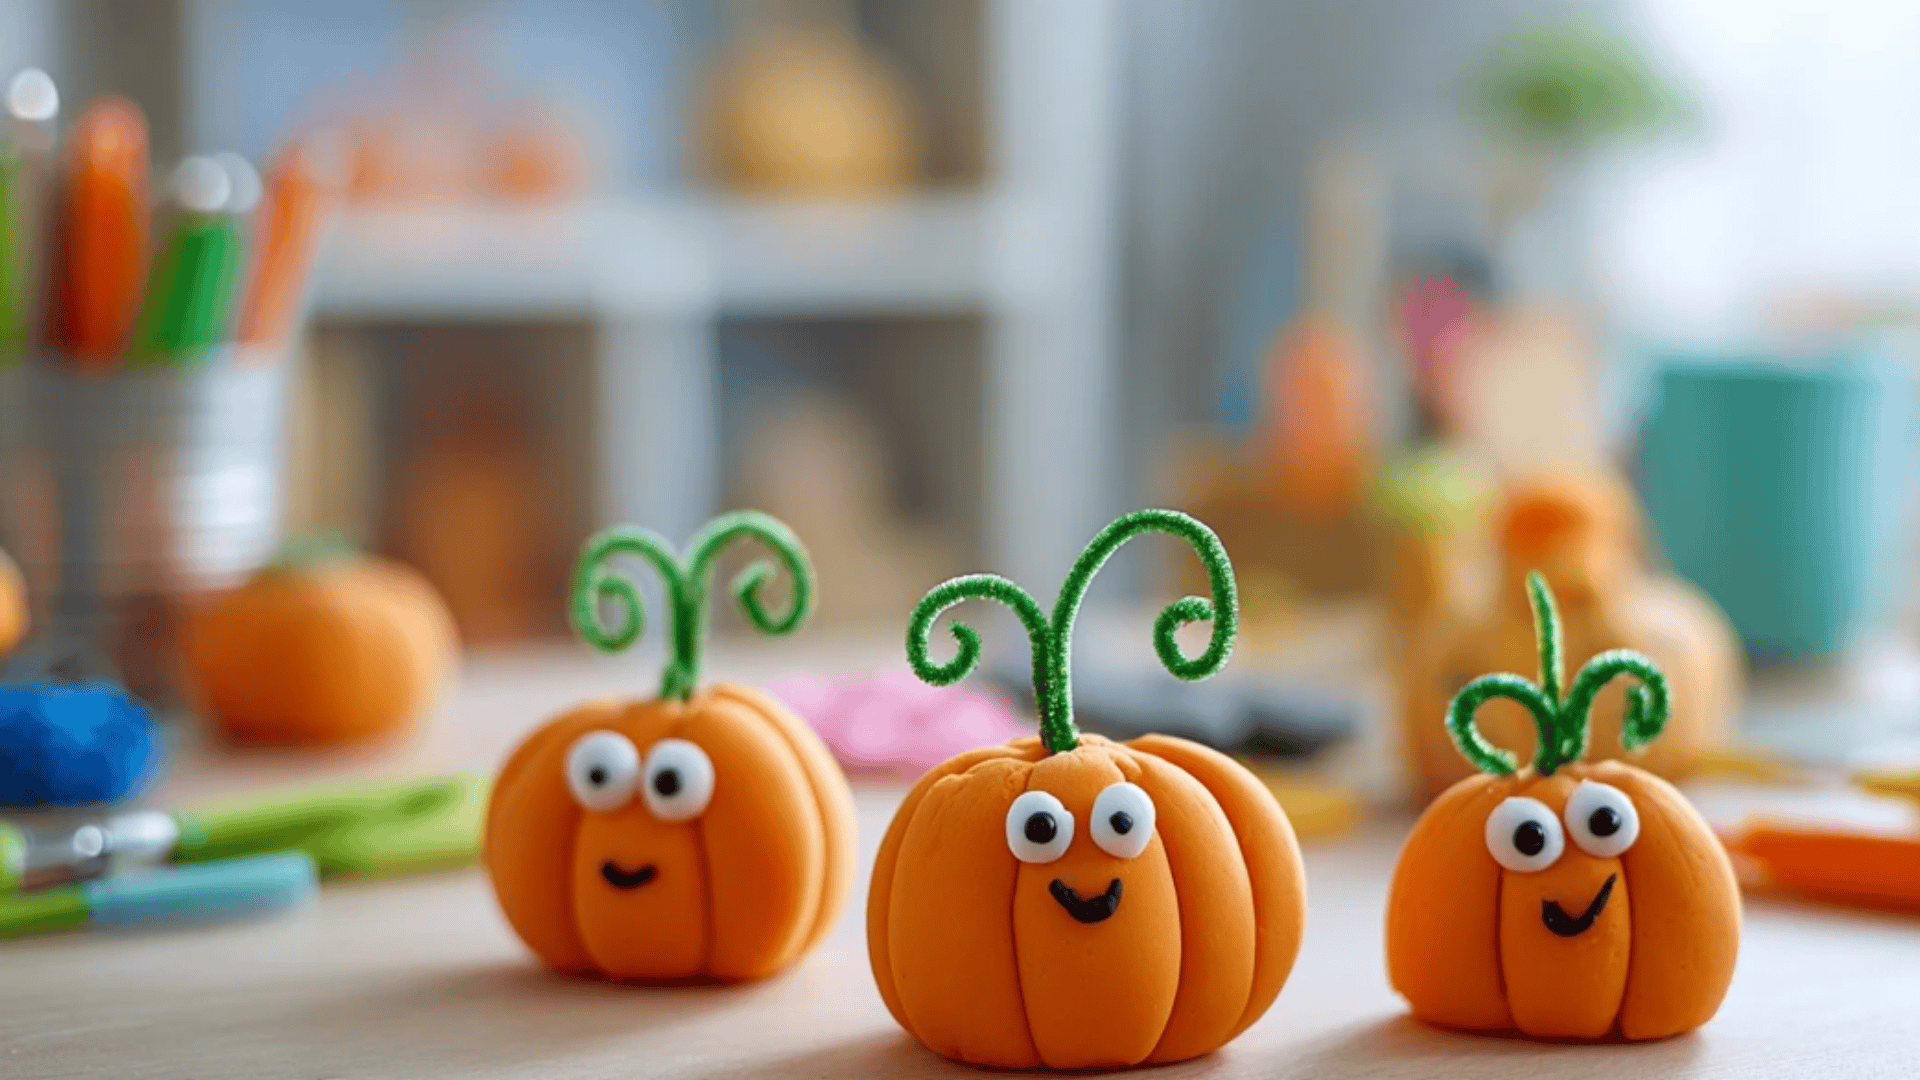
Create a themed sensory play activity using orange playdough (homemade or store-bought), green pipe cleaners for vines, googly eyes, and plastic sculpting tools.
- Provide orange playdough and let children roll, squeeze, and shape it into round pumpkin forms of various sizes for sensory investigation.
- Poke green pipe cleaners into the top of each playdough pumpkin to create curling vines and stems that add dimension.
- Press googly eyes into the playdough to create pumpkin faces, experimenting with different eye arrangements and expressions that can be changed.
- Use plastic tools to carve jack-o-lantern faces, practicing fine motor skills and learning how to create facial features through carving.
- Children can repeatedly reshape pumpkins, making this an activity that provides extended playtime beyond a single craft session.
This reusable sensory activity develops hand strength and creative expression while remaining completely mess-free and allowing endless imaginative pumpkin variations.
27. Paper Spider Ring
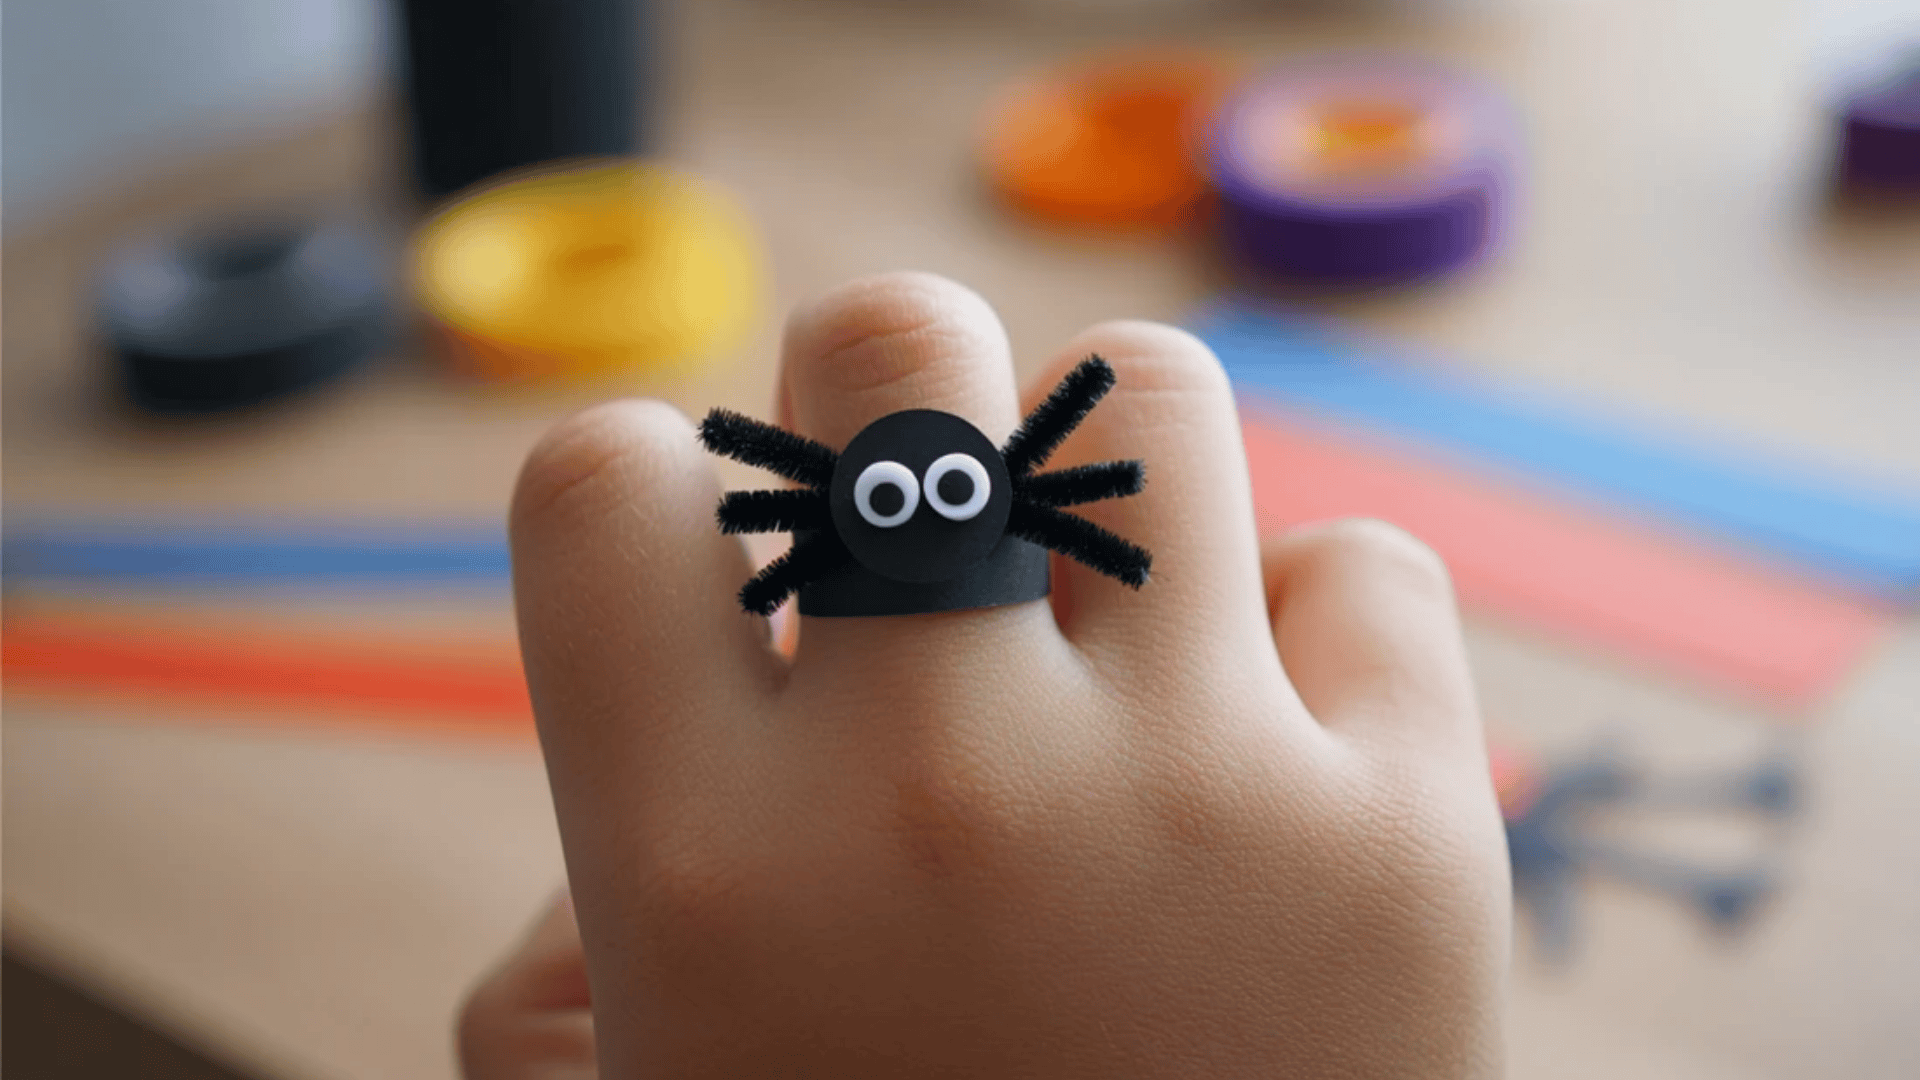
Make wearable crafts using black construction paper, googly eyes, pipe cleaners for legs, and tape for creating finger-sized spider rings.
- Cut a strip of black construction paper about half an inch wide and long enough to wrap around a child’s finger.
- Form the strip into a ring that fits the child’s finger, and tape or glue the ends together securely.
- Cut a small circle from black construction paper for the spider body and glue it on top of the paper ring.
- Attach two tiny googly eyes to the spider body circle and add short pipe cleaner pieces as spider legs on the sides.
- Let children wear their spider rings on different fingers and use them for imaginative play or as party favors for friends.
These wearable crafts make children feel like they’re part of Halloween, and the small-scale work helps develop precise fine motor control in little fingers.
28. Candy Corn Handprint
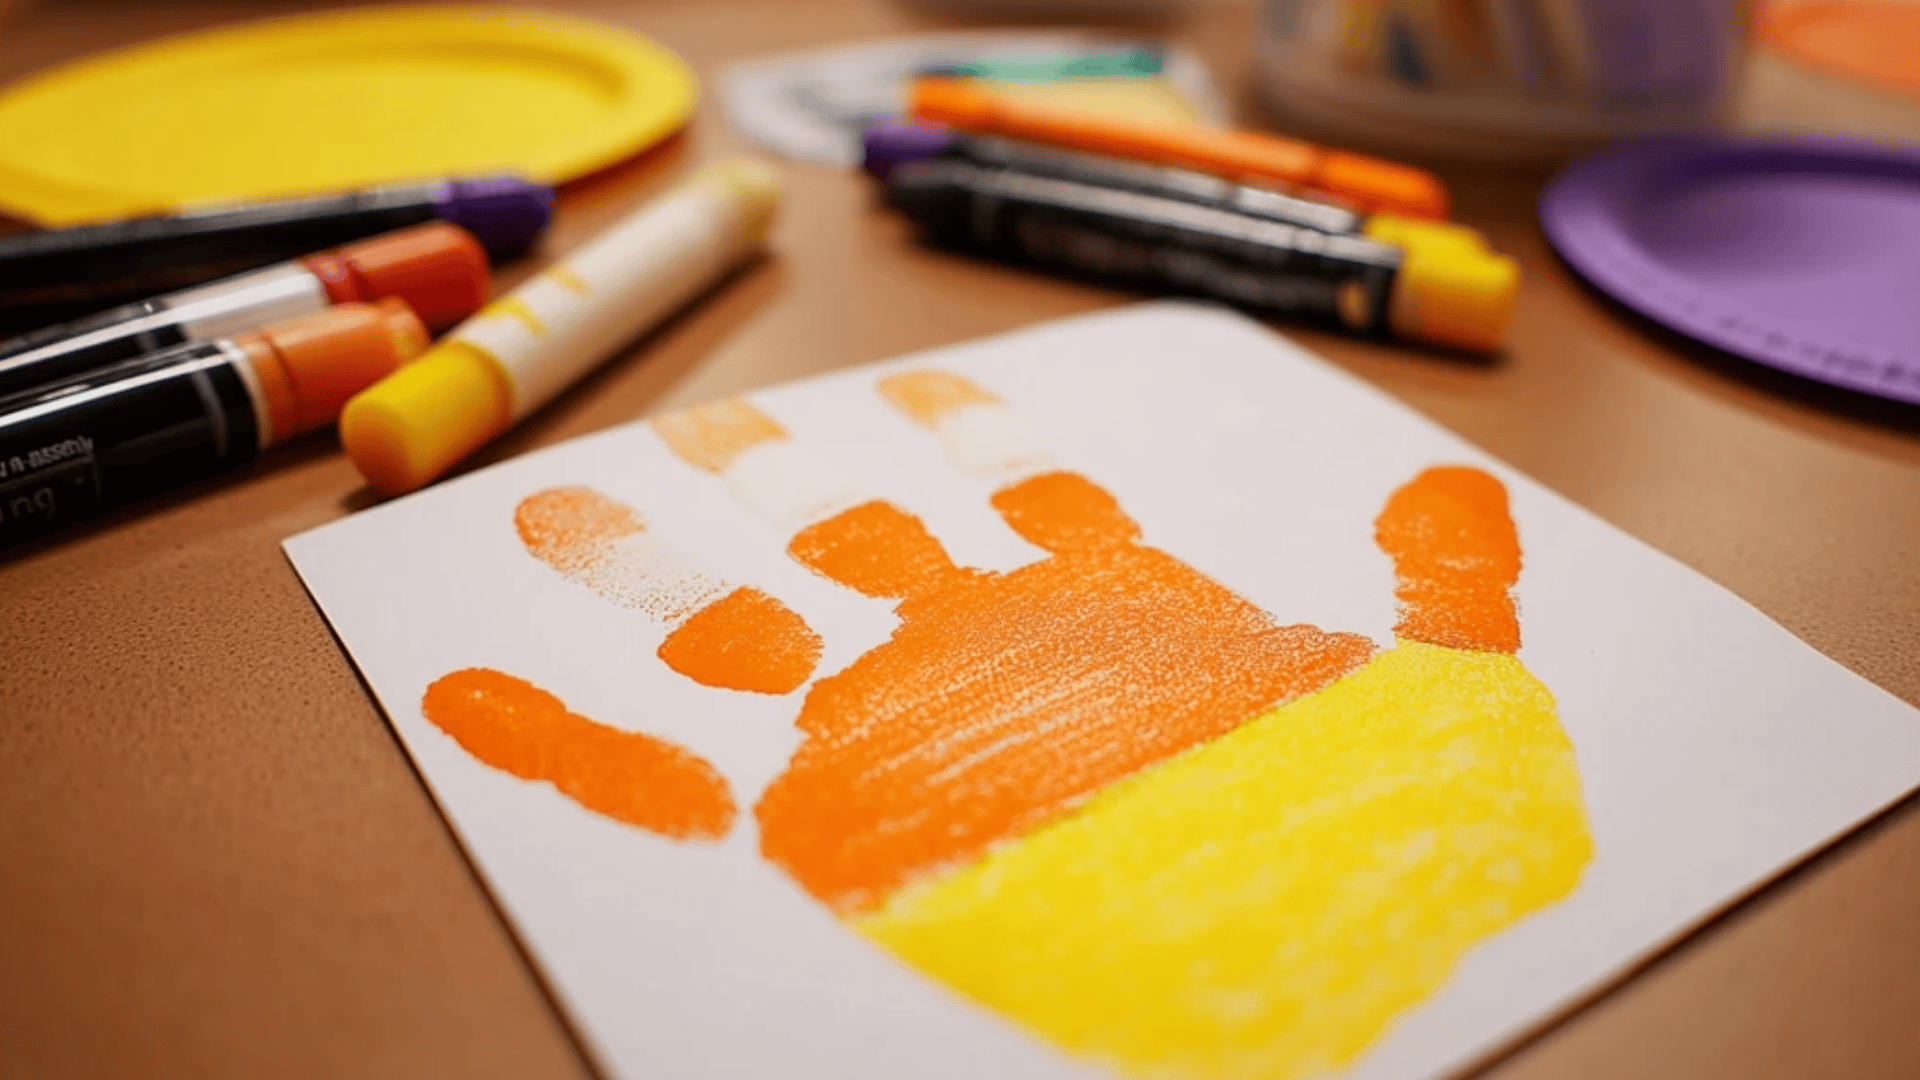
Layer three colors using yellow, orange, and white paint, a child’s hand, paper, and markers to create candy corn shapes from handprints.
- Paint the palm and base of the child’s hand yellow, the middle fingers orange, and the fingertips white to create candy corn color layers.
- Press the painted hand firmly onto white paper, making sure all three colored sections transfer clearly to show the color graduation.
- Let the handprint dry completely for about ten to fifteen minutes before adding any outlines or additional decorative details with markers.
- Optional: Use a black marker to outline the handprint shape to make it look more defined, like a candy corn piece.
- Display these festive handprints as keepsakes, showing how small hands were during this Halloween season, for future memory keeping.
The tri-color painting introduces children to concepts of color layering while creating a recognizable candy corn shape from their own handprint. They’ll enjoy seeing.
29. Paper Bat Mobile
Create hanging decorations using black construction paper, googly eyes, string or yarn, a hanger or stick, and a hole punch for assembly.
- Cut multiple bat shapes from black construction paper in various sizes, using a simple template or freehand cutting, for variety in the mobile.
- Attach googly eyes to each bat and draw simple details like fangs or wing texture with white crayon or chalk markers.
- Punch a small hole at the top center of each bat where the string will attach for balanced hanging from the mobile.
- Cut pieces of string or yarn in different lengths and tie one end to each bat and the other end to a hanger or stick.
- Arrange bats at varying heights along the hanger to create a cascading mobile effect that moves gently when air circulates around it.
This multi-step project teaches spatial planning and creates vibrant decorations that move and create interest in the room by catching air movement naturally.
30. Pumpkin Paper Weaving
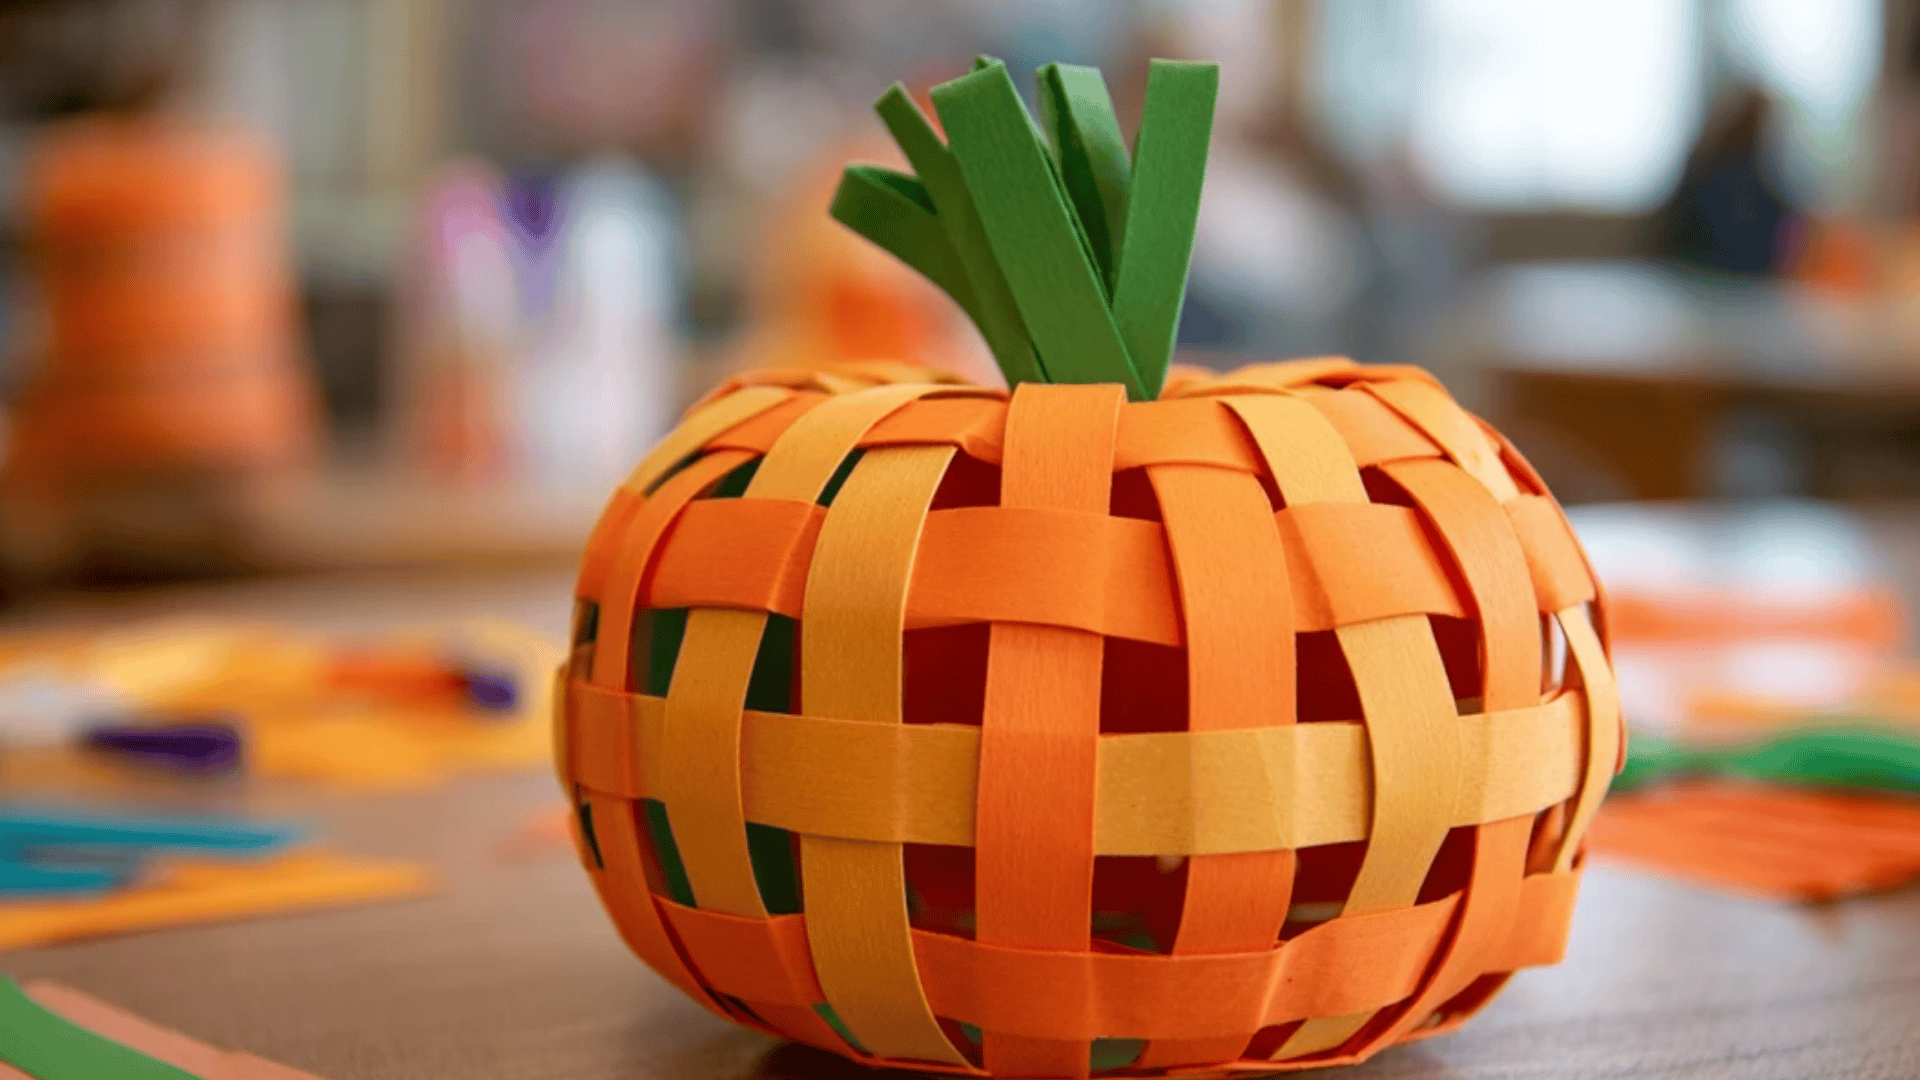
Introduce basic weaving using orange and green construction paper strips, scissors, and glue to create a woven pumpkin with a checkered pattern.
- Cut an orange pumpkin shape from construction paper and make vertical slits across the middle, leaving borders uncut to hold the weaving.
- Cut several orange and green construction paper strips about one inch wide to weave through the slits, creating the woven pattern.
- Demonstrate the over-under weaving pattern by threading the first green strip through the orange pumpkin slits, alternating over and under each strip.
- Continue weaving additional strips in alternating colors, pushing each strip close to the previous one to achieve a tight, gap-free weave.
- Glue the ends of the woven strips to the back of the pumpkin to permanently secure them.
This early weaving project develops hand-eye coordination and following patterns while creating textured pumpkin art that looks more complex than it actually is.
31. Ghost Windsock
Make moving decorations using white paper, streamers, googly eyes, tape, string, and markers to create wind-activated ghosts that flutter and flow.
- Roll white construction paper into a cylinder shape and tape or glue the overlapping edge to secure the tube firmly for the ghost body.
- Attach long white streamers or crepe paper strips to one open end of the cylinder using tape so they hang down freely.
- Glue googly eyes and draw a simple ghost mouth on the outside of the cylinder where the face should be positioned.
- Punch two holes at the top of the cylinder and thread a string through them to create a hanger for suspending the windsock.
- Hang the ghost windsock outdoors or near a window where breezes will make the streamers flutter like a floating ghost moving in the wind.
The movement aspect makes these decorations especially engaging and teaches cause and effect as children see how the wind brings their ghosts to life.
32. Pumpkin Sun Print
Create nature art using orange construction paper, fall leaves, or Halloween cookie cutters as stencils, and sunlight to make naturally shadow-printed images.
- Place orange construction paper in bright, direct sunlight, either outside or on a sunny windowsill, where it will receive strong sunlight.
- Arrange fall leaves, Halloween cookie cutters, or other objects on top of the orange paper to create shadow patterns underneath them.
- Leave the paper in direct sunlight for several hours or all day, allowing the sun to fade the exposed paper around the objects.
- Remove the objects to reveal the shapes left behind as darker orange silhouettes against the faded background created by sunlight exposure.
- Display the finished sun prints as artwork that demonstrates how sunlight changes colors and creates natural art through scientific processes that children can observe.
This slow craft teaches patience and introduces scientific concepts about how sunlight affects materials as artwork is created through a natural chemical process.
33. Paper Cauldron
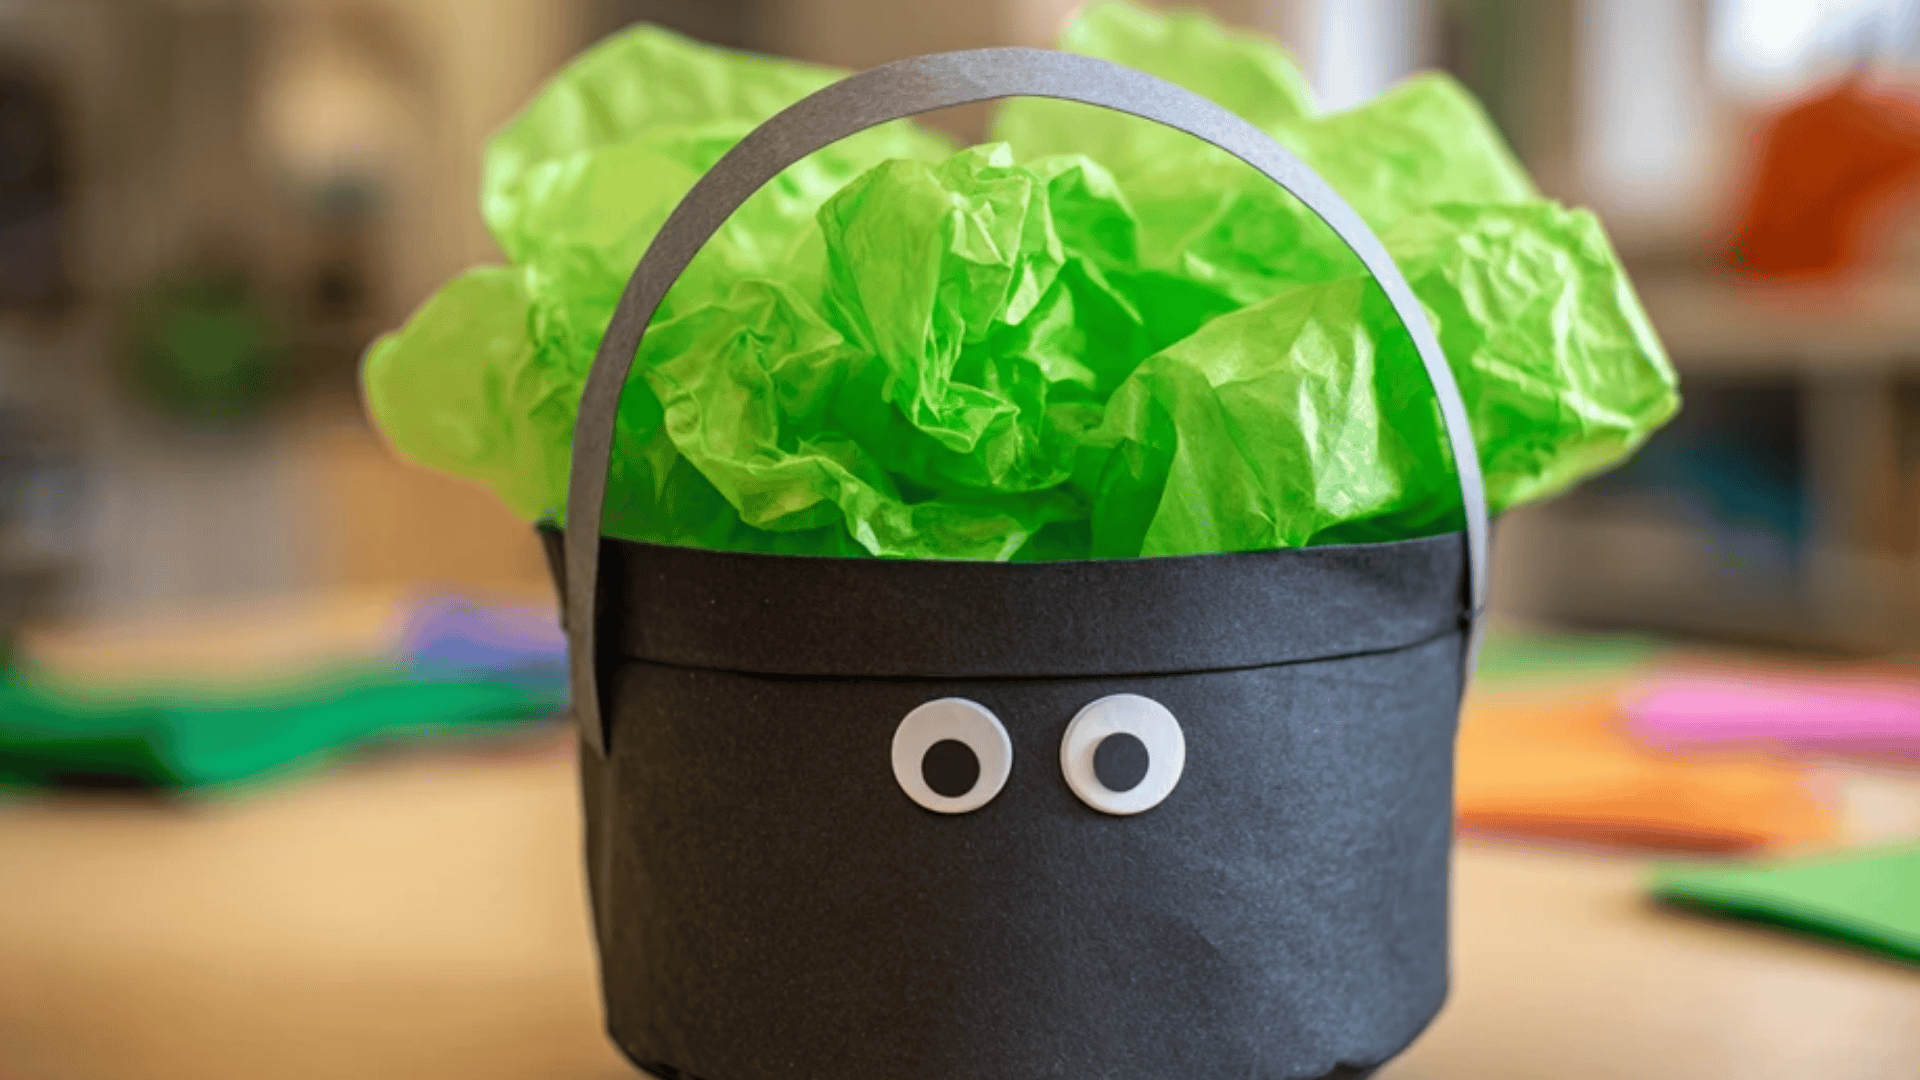
Craft three-dimensional pots using black construction paper, gray paper strips, googly eyes for decoration, and green tissue for bubbling potion effects.
- Cut a large black circle from construction paper for the cauldron base and a curved strip for the sides of the pot.
- Form the curved strip into a circular band and glue or staple it to the black circle base to create a shallow pot shape.
- Add a gray paper handle arching over the top of the cauldron by attaching each end to opposite sides with glue or staples.
- Fill the cauldron with crumpled green tissue paper sticking up to represent a bubbling, overflowing witch’s potion that’s brewing inside.
- Optional: Add plastic spiders, googly eyes, or draw potion ingredients on paper pieces and glue them inside the cauldron for extra detail.
This craft introduces basic three-dimensional construction concepts while creating a classic Halloween symbol that encourages imaginative play about witches and magic potions.
Early Elementary Makers
Kids who love to cut, glue, paint, and proudly say “I made this myself” will enjoy these projects, combining basic tools with imagination.
34. Paper Bag Vampire Puppet
Create talking fanged puppets with paper bags, red and black paint, white paper fangs, googly eyes, and construction paper capes for dramatic puppet show performances.
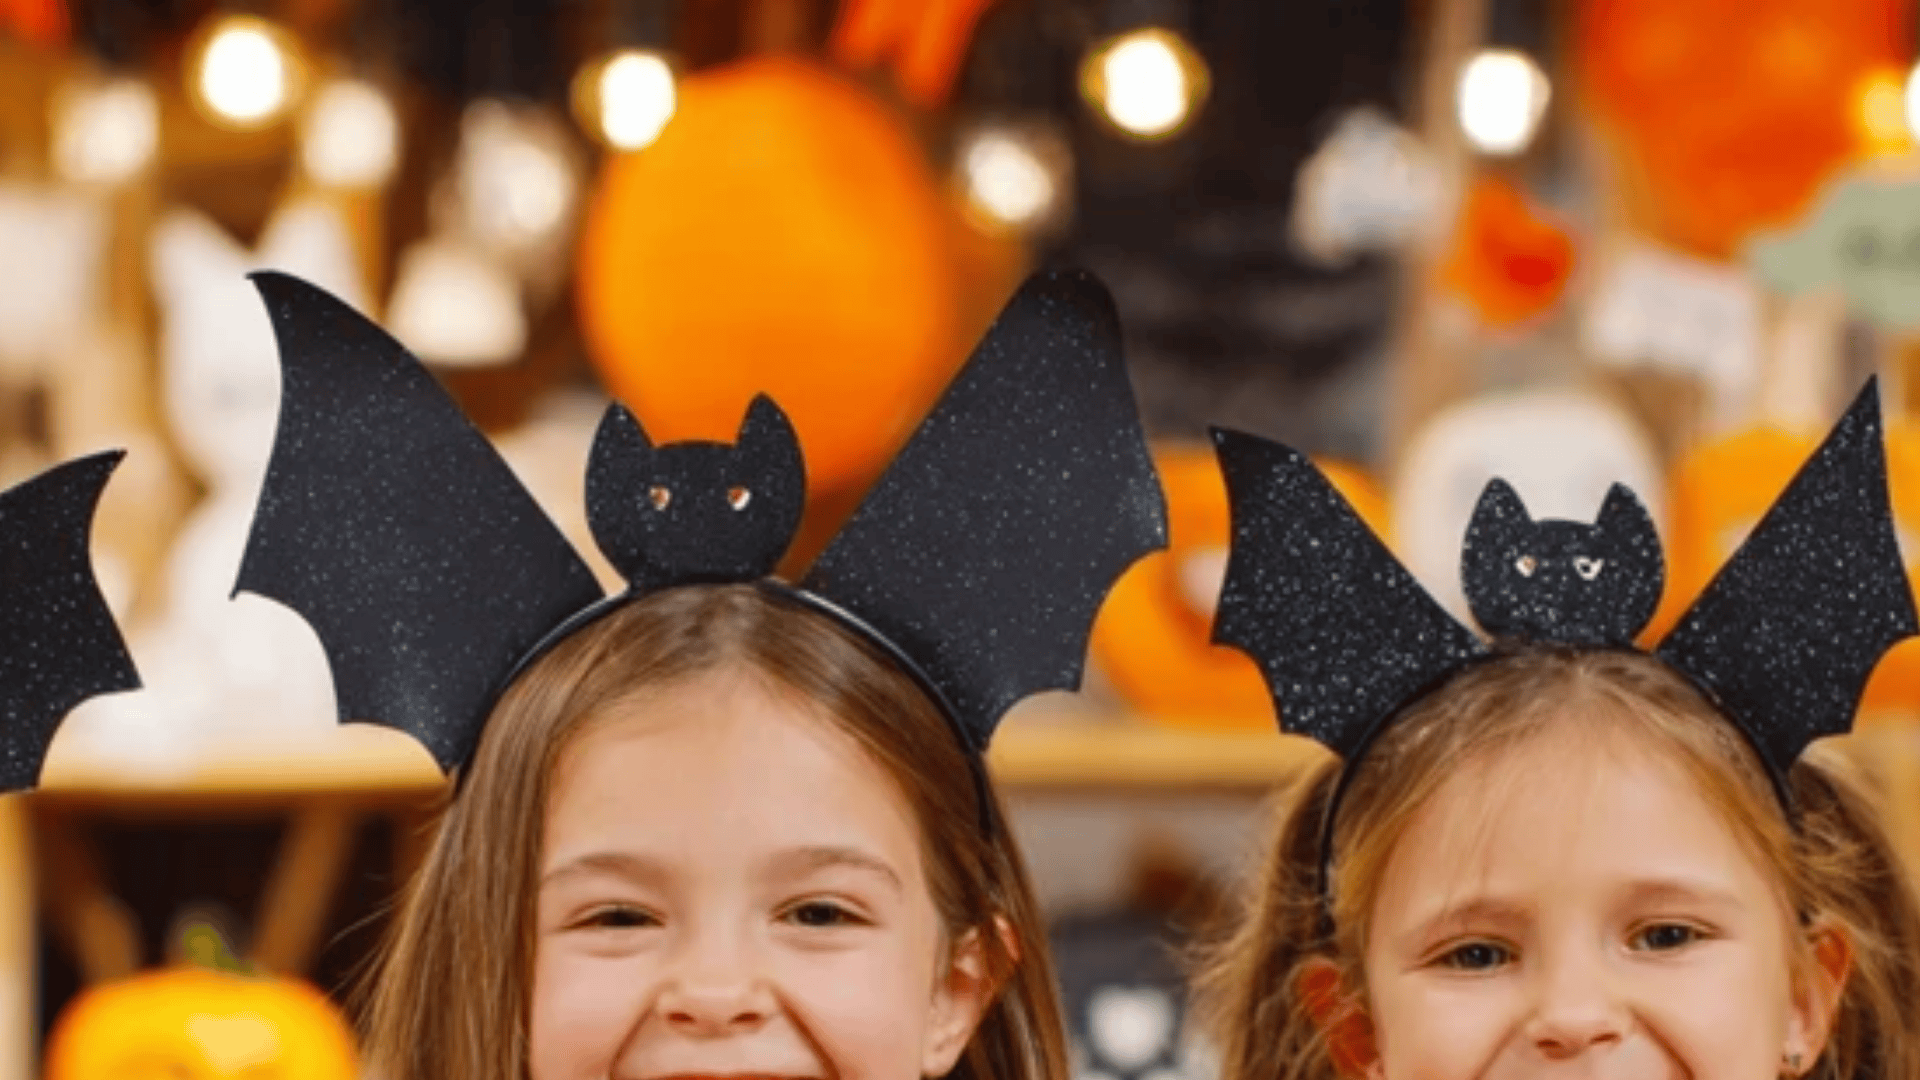
35. Bat Headband Craft
Design wearable Halloween accessories using black construction paper strips, scissors, glue, and glitter to create bat-ear headbands for children to wear to parties.
36. Frankenstein Paper Plate Mask
Build the classic green monster mask with paper plates, green paint, yarn for hair, googly eyes, and markers for creating wearable costume pieces easily.
37. Candy Corn Paper Garland
String festive decorations together using tri-colored paper triangles, a hole punch, yarn, and glue to create long Halloween banners for classrooms and homes.
38. Monster Popsicle Stick Puppets
Craft colorful creature puppets with painted popsicle sticks, googly eyes, construction paper features, and yarn hair for imaginative storytelling and creative character development.
39. Paper Cup Owl Lantern
Change paper cups into glowing lanterns with construction paper feathers, googly eyes, battery tea lights, and a hole punch for safe, illuminated decorations.
40. Jack-o’-Lantern Collage
Design unique pumpkin faces by gluing cut paper shapes onto orange backgrounds, creating varied expressions from happy to spooky, using simple geometric pieces.
41. Ghost Handprint Garland
Make connected spirit chains by tracing hands on white paper, cutting them out, drawing faces, and linking them together for collaborative classroom Halloween decorations.
42. Black Cat Paper Plate Craft
Build the Halloween classic using painted black plates, construction paper ears and tail, googly eyes, pink nose, and white pipe cleaner whiskers for symmetrical animal art.
43. Paper Skeleton Chain
Assemble poseable dancing skeletons by cutting bone shapes from white paper and connecting them with brass fasteners, creating movable joints for interactive anatomy learning.
44. Witch Broom Pencil Topper
Create flying-broom pencil decorations with fringed yellow paper for bristles and brown paper handles, making functional school supplies festive for the Halloween season.
45. Paper Witch Puppet
Build cackling witch characters on popsicle sticks with construction paper clothing, yarn hair, googly eyes, and cone hats for puppet theater performances and imaginative play.
46. Spooky Tree Handprint
Paint bare haunted trees with brown paint on arms and hands, stamping onto dark paper to create branch-like finger shapes that form eerie forest scenes.
47. Monster Bookmark
Design functional reading tools with colorful cardstock, googly eyes, construction paper features, and written messages, creating useful crafts that encourage literacy habits throughout the school year.
48. Paper Mummy
Wrap ancient Egyptian figures by gluing white paper strips onto body cutouts, creating layered bandage effects with googly eyes peeking through for a classic mummy appearance.
49. Haunted House Window Scene
Cut spooky mansion silhouettes from black paper, add yellow window cutouts, and mount on colored backgrounds, creating nighttime scenes with glowing windows and architectural details.
50. Pumpkin Counting Book
Make educational tools by stapling numbered orange pages together, drawing corresponding pumpkins on each page, and teaching number recognition and one-to-one counting correspondence through Halloween themes.
51. Paper Spider Web Doily
Fold and cut white paper circles into intricate symmetrical patterns resembling spider webs, teaching geometry and symmetry concepts through snowflake-style cutting techniques for delicate decorations.
52. Candy Corn Painting
Create the classic treat using painter’s tape to section triangles into three bands, painting white, orange, and yellow sections for clean-edged striped Halloween art.
53. Bat Cave Diorama
Build three-dimensional cave environments inside shoeboxes with gray painted walls, dangling paper bats on strings, and optional LED lighting for atmospheric underground habitat displays.
54. Ghost Mobile
Assemble floating spirit decorations by cutting ghost shapes from white paper, drawing faces, attaching varied string lengths to hangers, and creating movement-activated hanging decorations.
55. Pumpkin Glyph
Create data-collection art in which decorative choices represent personal information, such as favorites or age, creating coded pumpkins that visually communicate each child’s preferences.
56. Monster Feet
Create wearable creature accessories using tissue boxes covered in construction paper, adding googly eyes and claws, and converting ordinary shoes into monster feet for costumes.
Upper Elementary Artists
Detail-loving kids who enjoy creating layered, colorful, and slightly advanced crafts, probing art techniques, and personal style.
57. Watercolor Haunted Forest
Paint atmospheric nighttime landscapes using wet-on-wet watercolor blending techniques in purples and blacks, adding silhouetted tree branches and glowing moon details for cultivated, spooky scenes.
58. Glow-in-the-Dark Bat Silhouette
Create a two-phase artwork featuring black bat shapes on glow-painted backgrounds, resulting in dramatic contrast art that looks different in daylight and complete darkness.
59. Yarn-Wrapped Pumpkin Ornaments
Craft textured hanging decorations by wrapping orange yarn around foam balls, adding cinnamon stick stems and felt leaves for dimensional pumpkins with beautiful tactile surfaces.
60. 3D Paper Haunted House
Build folded standing structures from black cardstock with cut windows backed by orange paper, creating architectural three-dimensional buildings with glowing window effects and detailed features.
61. Frankenstein Bookmark
Design functional monster page holders using green cardstock, construction paper, bolts, hair, and googly eyes, creating practical reading tools children will proudly use in their books.
62. Paper Circuit Ghost Card
Introduce electronics by creating interactive greeting cards with copper tape circuits, LED lights, and coin batteries, making ghost designs that illuminate when the circuit completes properly.
63. Q-Tip Skeleton Art
Build anatomically accurate bone structures using white cotton swabs glued onto black paper, teaching skeletal anatomy while creating striking educational art with high visual contrast.
64. Mosaic Candy Corn Frame
Decorate picture frames by gluing torn tissue paper pieces in candy-corn colors, creating textured mosaic patterns that add dimensional interest to the functional frame borders.
65. Pumpkin Button Canvas
Create tactile artwork by gluing orange buttons of various sizes onto canvas in pumpkin silhouettes, filling shapes completely with different-sized buttons, creating interesting dimensional texture.
66. Halloween Shadow Box Diorama
Build layered three-dimensional scenes using spaced paper layers at different depths inside boxes, creating perspective with foreground, middle ground, and background Halloween elements.
67. Glow Jar Luminary
Convert glass jars into magical lanterns by painting with glow-in-the-dark paint or applying colored tissue paper, adding battery tea lights for safe, glowing room decorations.
68. Melted Crayon Pumpkin Art
Create abstract, textured artwork by melting orange crayons on canvas with heat guns, controlling drips and flows for colorful, modern, pumpkin-inspired wax art.
69. Paper Quilling Halloween Designs
Roll thin paper strips into coiled shapes and arrange them into Halloween images, creating delicate, intricate designs with simple rolling techniques that require patience and precision.
70. Tin Foil Pumpkins
Sculpt three-dimensional metallic pumpkins by shaping aluminum foil, then painting and sealing them, creating interesting reflective surfaces that catch light from different angles dramatically.
71. Stamped Halloween Cards
Design personalized greeting cards using rubber stamps with Halloween motifs, ink pads in various colors, and handwritten messages to create thoughtful, handmade cards for friends.
Tween Creators
Trend-focused, tech-curious kids who love personal expression through DIY décor projects and advanced crafts, fostering independence and innovation.
72. Light-Up Haunted House Scene
Build cultured dioramas with working LED fairy lights threaded through cardboard structures, creating elaborate illuminated mansion displays with detailed interior rooms and landscaping.
73. Sewn Felt Halloween Characters
Learn hand-sewing techniques, creating stuffed felt characters like ghosts and pumpkins using running stitch, teaching practical textile skills while making soft decorative characters.
74. Resin Halloween Keychains
Cast professional accessories by pouring resin into molds with Halloween confetti and glitter, creating glossy glass-like keychains that look store-bought with proper finishing hardware.
75. Spooky Room Décor Signs
Design custom wooden signs with Halloween phrases using acrylic paint, stencils, and distressing techniques, creating personalized bedroom decorations reflecting individual style and interests.
76. Origami Hanging Bats
Master complex paper-folding following detailed diagrams to create three-dimensional bats from single sheets, developing spatial reasoning and patience through precision folding, requiring concentration.
77. Mason Jar Mummy Luminaries
Wrap glass jars with gauze bandages and googly eyes, add battery tea lights inside, and create textured, glowing mummy lanterns with safe, soft illumination for atmospheric room lighting.
Tips for Smooth Crafting Sessions
Creating with kids is easier and more enjoyable when the environment is organized, relaxed, and encouraging for every age.
- Gather all materials beforehand and prepare a designated craft area for easy setup and cleanup.
- Keep sessions short, 15–20 minutes for younger kids, 30–45 minutes for older ones, to match attention spans.
- Focus on creativity, not perfection; every unique craft reflects effort and imagination.
- Watch for signs of frustration and take short breaks to maintain a positive experience.
- Encourage group crafting with siblings or friends to boost engagement and idea sharing.
- Turn cleanup into a fun activity using music, timers, or friendly challenges.
With the right setup and attitude, crafting becomes a joyful, stress-free experience that kids look forward to every time.
Final Thoughts
Crafting during the spooky season is more than a creative pastime; it’s a chance for kids to express imagination, build confidence, and connect with loved ones.
Simple, hands-on projects encourage focus, patience, and teamwork while bringing festive energy into your home.
Instead of aiming for perfection, enjoy the laughter, conversation, and little messes that come with creating together.
A few supplies and a spark of creativity can change an ordinary afternoon into something magical.
Grab your scissors and glue, gather the kids, and start crafting memories that will light up your Halloween season!